A2 CHECK SUSPECT POWER DOOR LOCK ACTUATOR LOCK OPERATION
- Gain access to suspect power door lock actuator as outlined.
- Disconnect power door lock actuator .
- Using a test lamp connected to a known good ground, check Circuit 117 (PK/BK) at harness connector while actuating front door lock switches in the lock position.
- Did test lamp illuminate?
A3 CHECK ACTUATOR FOR UNLOCK OPERATION
- Remove test lamp from Circuit 117 (PK/BK) and connect it to Circuit 118 (P/O).
- Actuate front door lock switch in the unlock position.
- Did test lamp illuminate?
A4 CHECK DOOR LOCK ACTUATOR
- Using two 10 gauge jumper wires connected to battery positive (+) and negative (-), attach jumpers to power door lock actuator connector; reverse polarity for opposite direction.
- Did actuator operate correctly?
A5 CHECK ACTUATOR CURRENT DRAW
- Using Rotunda Digital Volt-Ohmmeter 007-00001 or equivalent, check power
door lock actuator current draw.
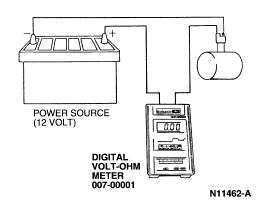
- Is current draw 6 amps or less?
PINPOINT TEST B: ALL DOOR LOCKS DO NOT WORK (WITHOUT ELECTRONIC DOOR LOCKS)
B1 CHECK SUPPLY TO LOCK SWITCH
- Partially remove left front door lock switch as outlined.
- Using voltmeter, check Circuit 517 (BK/W), Pin 3 171 (BK/W) (convertible) at switch connector for voltage.
- Is battery voltage present?
B2 CHECK CIRCUIT 517 (BK/W) FOR OPEN
- Disconnect No. 12 circuit breaker (20A) at primary junction block.
- Disconnect left front door lock switch .
- Using an ohmmeter, check resistance of Circuit 517 (BK/W) 171 (BK/W) (convertible) from door lock switch connector to output side of No. 12 circuit breaker (20A) cavity.
- Is resistance 5 ohms or less?
B3 CHECK CIRCUIT 517 (BK/W) FOR SHORT
- Using ohmmeter connected to a known good ground, connect second lead to Circuit 517 (BK/W) 171 (BK/W) (convertible) at door lock switch connector.
- Measure resistance.
- Is resistance 5 ohms or less?
B4 CHECK CIRCUIT 57 (BK)
- Using an ohmmeter connected to a known good ground, connect second lead to Circuit 57 (BK), Pin 1 at door lock switch connector.
- Measure resistance.
- Is resistance 5 ohms or less?
B5 CHECK DOOR LOCK SWITCH LOCK OUTPUT
- Reconnect LH front door lock switch .
- Using a voltmeter, check Circuit 119 (PK/Y) at switch connector Pin 4 for voltage as switch is actuated to the lock position.
- Is battery voltage present?
B6 CHECK DOOR LOCK SWITCH UNLOCK OUTPUT
- Disconnect ohmmeter from Circuit 119 (PK/Y).
- Connect lead to Circuit 120 (PK/LG), Pin 2 at switch connector.
- Measure voltage as front door lock switch is actuated to unlock position.
- Is battery voltage present?
B7 CHECK CIRCUIT 117 (PK/BK)
- Gain access to LH power door lock actuator as outlined.
- Disconnect power door lock actuator .
- Using a test lamp, check for voltage at Circuit 117 (PK/BK) in harness connector as front door lock switch is actuated to the lock position.
- Did test lamp illuminate?
PINPOINT TEST BB: ALL DOOR LOCKS DO NOT WORK (WITH REMOTE KEYLESS ENTRY)
BB1 NEITHER OF THE DOOR LOCKS WORK
- Check fuse 12.
- Are fuses OK?
BB2 POWER TO MODULE J1 CONNECTOR
- Disconnect module connector (J1) from the module.
- Check voltage between Pins 14 and 25 of connector (J1) and ground.
- Is voltage 10 volts or more?
BB3 POWER TO MODULE (J2 CONNECTOR)
- Disconnect J2 connector at module.
- Check voltage between Pin 1 of connector J2 and ground.
- Read voltage.
- Is voltage 10 volts or more?
BB4 CHECK MODULE GROUNDS (J1 CONNECTOR)
- Disconnect module connector (J1).
- Check continuity between Pins 1 and 15 of connector (J1) and ground.
- Is continuity present?
BB5 CHECK MODULE GROUNDS (J2 CONNECTOR)
- Disconnect module connector at J2.
- Check continuity of Pin 5 and ground.
- Is continuity present?
BB6 DOES CIRCUIT BREAKER BLOW WHEN SWITCH ACTIVATES?
- Reconnect module connectors (J1, J2).
- Activate the lock and unlock switches.
- Check fuse No. K, located in power distribution box.
- Is fuse blown?
BB7 CHECK LOCK ACTUATORS
- Manually lock all doors.
- Connect a jumper between ground and Pins 2 and 16 of module connector (J1) with connector (J1) disconnected.
- With a second jumper, momentarily connect together Pins 14 and 25 of connector (J1) and Pin 6 of connector (J1). (Only passenger door should unlock.)
- Momentarily connect Pins 14 and 25 of connector (J1) and Pin 3 of connector (J1). (Driver door should now unlock.)
- Do doors unlock properly?
BB8 CHECK LOCK SWITCHES
- Test for lock switch stuck in LOCK or UNLOCK position.
NOTE: May be mechanically stuck, check switch using meter.
- Does lock switch work?
BB9 SHORT BETWEEN LOCK AND UNLOCK CIRCUITS
- Disconnect module connector (J1).
- Measure continuity between Pin 4 of connector (J1) and Pin 5 of connector (J1).
- Is there continuity?
BB10 CHECK LOCK SWITCHES FOR SHORT TO GROUND
- Disconnect module connector (J1).
- Check for short to ground between Pin 4 of connector (J1) and ground.
- Check for short to ground between Pin 5 of connector (J1) and ground.
- Is there a short?
BB11 ONE OR BOTH LOCKS DO NOT WORK
- Manually cycle the lock several times to check for latch or linkage binding.
- Is latch or linkage binding?
BB12 POWER TO ACTUATOR WITH DOOR SWITCH LOCK
- Remove trim panel on the door.
- Check voltage between the suspect lock actuator and ground while pressing the lock of a door switch.
- Is voltage 10 volts or greater?
BB13 CHECK MODULE OUTPUT (DEPRESSED LOCK SWITCH)
- With both connectors (J1, J2) connected, depress lock button and measure voltage at Pins 2 and 16 of connector (J1) to ground.
- Is voltage 10 volts or more?
BB14 CHECK MODULE OUTPUT (DEPRESSED UNLOCK SWITCH)
- With both connectors (J1, J2) connected, depress switch to unlock position.
- Measure voltage at Pins 3 and 6 of connector (J1) to ground.
- Read voltage.
- Is voltage 10 volts or more?
BB15 POWER TO ACTUATOR WITH DOOR SWITCH UNLOCK
- Check voltage between the suspect lock actuator Circuit 118 and ground while pressing the UNLOCK position of the door switch.
- Is voltage 10 volts or greater?
BB16 ONE OR MORE SWITCHES DO NOT WORK
- Key OFF.
- Disconnect module connector (J1).
- Remove trim panel of the door with the malfunctioning switch.
- Check continuity between Pin 4 of connector (J1) and lock position terminal of the door switch (locking Circuit 119).
- Check continuity between Pin 5 of connector (J1) and unlock position terminal of the door switch (unlocking Circuit 120).
- Check continuity between ground terminal of the door switch and ground (Circuit 57).
- Is there continuity?
BB17 LOCKS WILL ONLY LOCK OR UNLOCK
- Key OFF.
- Disconnect module connector (J1).
- Check Circuit 57, ground to switches.
- Is there continuity?
- GO to BB19.
BB18 CHECK SWITCH GROUND CIRCUIT
- Check continuity between Pin 4 (Pin 5 if doors will not unlock) of connector (J1) and ground while pressing the lock (unlock) position of one of the door switches.
- Read ohmmeter.
- Is there continuity?
BB19 CHECK OUTPUT FROM MODULE
- With both connectors (J1), (J2) connected, check voltage between Pins 2 and 16 of connector (J1) (Pins 3 and 6 for unlock) and ground while pressing the lock (unlock) position of one of the door switches.
- Is voltage 10 volts or greater?
BB20 CHECK DOOR SWITCH FUNCTION
- Check continuity between ground and Circuit 119 for lock (120 for unlock) connection to door locking switch while pressing the lock (unlock) position of the switch.
- Is there continuity?
BB21 LOCKS WORK INTERMITTENTLY
- Key OFF.
- Disconnect connectors (J1, J2).
- Check continuity to ground at Pins 1 and 15 of connector (J1) and at Pin 5 of connector (J2).
- Is there continuity?
BB22 LOCKS DO NOT WORK IN FREEZING WEATHER
- Bring vehicle into heated garage to thaw.
- Lubricate locks as outlined.
- Do locks operate?
BB23 LOCKS ONLY WORK WITH ENGINE RUNNING
- Double check the following: Battery fully charged. Any latch or linkage binding. Loose or corroded connections to actuators, switches, remote keyless entry module connector.
- Do components operate properly?
PINPOINT TEST C: ALL LOCKS WORK FROM ONE SWITCH ONLY
C1 CHECK SUSPECT SWITCH
- Remove suspect front door lock switch as outlined.
- Perform switch test per component test.
- Did switch test OK?
C2 CHECK SUPPLY TO SWITCH
- Using a test lamp, check Circuit 517 (BK/W) at Pin 3 171 (BK/W) (convertible) for LH switch or Pin 3 for RH front door lock switch for voltage.
- Did test lamp illuminate?
C3 CHECK CIRCUIT 119 (PK/Y)
- Remove opposite front door lock switch .
- Using an ohmmeter, check Circuit 119 (PK/Y) from LH door lock switch connector to RH door lock switch connector for continuity.
- Is there continuity?
C4 CHECK CIRCUIT 120 (PK/LG)
- Using ohmmeter, check Circuit 120 (PK/LG) from LH door lock switch connector to RH door lock switch connector for continuity.
- Is there continuity?
PINPOINT TEST D: DOOR LOCKS OPERATE ONE WAY ONLY
D1 CHECK LOCK OPERATION
- Actuate power door locks to the lock position.
- Did the doors lock?
D2 CHECK CIRCUIT 119 (PK/Y) SUPPLY
- Partially remove LH front door lock switch as outlined. Leave connected.
- Using a test lamp, check for voltage at Pin 4, Circuit 119 (PK/Y) as switch is actuated to the lock position.
- Did test lamp illuminate?
D3 CHECK CIRCUIT 119 (PK/Y) FOR OPEN/SHORT
- Using an ohmmeter connected to a known good ground, connect second lead to Circuit 119 (PK/Y) at switch connector Pin 4.
- Measure resistance.
- Is resistance 5 ohms or less?
D4 CHECK CIRCUIT 120 (PK/LG) SUPPLY
- Partially remove LH front door lock switch as outlined. Leave connected.
- Using a test lamp, check voltage at Pin 2, Circuit 120 (PK/LG) as front door lock switch is actuated to the unlock position.
- Did test lamp illuminate?
D5 CHECK CIRCUIT 120 (PK/LG) FOR OPEN/SHORT
- Using an ohmmeter connected to a known good ground, connect second lead to Circuit 120 (PK/LG) at front door lock switch connector Pin 2.
- Measure resistance.
- Is resistance 5 ohms or less?
PINPOINT TEST E: DOOR LOCKS WORK WITH ENGINE RUNNING ONLY
E1 CHECK SUPPLY CIRCUIT
- Using a voltmeter, check vehicle battery voltage.
- Is voltage 10 volts or more?
E2 CHECK LATCH/LINKAGE
- Manually lock/unlock door.
- Does latch operate easily?
E3 CHECK DOOR LOCK SWITCH CONNECTOR
- Partially remove left front door lock switch as outlined.
- Inspect connector for corrosion or damaged/loose connection.
- Is connector OK?
PINPOINT TEST F: DOOR LOCKS WORK INTERMITTENTLY
F1 CHECK LATCH AND LINKAGE
- Using Multi-Purpose Grease D7AZ-19584-AA (ESR-MIC159-A and ESB-MIC106-B) or equivalent, spray into door lock cylinder. Manually cycle 10 times. Check for interference around right latch and all linkage.
- Do door locks operate intermittently after lubrication?
F2 RECHARGE BATTERY
- Recharge battery by turning ignition switch to RUN (with engine running, vehicle in PARK).
- Operate door lock cylinder .
- Do door lock cylinders work intermittently withbatterycharged?
F3 CHARGED BATTERY OPERATION
- Let battery charge for 5-10 minutes. Turn engine off.
- Operate door locks or luggage compartment door lock cylinder .
- Do door locks work with battery charged?
F4 CHECK WIRING CONNECTIONS
- Check ground terminals to Circuit 57 (BK) to be secure.
- Check door locks circuit breaker for socket damage and secure connections.
- Check wiring connections to power door lock actuator .
- Check front window regulator wiring to front door lock switch .
- Are all wiring connections secure, corrosion-free, not loose, open or shorted?
F5 CHECK FOR INTERMITTENT DOOR LOCK SWITCHES
- Place Digital Volt-ohmmeter (007-00001) or equivalent from UNLOCK Circuit 118 (PK/O) to ground and UNLOCK Circuit 163 (R/O) to ground. Also, measure voltage from lock Circuit 117 (PK/BK) to ground.
- Observe voltage as each front door lock switch is operated to lock and unlock repeatedly.
- Observe voltage as each front door lock switch is "jiggled" but not actuated.
- Arefront door lock switchesoperating intermittently?
PINPOINT TEST G: LUGGAGE COMPARTMENT LOCK DOES NOT WORK
G1 CHECK LATCH AND LINKAGE
- Using Multi-Purpose Grease (D7AZ-19584-AA (ESR-MICI59-A and ESB-MICI06-B) or equivalent, spray into door lock cylinder luggage compartment door latch opening and manually cycle 10 times. Check for interference around right latch and all linkage.
- Doesdoor lock cylinderwork after lubrication?
G2 CHECK FOR SHORTED LUGGAGE COMPARTMENT RELEASE SWITCH
- Using Digital Volt-Ohmmeter (007-00001) or equivalent, measure voltage from release Circuit 84 (P/Y) to ground.
- Observe voltage to be zero volts with luggage compartment remote control lock switch in NEUTRAL (not pressed) position.
- Observe voltage to be 8 or more volts with luggage compartment remote control lock switch in RELEASE (pressed) position.
- Does voltmeter indicate proper voltage in bothluggage compartment remote control lock switchpositions?
G3 CHECK POWER TO LUGGAGE COMPARTMENT RELEASE SWITCH
- Measure voltage from Circuit 517 (BK/W) to ground at the luggage compartment release switch input.
- Does voltmeter indicate 10 to 12.45 volts?
PINPOINT TEST H: LUGGAGE COMPARTMENT RELEASE SWITCH INOPERATIVE
H1 CHECK DOOR LOCKS CIRCUIT BREAKER 12
- Check door locks circuit breaker 12 for a tripped condition.
- Is circuit breaker 12 tripped?
H2 CHECK FOR GROUNDED POWER FEED
- Check for continuity from Circuit 517 (BK/W) at circuit breaker 12 output to a known good ground.
- Does continuity exist?
H3 CHECK FOR POWER TO LUGGAGE COMPARTMENT RELEASE SWITCH
- Using Digital Volt-Ohmmeter (007-00001) or equivalent, measure voltage of Circuit 517 (BK/W) from luggage compartment remote control lock switch input to ground.
- Does voltmeter indicate 10 to 12.45 volts?
H4 CHECK FOR POWER AT CIRCUIT BREAKER 12
- Measure voltage at door locks circuit breaker 12 output Circuit 517 (BK/W) to ground.
- Does voltmeter indicate 10 to 12.45 volts?
H5 CHECK LUGGAGE COMPARTMENT RELEASE SWITCH
- With luggage compartment remote control lock switch in RELEASE (pressed) position, measure voltage of Circuit 84 (P/Y) at luggage compartment remote control lock switch output to ground.
- Does voltage exist?
H6 CHECK CIRCUIT 84 (P/Y)
- Measure voltage of Circuit 84 (P/Y) at luggage compartment door lock solenoid input to ground with luggage compartment remote control lock switch in RELEASE (pressed) position.
- Does voltage exist?
H7 CHECK GROUND CIRCUIT 57 (BK)
- Disconnect circuit breaker 12 temporarily.
- Check for continuity of Circuit 57 (BK) from ground terminal to luggage compartment door lock solenoid output.
- Does continuity exist?