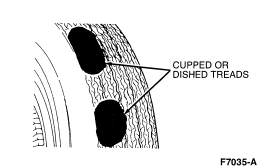
A2 INSPECT TIRES
- Raise vehicle on hoist. Inspect tires for extreme wear or damage, cupping or flat spots.
- Are tires OK?
A3 INSPECT FRONT WHEEL BEARINGS
- Spin front tires by hand to check for front wheel bearing roughness. Check bearing end play.
- Is end play OK?
A4 WHEEL/TIRE RUNOUT ON VEHICLE
- Measure wheel/tire assembly runouts on vehicle using Rotunda Radial Run-Out Gauge 007-00014 or equivalent. Assembly runout should be less than 1.14 mm (0.045 inch) radial and lateral. Warm up tires prior to taking measurement to eliminate slight flat spotting.
- Is measurement in specification?
A5 WHEEL/TIRE RUNOUT OFF VEHICLE
- Measure wheel/tire assembly from any position that exceeds 1.14 mm (0.045 inch) radial or lateral. Before removing wheel/tire assembly, mark wheel stud and corresponding bolt hole so assembly can be installed in same position. Remove assembly and mount on wheel balancer. Measure runout as in Step A4. Assembly runout should be less than 1.14 mm (0.045 inch) radial and lateral.
- Is measurement in specification?
A6 MATCH MOUNTING
- Mark the high runout location on the tire and also on the wheel . Break the assembly down and rotate the tire 180 degrees (half-way around) on the wheel . Inflate the tire and measure the runouts.
- Is wheel/tire assembly balanced?
A7 WHEEL RUNOUT
- Dismount tire and mount wheel on wheel balancer. Measure runouts on both flanges. Runout should be less than 1.14 mm (0.045 inch) radial and lateral.
- Is there proper runout?
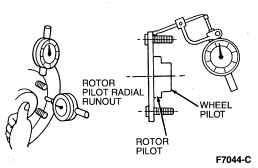
A8 AXLE, ROTOR AND BOLT CIRCLE RUNOUTS
- For rear wheel positions, remove rotor and measure axle flange face runout (less than 0.254mm (0.010 inch)). Bolt circle runout (less than 0.397mm (0.015 inch)) and rotor pilot radial runout (less than 0.152mm (0.006 inch)).
- For front wheel positions, measure rotor lateral runout (greater than 0.127mm (0.005 inch)).
- For front wheel position, measure lateral runout (less than 0.05mm (0.002 inch)) bolt circle runout (less than 0.35mm (0.014 inch)).
- Are measurements correct?
A9 FRONT TIRES
- Spin front tires with a wheel balance spinner while vehicle is raised on hoist. Feel for vibration in fender or while seated in vehicle.
- Is vibration felt?
A10 REAR TIRES
- Engage drivetrain while vehicle is raised on hoist. Carefully accelerate the drive wheels while feeling for vibration.
- Is vibration felt?
A11 DRIVETRAIN
- Remove rear wheels, secure brake drums, if so equipped by installing wheel hub bolt nuts , reversed. Carefully accelerate the drivetrain while feeling for vibration.
- Is vibration felt?
A12 REAR DISC BRAKE ROTORS
- Remove the brake drums or rotors. Carefully accelerate the drivetrain while feeling for vibration.
- Is vibration felt?
A13 WHEEL BALANCE
- Balance all wheels not previously balanced. Road test vehicle.
- Are wheels balanced?
A14 SUBSTITUTE WHEELS AND TIRES
- Substitute a known good set of wheels and tires. Road test vehicle.
- Is vibration felt?
PINPOINT TEST B: TIP-IN MOAN
B1 AIR CLEANER
- Check air cleaner for proper installation of base gasket, air cleaner element and air inlet duct assembly.
- Are components properly installed?
B2 POWERTRAIN RESONANCE
- Loosen all torque converter housing-to-engine retaining bolts 3/4 turn and road test. Tighten bolts after test.
- Is moan reduced or eliminated?
B3.
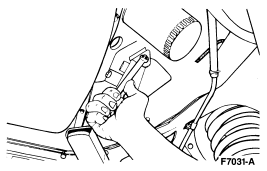
B3 ENGINE MOUNTS
- Normalize engine mounts by loosening them and, with engine running, shifting transmission from NEUTRAL to DRIVE and back to NEUTRAL. With manual transmission, load engine by slipping clutch in gear. Tighten mounting bolts and road test.
- Is moan reduced or eliminated?
B4 EXHAUST SYSTEM
- Warm up system to normal operating temperature. Loosen all hanger attachments and reposition hangers until they hang free and straight. Then loosen all flange joints and, with engine running, shift transmission from NEUTRAL to DRIVE and back to NEUTRAL (or load engine with clutch). Tighten all hanger clamps and flanges. Road test vehicle.
- Is moan reduced or eliminated?

PINPOINT TEST C: ENGINE ACCESSORY VIBRATION
C1 ENGINE RUN-UP
- Run-up to problem rpm observed in road test, with vehicle stationary.
- Does vibration occur?
C2 DRIVE BELTS AND PULLEYS
- With engine stopped, inspect all engine accessory drive belts and pulleys for wear or damage, and check belt tension, using Belt Tension Gauge T63L-8620-A or equivalent.
- Automatic tensioners have belt wear indicator marks. If the indicator mark is not between the min and max marks, the belt is worn or an incorrect belt is installed.
- Are belts or pulleys worn or damaged?

C3 MOUNTING HARDWARE
- Inspect mounting brackets and adjusting components for proper alignment and tightness.
- Are mounting and adjusting components secure?
C4 ENGINE IDLING
- With engine idling, visually check all accessory drive belts and pulleys for misalignment, runout or irregular motion. Maximum runout is 3mm (1/8 inch).
- Increase engine rpm.
- Is runout within specifications?
C5 DRIVEBELT ALIGNMENT
- With engine idling, visually check all accessory drive belts and pulleys for misalignment, runout or irregular motion. Maximum runout is 3mm (1/8 inch).
- Increase engine rpm.
- Does belt ride up on pulley?
C6 ACCESSORY DRIVE BELT NOISE
- Check for "chirps" or squeal in a poly-vee belt by spraying a small amount of water on the grooved side of the belt (use a spray bottle or equivalent).
- Does the noise change?
C7 ACCESSORIES
- Run-up engine to problem rpm and, with stethoscope-type device, check each component.
- If the source cannot be detected by probing, remove each belt, one at a time, until vibration goes away.
- Is noisy component located?
PINPOINT TEST D: DRIVESHAFT VIBRATION
D1 WHEELS AND TIRES
- Verify that the observed condition is not a high speed shake caused by wheels/tires.
- Is condition a high speed shake?
D2 DRIVESHAFT
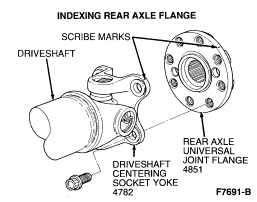
- Inspect driveshaft for undercoating or physical damage. Check index marks (yellow paint daubs) on rear of driveshaft and rear axle universal joint flange . These marks should be no more than 90 degrees apart.
- Are marks more than 90 degrees apart?
D3.
D3 DRIVESHAFT RUNOUT
- With vehicle on hoist, measure runout at front, center and rear of driveshaft . Maximum runout is 0.89 mm (0.035 inch).
- Is runout within specifications?
D4 DRIVESHAFT RE-INDEXING AT TRANSMISSION
- Note or mark indexing of driveshaft
to transmission and rear axle universal joint flange
. Disconnect the driveshaft, re-index 180 degrees at
transmission only and reconnect. Check runout at front and center of
driveshaft. Maximum runout is 0.89 mm (0.035 inch).
NOTE: While driveshaft is removed from vehicle and manipulate U-joints in each direction of rotation. If a U-joint feels stiff or has a "lumpy," "gritty" feel in any direction, replace U-joints or driveshaft .
- Is it within specification?
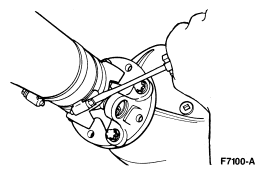
D5 DRIVESHAFT RE-INDEXING AT AXLE
- Note or mark indexing of rear axle universal joint flange . Disconnect the driveshaft . Re-index 180 degrees at rear axle housing and connect. Check runout at rear of driveshaft . Maximum runout is 0.89 mm (0.035 inch).
- Is it within specification?
D6 REAR AXLE UNIVERSAL JOINT FLANGE
- Compare the two high points of runout marked in Test Steps C3 and C4.
- Are marks within 25mm (1 inch) of each other?
D7 DRIVESHAFT VIBRATION
- The driveshaft can be re-indexed at both the rear axle and transmission to minimize system imbalance. Refer to driveshaft indexing procedure.
- Is driveshaft balanced?
D8 AXLE PINION NOISE DAMPER
- If vibration still exists after balancing driveshaft , install an axle pinion damper, as outlined.
- Is vibration still present?
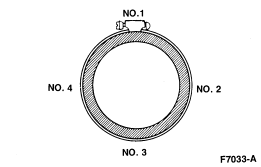
D9 DRIVESHAFT BALANCING � CLAMP METHOD
- Mark rear of driveshaft in four equal parts and number them 1, 2, 3 and 4.
- Install hose clamp with screw at position No. 1.
- Operate driveline at speed at which customer complained of vibration.
- Rotate clamp to each of the other three positions and check for vibration.
- Is vibration the same?
D10 INSTALL SECOND CLAMP
- Install another clamp, with screw in same position as first clamp.
- Operate vehicle at speed at which customer complained of vibration.
- Is vibration minimal?
D11 REPOSITION CLAMP
- Rotate screws of clamps equally away from each other about 12.7mm (1/2 inch).
- Operate vehicle at speed at which customer complained of vibration.
- Is vibration minimal?

NOTE: If vibration is corrected with the addition of clamps, the clamps will be left on the driveshaft permanently. Check clamp clearance after installation to prevent any contact with floorpan or other parts.
D12 ROAD TEST
- Install wheels and tires.
- Road test vehicle.
- Is vibration minimal?
NOTE: Vibration felt on hoist may be acceptable during road test.
PINPOINT TEST E: TIRE/WHEEL RUNOUT
E1 TIRE WHEEL BEARING INSPECTION
- Raise vehicle, inspect tires and check wheel bearings .
- Are bearings OK?
E2 BALANCE TIRES
- Balance tires and place back on vehicle.
- Does vehicle function properly?
E3 ROTATE TIRES
- Rotate tire and wheel assembly. Front to rear, and rear to front.
- Does vehicle function properly?
E4 CHECK RUNOUT
- Check total radial runout and total lateral runout of tire/wheel assembly.
NOTE: All runout values shown are for front wheels. Runout values should be increased 0.127mm (0.005 inch) for rear wheels. If both radial and lateral runouts are excessive, resolve lateral concerns before proceeding with radial service procedures.
- Is runout within specifications?
E5 INDEX TIRE ON WHEEL
- Index tire on wheel . Align highest runout point to wheel low runout point.
- Is total radial runout less than 1.01mm (0.040 inch)?
E6 BALANCE TIRES
- Check and balance tires.
- Road test.
- Is vibration eliminated?
E7 CHECK WHEEL RADIAL RUNOUT
- Check wheel radial runout and ensure it is correct.
NOTE: Although maximum wheel runout shown exceeds acceptable total tire/wheel assembly runout, acceptable assembly runout may be achieved by indexing tire on wheel.
- Is wheel runout less than 1.14mm (0.045 inch)?