 CAUTION: Do not use a test lamp to perform the following tests as excessive
current draw will damage electronic components inside the amplifier. Use only a
voltmeter of 5,000 ohm/volt rating or higher.
CAUTION: Do not use a test lamp to perform the following tests as excessive
current draw will damage electronic components inside the amplifier. Use only a
voltmeter of 5,000 ohm/volt rating or higher. Section 10-03: Speed Control System | 1993 Mustang Workshop Manual |
Disconnect the connector to the VSS and connect an ohmmeter between the VSS terminals at the VSS end. A reading of approximately 200-300 ohms should be obtained. A reading of 0 ohms indicates a shorted coil and a maximum reading indicates an open coil. Replace the VSS in either case.
If the ohmmeter records 200-300 ohms and the speedometer operates properly within needle waver, the VSS is probably good. A speed sensor of known good quality can also be substituted in place of the existing VSS to check for proper operation.
Servo Assembly Test
Start the engine, and with the servo disconnected from the amplifier, connect the Circuit 144 (O/Y) lead of the servo to the battery positive terminal. Connect the Circuit 146 (W/PK) lead of servo to ground, and momentarily touch the Circuit 145 (GY/BK) lead of the servo to ground. The servo throttle actuator arm should pull in and the engine speed should increase. The arm should hold in that position or slowly release, when Circuit 145 (GY/BK) lead is removed from ground. When Circuit 146 (W/PK) is removed from ground, the servo should release. Replace the servo if it fails any part of the preceding test.
If the Circuit 144 (O/Y) lead is shorted to either the Circuit 146 (W/PK) or Circuit 145 (GY/BK) leads, it may be necessary to replace the amplifier.
Amplifier Test
CAUTION: Do not use a test lamp to perform the following tests as excessive
current draw will damage electronic components inside the amplifier. Use only a
voltmeter of 5,000 ohm/volt rating or higher.
ON Circuit Test
Turn ignition switch to the RUN position. Connect voltmeter between Circuit 296 (W/P) and ground in 6-pin connector at amplifier. Voltmeter should read battery voltage. If battery voltage is not present, check the fuse voltage and service as required.
Connect voltmeter between Circuit 151 (LB/BK), and ground in 6-pin connector at amplifier. The voltmeter should now read battery voltage when the ON switch on the steering wheel is depressed and held. If voltage is not available perform control switch test.
Release the ON button; the voltmeter should read approximately 7.8 volts. The voltage should remain approximately 7.8 volts until one of the speed control buttons is depressed and held. If the meter reads zero, check the ground connections on the amplifier (either black wire on the 6-pin connector). If there is still no ground on the amplifier, check the system ground connection and wiring. Also check the 20-amp fuse and/or substitute (but do not install) a known good amplifier and recheck for a properly operating ON circuit.
Brake Circuit Test
Connect voltmeter between Circuit 511 (LG) on the 6-pin connector and ground. The voltmeter should read battery voltage with brake pedal depressed, and less than one volt with brake pedal released. If voltage is other than above, check for improper wiring, burned out stoplamps, burned out stoplamp fuse, clutch switch malfunction or stoplamp switch malfunction.
OFF Circuit Test
With the ignition switch in the RUN position and the voltmeter connected between Circuit 151 (LB/BK) on the 6-pin connector and ground, depress and hold the OFF switch on the steering wheel. The voltmeter should indicate 0 volts. If the voltage does not drop to zero, perform control switch test. If the switches check OK, temporarily connect a known good amplifier and recheck the OFF circuit as outlined.
SET ACCEL Circuit Test
With the ignition switch in the RUN position and the voltmeter connected between Circuit 151 (LB/BK) in the 6-pin connector and Circuit 57 (BK) ground, depress and hold the SET ACCEL button on steering wheel. Voltmeter should indicate approximately 4.5 volts. Rotate the steering wheel back and forth and watch the voltmeter for fluctuations. If the voltage varies more than 0.5 volt, perform the control switch test.
COAST Circuit Test
With the ignition switch in the RUN position and the voltmeter connected between Circuit 151 (LB/BK) in the 6-pin connector and ground, depress and hold the COAST button on steering wheel. The voltmeter should indicate approximately 1.5 volts. Rotate the steering wheel back and forth and watch the voltmeter for fluctuations. If the voltage varies more than 0.5 volt, perform the control switch test.
RESUME Circuit Test
With the ignition switch in the RUN position and the voltmeter connected between Circuit 151 (LB/BK) in the 6-pin connector and ground, depress and hold the RESUME button on the steering wheel. The voltmeter should read approximately 6.5 volts. Rotate the steering wheel back and forth and watch the voltmeter for fluctuations. If the voltage varies more than 0.5 volt, perform the control switch test.
If all the circuits check OK, perform the servo assembly test and temporarily connect a known good amplifier. Do not substitute a good amplifier until the servo assembly test has been successfully completed.
Simulated Road Test
Tools Required:
CAUTION: When performing this simulated road test, the rear wheels of the
vehicle must be raised clear of the floor. Block the front wheels securely and
use only a suitable lifting device (such as a garage-type hoist) and support
the rear axle with one jack stand on each side. Never attempt to use the
vehicle bumper jack for tests of this type.
CAUTION: If any time during the following Steps the system should appear to go
out of control and overspeed, be prepared to turn the system off at once with
the OFF switch or the ignition switch.
NOTE: When performing these tests, keep the vehicle speeds within reasonably low limits. If the system does not perform as normally expected, make note of the malfunction.
Stoplamp Switch and Circuit Test
To be performed when brake application will not disconnect the speed control:
Vacuum Dump Valve Test
Tools Required:
The vacuum dump valve releases the vacuum in the servo assembly whenever the brake pedal is depressed, and thus acts as a redundant safety feature. It should be checked whenever brake application does not disconnect the speed control.
Disconnect the vacuum hose (white stripe) from the dump valve to the servo at the servo.
NOTE: LH inner front fender splash shield must be removed. Refer to Section 01-02.
Connect a hand vacuum pump such as Rotunda Vacuum Tester 021-00037 or equivalent, to the hose, and pump up a vacuum. If a vacuum can not be obtained, the hose or the dump valve leaks and should be replaced or adjusted. Step on the brake pedal. The vacuum should be released. If it is not, adjust or replace the dump valve.
Clutch Switch Test
Automatic Transmission
Vehicles equipped with automatic transmissions use a shorting plug instead of a clutch switch.
Manual Transmission
The speed control system is designed to disengage when the clutch pedal is depressed. This is accomplished via a clutch disable switch mounted to the clutch pedal.
The disengage function operates by opening the circuit between the speed control module and the stoplamps. This prevents engine overspeed when the clutch is depressed and the speed control is engaged.
The switch is a plastic plunger-type mounted to the brake and clutch pedal support on the side near the accelerator pedal.
The switch is activated by a bar that is part of the clutch pedal mechanism.
CAUTION: Do not use a strong magnet close to the clutch switch. The switch
operation can be affected by strong magnetic fields.
If the switch is open when the clutch pedal is released, the speed control will not operate. This must be corrected before making other tests.
CAUTION: Do not use a test lamp to perform the following tests. A light cannot
properly indicate condition of switch. Use only a voltmeter of 5,000 ohm/volt
rating or higher.
To check the switch, disconnect switch pigtail connector from speed control harness connector and connect an ohmmeter to the two switch connector terminals. With the clutch pedal in the full-up (released) position, the resistance should be less than 5 ohms. With the clutch pedal depressed (switch plunger extended), the circuit should be open.
If the switch does not function as described, remove and replace by
removing one sheet metal screw and installing a replacement switch. 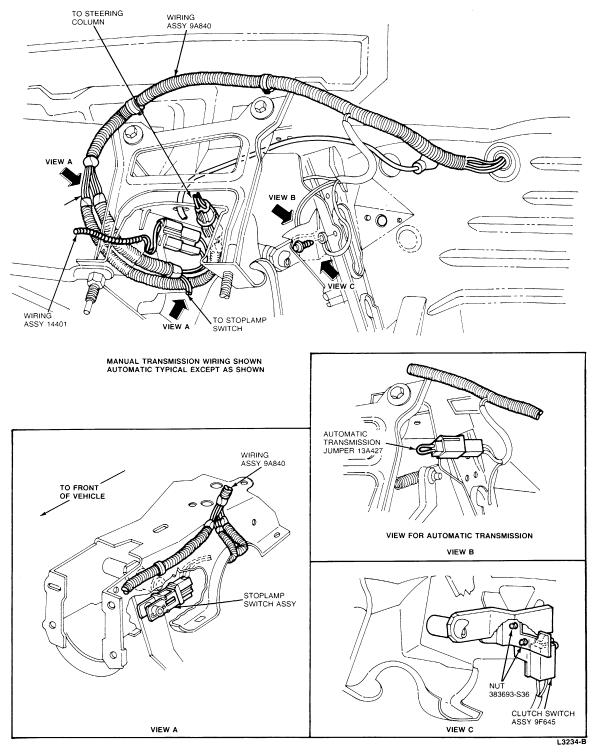
Speed Control Tester
The speed control system can be operated and diagnosed using the Rotunda
Speed Control Tester 007-00013 or equivalent. The tester works on vehicles with
all combinations of control switches, transmissions, speedometers (electronic
and mechanical), brakes and clutches. With three modes of operation: Automatic,
Single Scan, and Scan Probe, the technician can pinpoint any failure including
wiring, vacuum hoses, switches and servo. The tester includes an instruction
manual with its own specially developed diagnostic tree charts for identifying
any failed or marginal component in the speed control system. 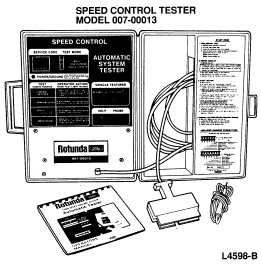
NOTE: 8.42 kPa (2.5 in-Hg) is minimum vacuum for normal servo operation. The vacuum source hose is attached to the 7.9mm (5/16 inch), engine vacuum fitting port.
NOTE: 8.42 kPa, (2.5 in-Hg) is minimum vacuum for normal speed control servo (9C735) operation. The vacuum source hose is attached to the 7.9mm (5/16 inch) engine vacuum-fitting port.