Section 10-03: Speed Control System | 1993 Mustang Workshop Manual |
Tools Required:
Check main feed fuse and stoplamp fuse first. If these fuses are OK proceed with test. Disconnect the 6-pin connector at the amplifier assembly. Refer to the wiring diagram before performing the following checks.
NOTE: Return ignition switch to OFF position after this step.
If resistance values are above the allowable limits, check the switch assemblies, clockspring circuits and ground circuit.
Reconnect the 6-pin connector at the amplifier.
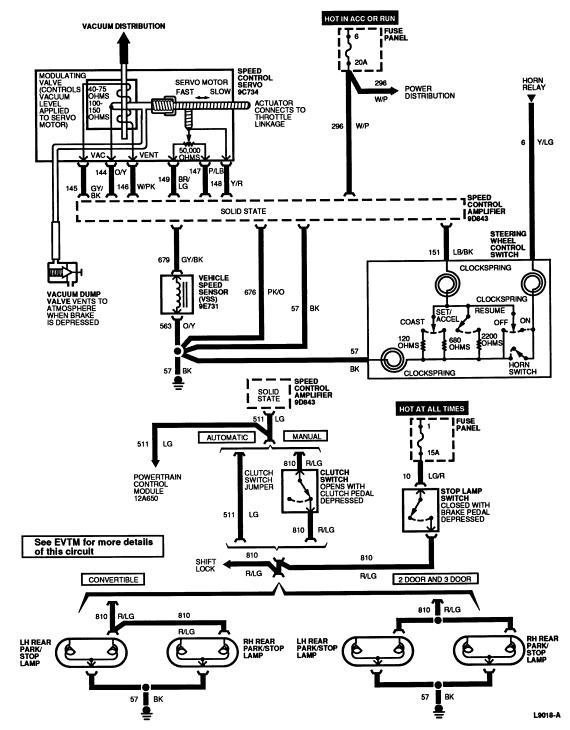
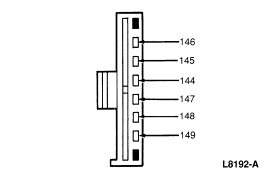
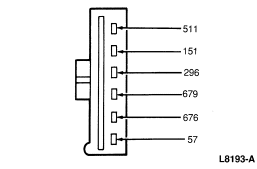
| CIRCUIT NUMBER | CIRCUIT DESCRIPTION | GAUGE | COLOR | CIRCUIT NUMBER | CIRCUIT DESCRIPTION | GAUGE | COLOR |
|---|---|---|---|---|---|---|---|
| 296 | IGNITION SWITCH (ACCESSORY) TO AMPLIFIER FEED | 20 | W/P | 6 | HORN SWITCH FEED | Y/LG | |
| 149 | SERVO FEEDBACK POTENTIOMETER + (TO AMPLIFIER) | 20 | BR/LG | 511 | BRAKE SWITCH (LOAD SIDE) TO AMPLIFIER DISABLE | 18 | LG |
| 148 | SERVO FEEDBACK POSITION (TO AMPLIFIER) | 20 | Y/R | 676 | SENSOR GROUND | 18 | PK/O |
| 147 | SERVO FEEDBACK POTENTIOMETER - (TO AMPLIFIER) | 18 | P/LB | 679 | SENSOR SIGNAL TO AMPLIFIER | 20 | GY/BK |
| 146 | SERVO VENT SOLENOID CONTROL | 20 | W/P | 57 | AMPLIFIER GROUND | 18 | BK |
| 145 | SERVO VACUUM SOLENOID CONTROL | 20 | GY/BK | 151 | AMPLIFIER CONTROL LINE | 18 | LB/BK |
| 144 | SERVO SOLENOID FEED | 20 | O/Y |