Section 07-01A: Transmission, Automatic, A4LD | 1993 Mustang Workshop Manual |
Tools Required
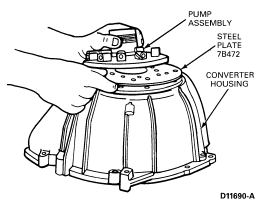
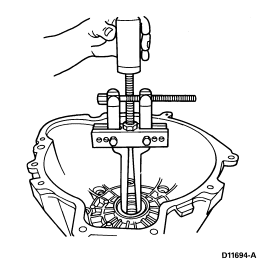
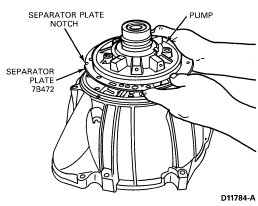
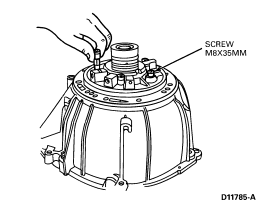
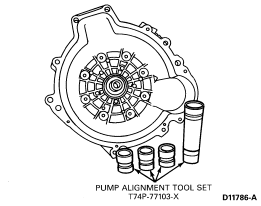
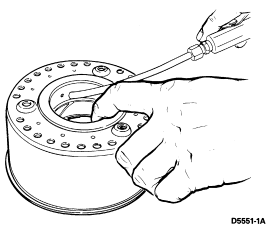
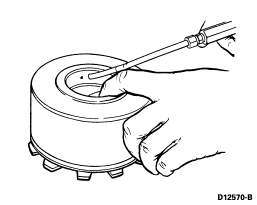
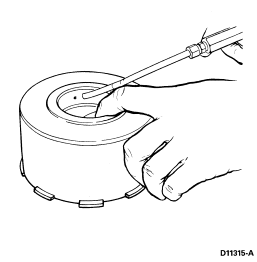
Converter Housing and Pump Assembly
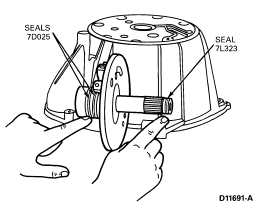
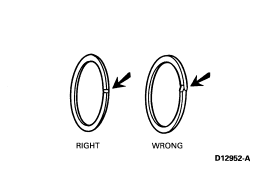
NOTE: Note correct installation of seals as shown. Be sure seal grooves are clean and free of burrs.
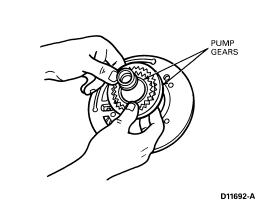
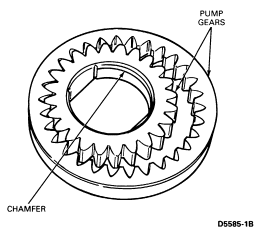
NOTE: The pump gears are part of the pump assembly and not serviced separately. Rough casting on pump surface crescent is not a flaw. Refer to TSB-91-19A Article 87-2-16 Figure 25.

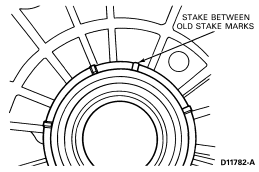
NOTE: Stake between the old stake marks.
 CAUTION: The chamfer on the inside edge of the small gear must be up when in
the pump housing gear pocket. The dimple on the larger gear must be down when
in the pump housing gear pocket.
CAUTION: The chamfer on the inside edge of the small gear must be up when in
the pump housing gear pocket. The dimple on the larger gear must be down when
in the pump housing gear pocket.
CAUTION: Make sure the holes in the plate line up with the holes in the pump.
CAUTION: Do not allow the pump gears to come out of pump housing pocket.
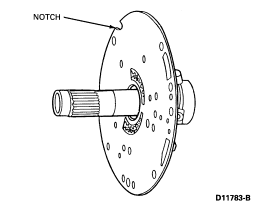
NOTE: The notch on the outside of separator plate will be at 9:00 o'clock, relative to converter housing.
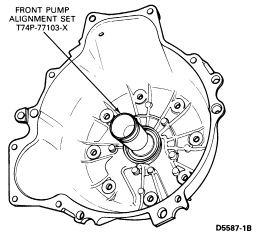
CAUTION: You must use Front Pump Alignment Set T74P-77103-X to properly align
the pump to converter housing, in order to prevent seal leakage, gear noise and
breakage, and bushing failure.
NOTE: This centers the pump to the converter housing.
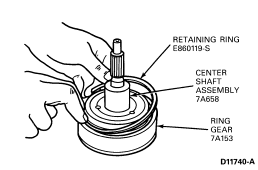
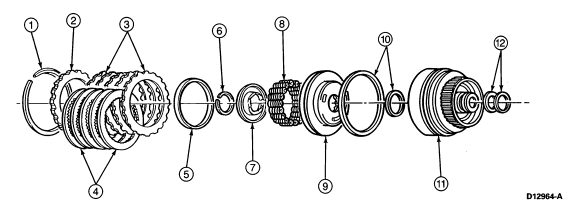
Overdrive Gear Train Assembly
Refer to the following illustration.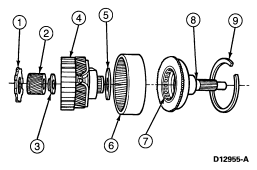
| Item | Part Number | Description |
|---|---|---|
| 1 | 7660 | Overdrive Clutch Adapter |
| 2 | 7D063 | Overdrive Sun Gear |
| 3 | 7D235 | Sun Gear Rear Thrust Bearing Race (No. 12) |
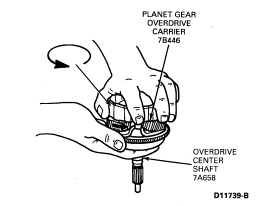
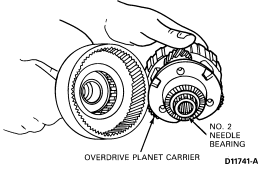
| 4 | 7B446 | Overdrive Planet Gear Carrier |
| 5 | 7L495 | Overdrive Inner Race Bearing (No. 2) |
| 6 | 7A153 | Overdrive Ring Gear |
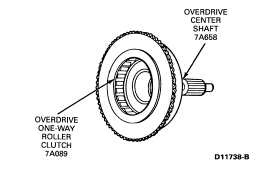
| 7 | 7A089 | Overdrive One-Way Roller Clutch |
| 8 | 7A658 | Overdrive Center Shaft |
| 9 | E860119-S | Center Shaft Retaining Ring |
Disassembly and Assembly
CAUTION: Do not remove overdrive one-way roller clutch. Damage to clutch may
occur if removed.
NOTE: The overdrive one-way roller clutch is serviced as a center shaft and clutch assembly only.
NOTE: Use petroleum jelly to hold No. 2 needle bearing in place.
NOTE: Before installing sun gear into overdrive planet assembly make sure No. 12 needle bearing washer is aligned with bearing assembly.
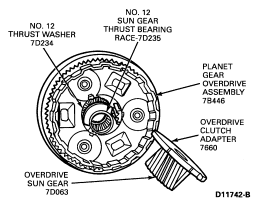
NOTE: The sun gear will not seat properly if No. 12 needle bearing washer is not aligned, with overdrive sungear.

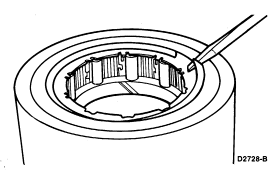
Low Reverse Brake Drum Assembly
Refer to the following illustration.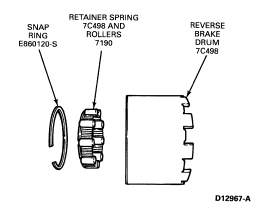
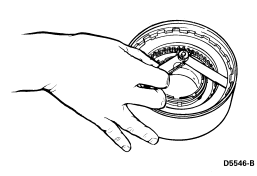
One-Way Clutch
Disassembly and Assembly
NOTE: When removing cage rollers will fall out.
NOTE: If rollers are damaged inspect inner race in case 7005 and reverse brake drum (7C489) may also be damaged and need to be replaced.
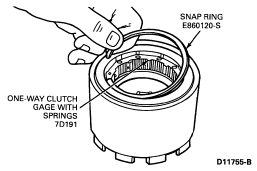
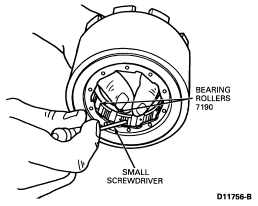
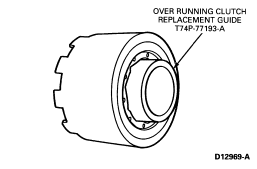
NOTE: Overrunning Clutch Replacing Guide T74P-77193-A can be used to keep the rollers in place prior to assembly into case (7005).
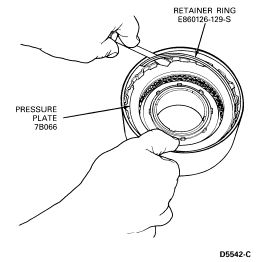
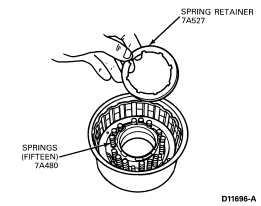
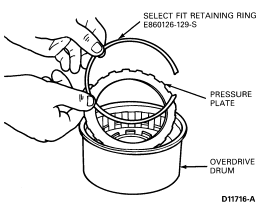
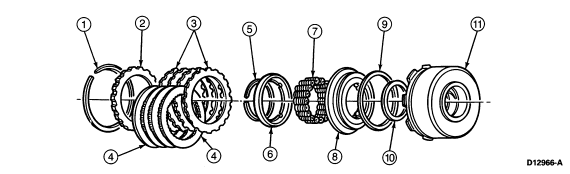
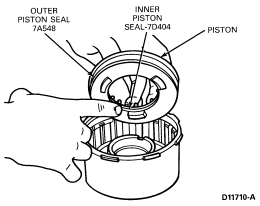
Overdrive Clutch and One-Way Clutch Assembly
Refer to the following illustration.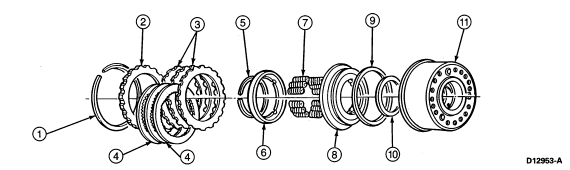
| Item | Part Number | Description |
|---|---|---|
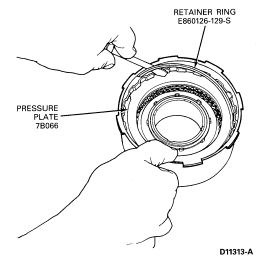
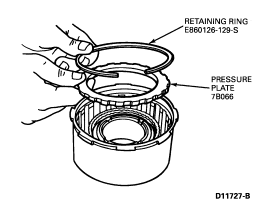
| 1 | E860126-129S | Reverse High and Overdrive Clutch Retaining Ring Ś Selective Fit (2 Req'd) |
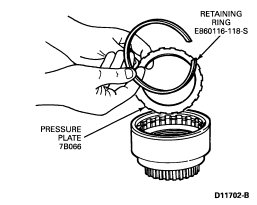
| 2 | 7B066 | Overdrive Clutch Pressure Plate |
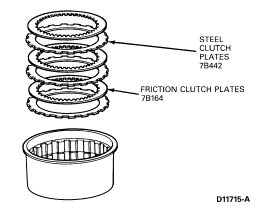
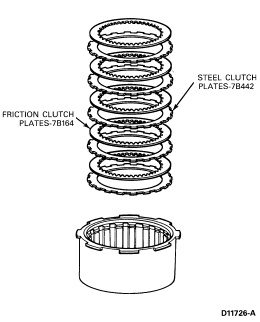
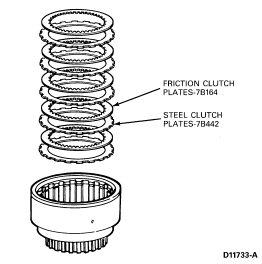
| 3 | 7B442 | Overdrive External Spline Clutch Plate Ś Steel |
| 4 | 7B164 | Overdrive Internal Spline Clutch Plate Ś Friction |
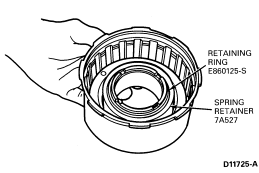
| 5 | E860125-S | Retaining Ring |
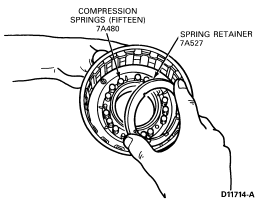
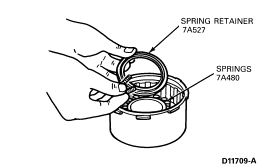
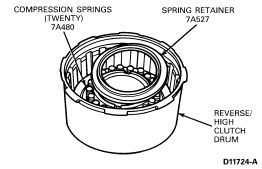
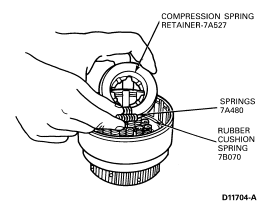
| 6 | 7A527 | Overdrive Clutch Piston Spring Retainer (8 Tabs) |
| 7 | 7A480 | Overdrive Clutch Piston Spring (15 Req'd) |
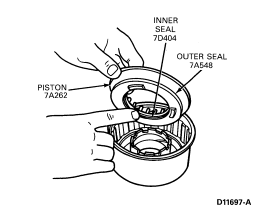
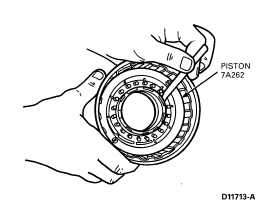
| 8 | 7A262 | Overdrive Clutch Piston |
| 9 | 7A548 | Overdrive Clutch Piston Seal Ś Outer |
| 10 | 7D404 | Overdrive Clutch Piston Seal Ś Inner |
| 11 | 7L669 | Overdrive Drum Assembly |
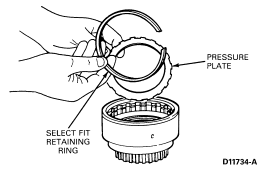
CAUTION: This is a select fit ring. See assembly procedure if ring or clutch
plate pack is replaced.
CAUTION: See note on soaking of new plates during assembly.
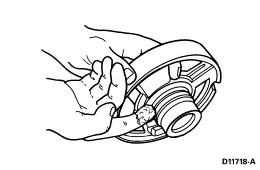
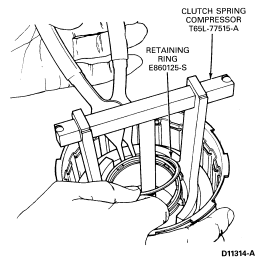
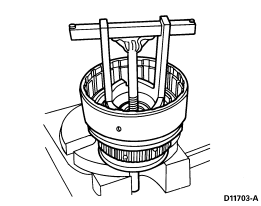
WARNING: CAREFULLY RELEASE TOOL PRESSURE ON THE SPRINGS AND REMOVE TOOL.
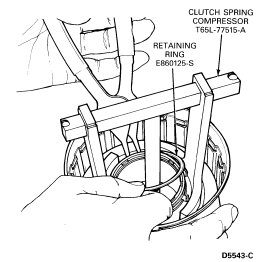
WARNING: DO NOT EXCEED 137 KPA (20 PSI). WEAR SAFETY GLASSES WHEN USING
COMPRESSED AIR AND MAKE SURE DRUM IS FACING DOWN AS SHOWN.
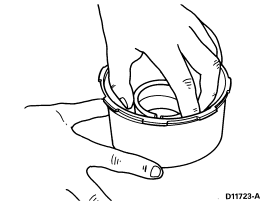
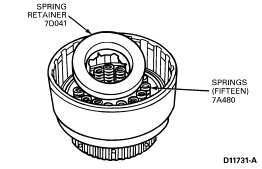
Overdrive Clutch
CAUTION: Lip seals must be positioned as removed. Care must be taken to prevent
roll over of seal lip. See view A.
CAUTION: Care must be taken to prevent damage to seals during this installation.
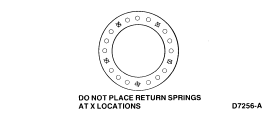
CAUTION: Springs are set in groups of three with a blank space between the
groups as shown.
CAUTION: If new plates are being used, they are to be soaked in clean
transmission fluid for at least 30 minutes before assembly.
CAUTION: The retaining ring is select fit.
Free Play Check
| Overdrive Clutch | ||||
|---|---|---|---|---|
| Part Number | Thickness | Diameter | ||
| mm | Inches | mm | Inches | |
| E 860126-S | 1.37 | .0539 | 130.1 | 5.122 |
| E 860127-S | 1.73 | .0681 | 130.1 | 5.122 |
| E 860128-S | 2.08 | .0819 | 130.1 | 5.122 |
| E 860129-S | 2.44 | .0961 | 130.1 | 5.122 |
WARNING: DO NOT EXCEED 13 KPA (20 PSI). WEAR SAFETY GLASSES WHEN USING
COMPRESSED AIR. MAKE SURE DRUM IS FACING DOWN AS SHOWN.
NOTE: Piston must apply with air pressure and release when air is removed.
Center Support
CAUTION: Do not overstretch seal upon installation.
CAUTION: Do not roll or cut seals. Allow to stand for several minutes before
attempting to remove hub and install into the intermediate drum (7D044) during
final assembly.
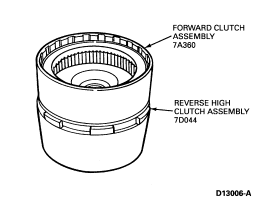
Reverse/High Clutch Assembly
| Item | Part Number | Description |
|---|---|---|
| 1 | E860126-129S | Reverse/High Clutch and Overdrive Clutch Retaining Ring Ś Selective Fit (2 Req'd) |
| 2 | 7B066 | Reverse and High Clutch Pressure Plate |
| 3 | 7B442 | Reverse and High Clutch External Spline Plate Ś Steel |
| 4 | B164 | Reverse and High Clutch Internal Spline Plate Ś Friction |
| 5 | E860125-S | High Clutch Piston Inner Intermediate Brake Drum Ring Ś 63mm |
| 6 | 7A527 | Reverse and High Clutch Piston Spring Retainer Ś (8 Tabs) |
| 7 | 7A480 | Reverse and High Clutch Piston Spring (20 Req'd) |
| 8 | 7A262 | Reverse and High Clutch Piston |
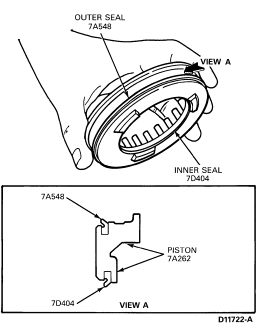
| 9 | 7A548 | Reverse and High Clutch Piston Seal Ś Outer |
| 10 | 7D404 | Reverse and High Clutch Piston Seal Ś Inner |
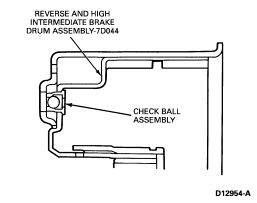
| 11 | 7D044 | Reverse and High Drum Assembly |
WARNING: AFTER REMOVING RETAINING RING USE CARE WHEN RELEASING PRESSURE ON
SPRINGS. REMOVE TOOL.
WARNING: DO NOT EXCEED 137 KPA (20 PSI). WEAR SAFETY GLASSES WHEN USING
COMPRESSED AIR. MAKE SURE DRUM IS FACING DOWN AS SHOWN.
Reverse Brake/High Clutch
CAUTION: These are lip seals and must be positioned as removed. Care must be
taken to prevent roll-over of seal lip. See View "A".
NOTE: Make sure check ball is free and clear of debris prior to installing piston. Check ball is located in drum.
CAUTION: Care must be taken to prevent damage to the seals.
CAUTION: The number of plates is model dependent. See specification chart in Specifications
, in this section. If new plates are being used, they are to be
soaked in clean transmission fluid for at least 30 minutes before assembly.
CAUTION: The retaining ring is a select fit.
| Reverse/High Clutch | ||||
|---|---|---|---|---|
| Part Number | Thickness | Diameter | ||
| mm | Inches | mm | Inches | |
| E 860126-S | 1.37 | .0539 | 130.1 | 5.122 |
| E 860127-S | 1.73 | .0681 | 130.1 | 5.122 |
| E 860128-S | 2.08 | .0819 | 130.1 | 5.122 |
| E 860129-S | 2.44 | .0961 | 130.1 | 5.122 |
WARNING: DO NOT EXCEED 13 KPA (20 PSI). WEAR SAFETY GLASSES WHEN USING
COMPRESSED AIR. MAKE SURE DRUM IS FACING DOWN AS SHOWN.
NOTE: Piston must apply with air pressure and release when air is removed.
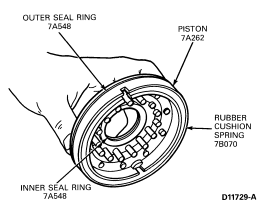
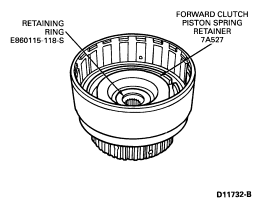
Forward Clutch
Refer to the following illustration for component location and orientation.
Forward Clutch Assembly
| Item | Part Number | Description |
|---|---|---|
| 1 | E860115-S | Forward Clutch Retaining Ring Ś Selective Fit |
| 2 | 7B066 | Forward Clutch Pressure Plate |
| 3 | 7B442 | Forward Clutch External Spline Plate Ś Steel |
| 4 | 7B164 | Forward Clutch Internal Spline Plate Ś Friction |
| 5 | 7B070 | Forward Clutch Cushion Spring |
| 6 | E860109-S | Retaining Ring (34mm) |
| 7 | 7A527 | Forward Clutch Piston Spring Retainer |
| 8 | 7A180 | Forward Clutch Piston Spring (15 Req'd) |
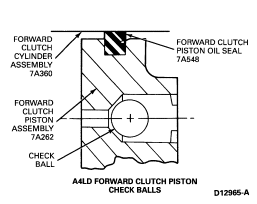
| 9 | 7A262 | Forward Clutch Piston Assembly |
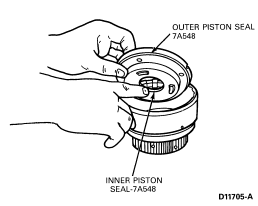
| 10 | 7A548 | Forward Clutch Piston Oil Seal Ś Inner and Outer |
| 11 | 7A360 | Forward Clutch Cylinder Assembly |
| 12 | 7D019 | Forward Clutch Cylinder Seal (2 Req'd) |
Disassembly
CAUTION: This is a select fit ring. See assembly procedure if the ring or
clutch pack is replaced.
CAUTION: See note on soaking of new plates during assembly.
WARNING: CAREFULLY RELEASE THE TOOL PRESSURE ON THE SPRINGS AND REMOVE TOOL.
WARNING: DO NOT EXCEED 137 KPA (20 PSI). WEAR SAFETY GLASSES WHEN USING
COMPRESSED AIR. MAKE SURE DRUM IS FACING DOWN AS SHOWN.
NOTE: This is the middle-sized port.
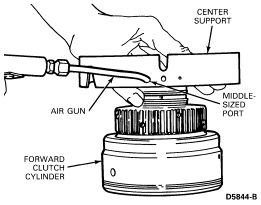
NOTE: Make sure check ball is free and clear of debris prior to installing piston. Check ball is located in piston.
Assembly
CAUTION: If there is evidence of clutch plate burning, replace rubber cushion
spring.
CAUTION: Care must be taken to prevent damage to the seals.
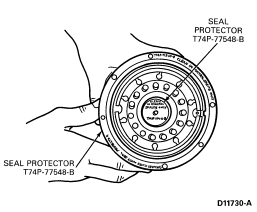
NOTE: Apply petroleum jelly to inner and outer seals.
NOTE: Lip Seal Protector T74P-77548-B may be used to prevent damage to outer seal (7A548), and Lip Seal Protector T74P-77548-A may be used to prevent damage to inner seal (7A548).
CAUTION: Use the correct number of plates. If new plates are being used, they
must be soaked in clean transmission fluid for at least 30 minutes before
assembly.
CAUTION: The retaining ring is a select fit.
| Forward Clutch | ||||
|---|---|---|---|---|
| Part Number | Thickness | Diameter | ||
| mm | Inches | mm | Inches | |
| E 860115-S | 1.37 | .0539 | 125.1 | 4.925 |
| E 860116-S | 1.73 | .0681 | 125.1 | 4.925 |
| E 860117-S | 2.08 | .0819 | 125.1 | 4.925 |
| E 860118-S | 2.44 | .0961 | 125.1 | 4.925 |
WARNING: DO NOT EXCEED 13 KPA (20 PSI). WEAR SAFETY GLASSES WHEN USING
COMPRESSED AIR. MAKE SURE DRUM IS FACING DOWN AS SHOWN.
CAUTION: Piston must apply with air and release when air is removed.
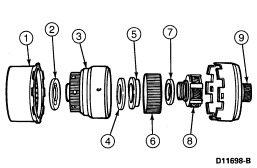
| Item | Part Number | Description |
|---|---|---|
| 1 | 7D044 | Reverse High Clutch Assembly |
| 2 | 7C096 | Thrust Washer Ś No. 5 |
| 3 | 7A360 | Forward Clutch Assembly |
| 4 | 7D234 | Needle Bearing Ś No. 6 |
| 5 | 7D090 | Forward Clutch Thrust Washer |
| 6 | 7D234 | Needle Bearing Ś No. 6 |
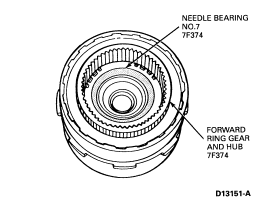
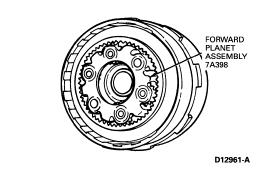
| 7 | 7F374 | Forward Planet Thrust Bearing Ś No. 7 |
| 8 | 7A398 | Forward Planet Assembly |
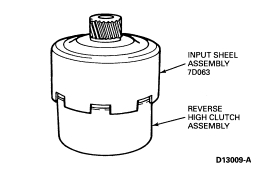
| 9 | 7D064 | Input Shell (with Sun Gear 7D063) |

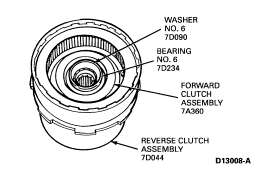
NOTE: Make sure the washer (7D090) aligns inside forward ring gear and hub.

NOTE: Make sure sun gear aligns with forward planet and input shell align with reverse and high clutch as shown.
Main Control Valve Body
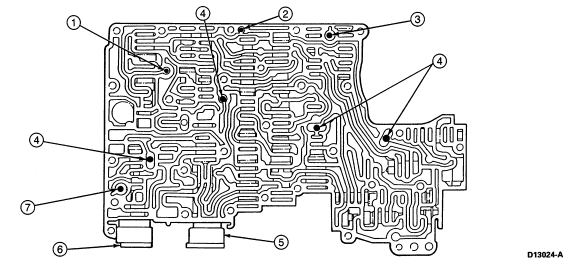
| Item | Part Number | Description |
|---|---|---|
| 1 | Ś | Overdrive Servo Release Accumulator Check Valve |
| 2 | Ś | Intermediate Servo Release Accumulator Check Valve |
| 3 | Ś | T.V. Pressure Relief Valve |
| 4 | Ś | Shuttle Balls |
| 5 | Ś | 3-4 Shift Solenoid |
| 6 | Ś | Torque Converter Clutch Solenoid |
| 7 | Ś | Converter Pressure Relief Valve |
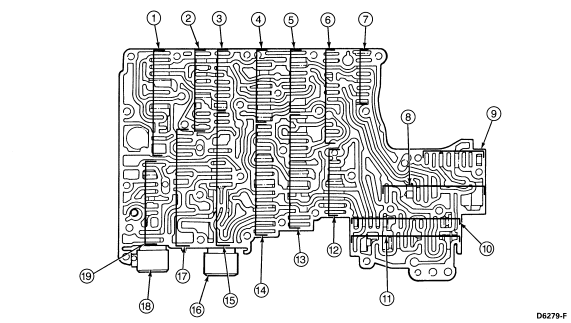
| Item | Part Number | Description |
|---|---|---|
| 1 | Bore 216 | Intermediate Servo, Accumulator Valve, Overdrive Servo Accumulator Valve, 3-4 Backout Valve |
| 2 | Bore 215 | 3-2 High Clutch Kickdown Control Valve; 3-2 Intermediate Servo Release Kickdown Control Valve |
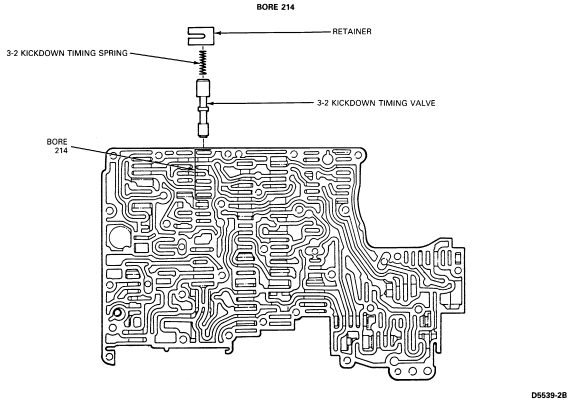
| 3 | Bore 214 | 3-2 Kickdown Timing |
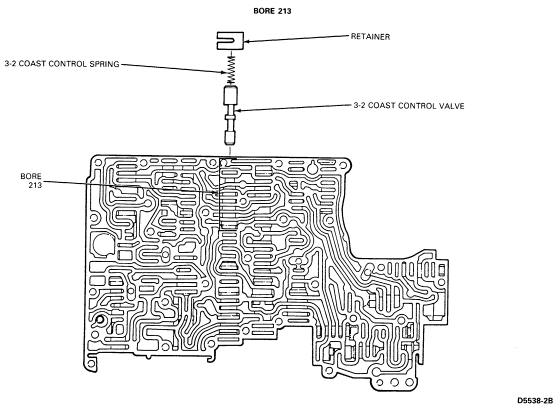
| 4 | Bore 213 | 3-2 Coast Control Valve |
| 5 | Bore 212 | T.V. Pressure Boost Valve |
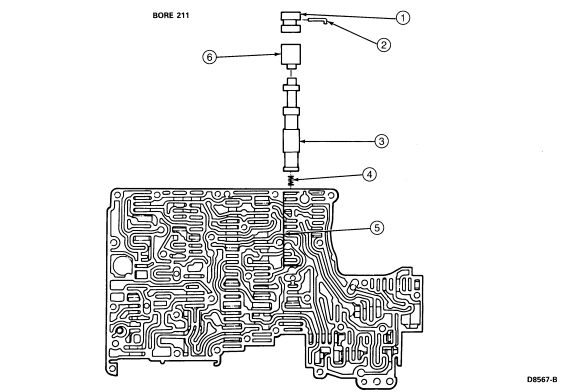
| 6 | Bore 211 | 1-2 Transition Valve; 2-3 Backout Valve |
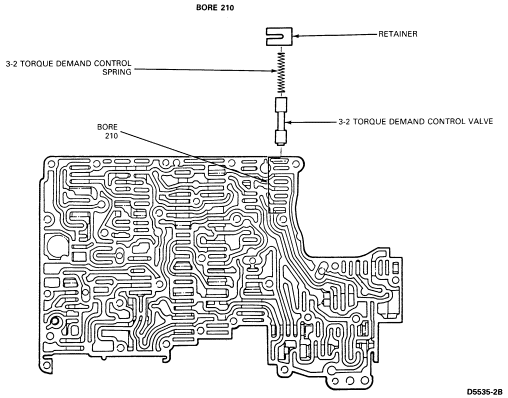
| 7 | Bore 210 | Torque Demand Control Valve |
| 8 | Bore 208 | Main Oil Pressure Booster Valve; Main Oil Pressure Regulator Valve |
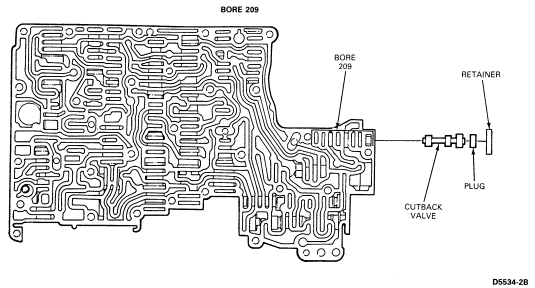
| 9 | Bore 209 | Cutback Valve |
| 10 | Bore 207 | Throttle Downshift Valve (Kickdown) |
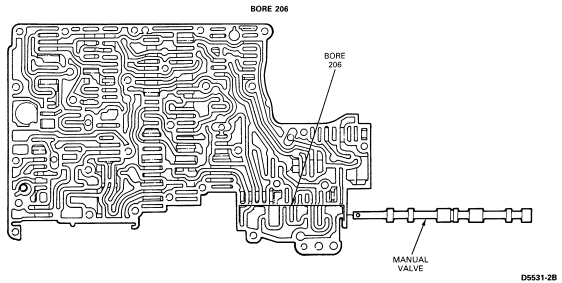
| 11 | Bore 206 | Manual Valve |
| 12 | Bore 205 | Governor Coast Boost Valve; Line Pressure Coast Boost Valve (2 and Low) |
| 13 | Bore 204 | 1-2 Shift Valve; D-2 Shift Valve |
| 14 | Bore 203 | 2-3 Shift Valve; 2-3 T.V. Modulator Valve |
| 15 | Bore 202 | 3-4 Shift Solenoid and Torque Converter Clutch; Modulator Valve |
| 16 | 3-4 Shift Solenoid | |
| 17 | Bore 201 | 3-4 Shift Valve |
| 18 | Torque Converter Clutch Solenoid | |
| 19 | Bore 200 | Torque Converter Clutch Shift Solenoid; Torque Converter Clutch Shuttle Valve |
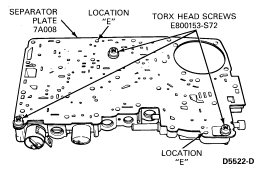
Valve Body Valve Identification
The following procedural steps detail the removal and installation of the
individual valves. Each valve body bore has been assigned a reference number on
the assembled view. The illustrations have been assigned a corresponding
reference number. Each set of illustrations contains the views necessary to
remove and install the components contained in a particular valve body bore.
Bore 200
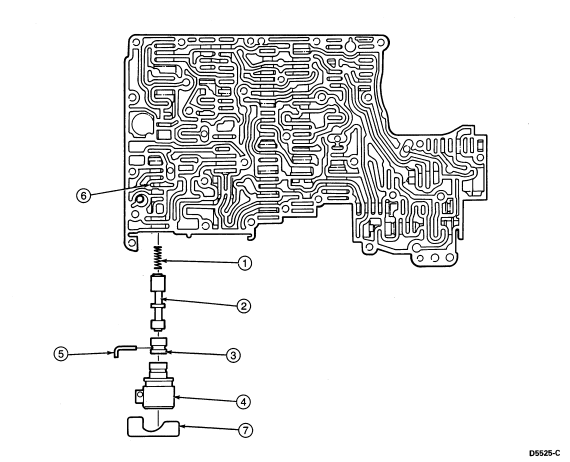
| Item | Part Number | Description |
|---|---|---|
| 1 | Ś | Torque Converter Clutch Shuttle Spring |
| 2 | Ś | Torque Converter Clutch Shuttle Valve |
| 3 | Ś | Plug |
| 4 | Ś | TCC Solenoid |
| 5 | Ś | Plug Retainer |
| 6 | Ś | Bore 200 |
| 7 | Ś | Solenoid Retainer |
| Item | Part Number | Description |
|---|---|---|
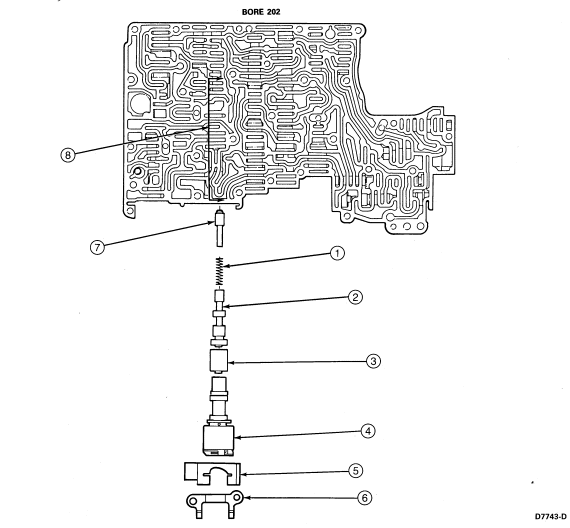
| 1 | Ś | Torque Converter Clutch T.V. Modulator Spring |
| 2 | Ś | Torque Converter Clutch Shift Valve |
| 3 | Ś | Spacer Valve (Must be Installed with Tip on Outside Toward 3-4 Shift Solenoid Surface) |
| 4 | Ś | 3-4 Shift Solenoid |
| 5 | Ś | Inner Solenoid Retainer |
| 6 | Ś | Outer Solenoid Retainer |
| 7 | Ś | Torque Converter Clutch T.V. Modulator Valve (Used for Spring Seat and Valve Stop Only) |
| 8 | Ś | Bore 202 |
| Item | Part Number | Description |
|---|---|---|
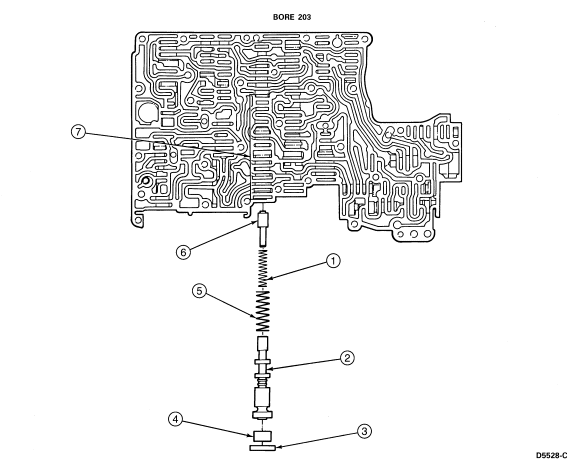
| 1 | Ś | 2-3 Throttle Pressure Modulator Spring |
| 2 | Ś | 2-3 Shift Valve |
| 3 | Ś | Retaining Plate |
| 4 | Ś | Plug |
| 5 | Ś | 2-3 Shift Spring |
| 6 | Ś | 2-3 Throttle Pressure Modulator Valve |
| 7 | Ś | Bore 203 |
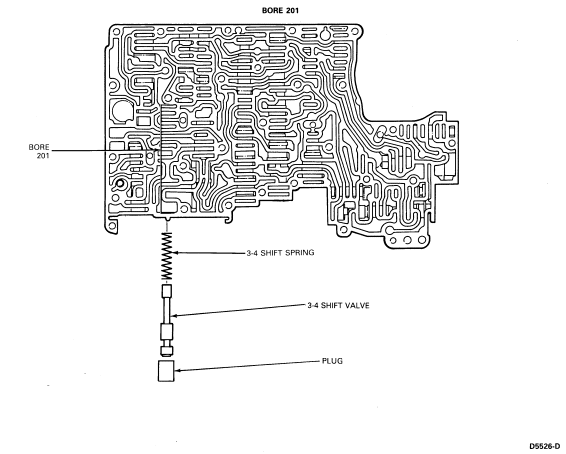
| Item | Part Number | Description |
|---|---|---|
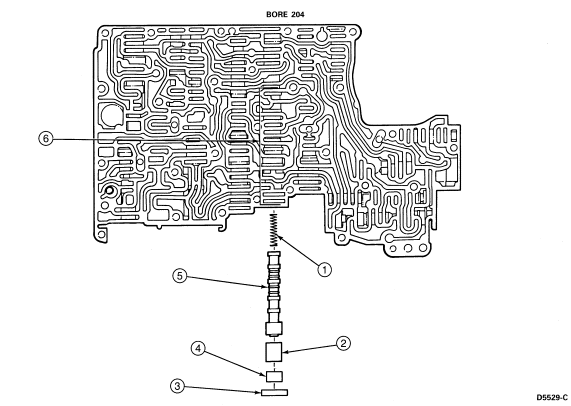
| 1 | Ś | 1-2 Shift Spring |
| 2 | Ś | 1-2 Shift Valve |
| 3 | Ś | Retaining Plate |
| 4 | Ś | Plug |
| 5 | Ś | D2 Shift Valve |
| 6 | Ś | Bore 204 |
| Item | Part Number | Description |
|---|---|---|
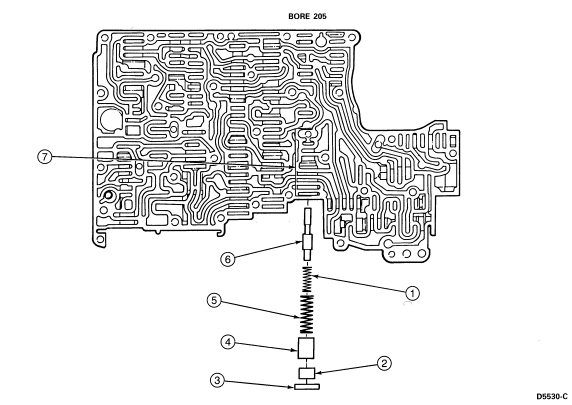
| 1 | Ś | Inner Spring |
| 2 | Ś | Plug |
| 3 | Ś | Retaining Plate |
| 4 | Ś | Governor Coast Boost Valve |
| 5 | Ś | Outer Spring |
| 6 | Ś | Coast Boost Valve (2 and Low) |
| 7 | Ś | Bore 205 |
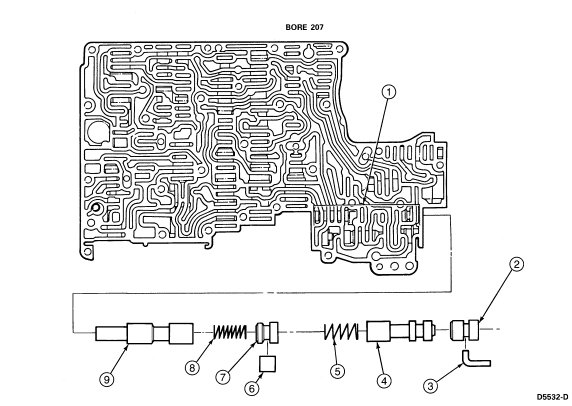
| Item | Part Number | Description |
|---|---|---|
| 1 | Ś | Bore 207 |
| 2 | Ś | Plug |
| 3 | Ś | Retainer |
| 4 | Ś | Reverse Engagement Control Valve |
| 5 | Ś | Spring |
| 6 | Ś | Retainer |
| 7 | Ś | Plug |
| 8 | Ś | Kickdown Spring |
| 9 | Ś | Kickdown Valve |
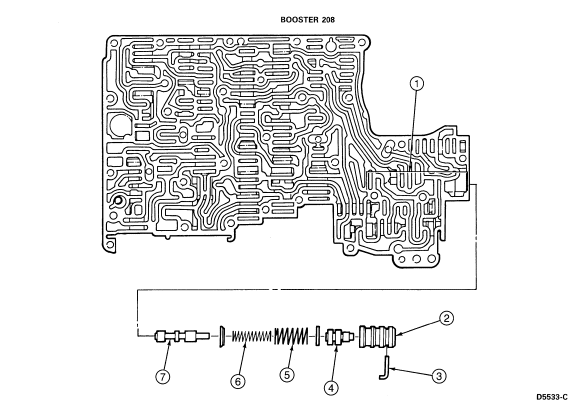
| Item | Part Number | Description |
|---|---|---|
| 1 | Ś | Bore 208 |
| 2 | Ś | Booster Valve Sleeve |
| 3 | Ś | Retainer |
| 4 | Ś | Main Oil Pressure Booster Valve |
| 5 | Ś | Main Regulator Spring |
| 6 | Ś | Booster Spring |
| 7 | Ś | Main Regulator Valve |
| Item | Part Number | Description |
|---|---|---|
| 1 | Ś | Plug |
| 2 | Ś | Retainer |
| 3 | Ś | Backout Valve |
| 4 | Ś | Backout Valve Spring |
| 5 | Ś | Bore 211 |
| 6 | Ś | 1-2 Transition Valve |
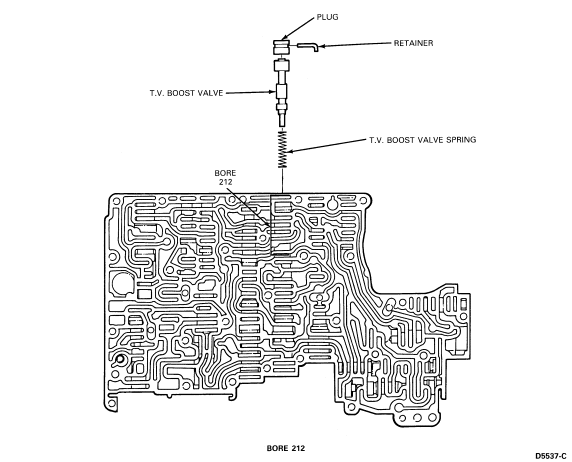
NOTE: TV boost valve and spring are calibration dependent. With longer valve (approximately .015 inch) spring is omitted.
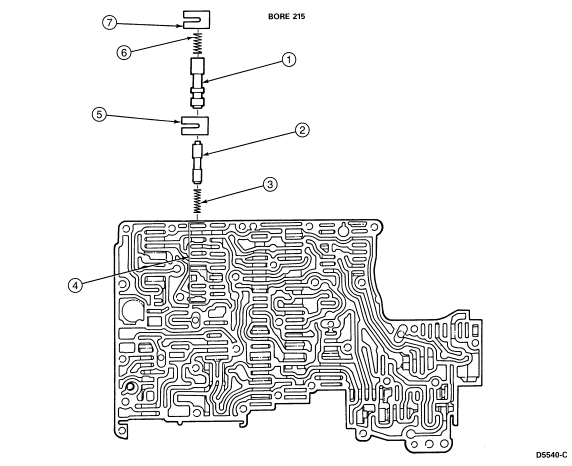
| Item | Part Number | Description |
|---|---|---|
| 1 | Ś | 3-2 High Clutch Kickdown Control Valve |
| 2 | Ś | 3-2 Intermediate Servo Kickdown Control Valve |
| 3 | Ś | 3-2 Intermediate Servo Kickdown Control Spring |
| 4 | Ś | Bore 215 |
| 5 | Ś | Retainer |
| 6 | Ś | 3-2 High Clutch Kickdown Control Spring |
| 7 | Ś | Retainer |
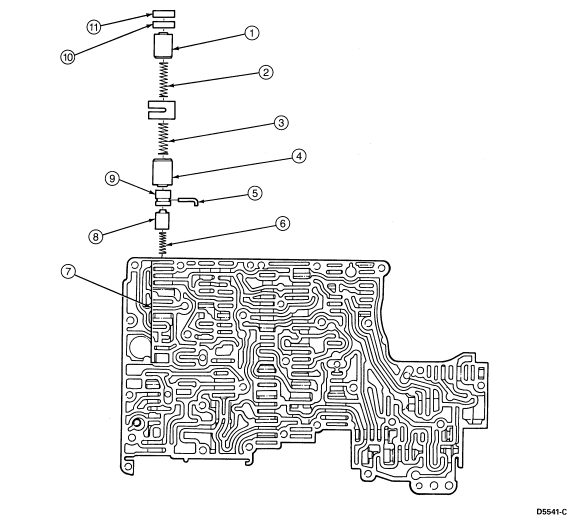
| Item | Part Number | Description |
|---|---|---|
| 1 | Ś | Intermediate Servo Release Accumulator Valve |
| 2 | Ś | Intermediate Servo Release Accumulator Spring |
| 3 | Ś | Overdrive Servo Release Accumulator Spring |
| 4 | Ś | Overdrive Servo Release Accumulator Valve |
| 5 | Ś | Retainer |
| 6 | Ś | 3-4 Backout Valve Spring |
| 7 | Ś | Bore 216 |
| 8 | Ś | 3-4 Backout Valve |
| 9 | Ś | Plug |
| 10 | Ś | Plug |
| 11 | Ś | Retaining Plate |
CAUTION: Make sure all holes in gasket line up with holes in separator plate.
NOTE: Make sure all check balls, retainers, blow-off springs and valves are installed properly.
Main Control Valve Body
NOTE: Petroleum jelly can be used to hold gasket in place.
NOTE: Use petroleum jelly to hold gasket in place.