Section 05-02B: Axle, Integral Carrier — 8.8 Inch Ring Gear
1993 Mustang Workshop Manual
MAJOR SERVICE OPERATIONS

Differential Case and Drive Pinion


Removal

  1. Raise vehicle and place jackstands under rear frame crossmember. Refer to Section 00-02. Lower the hoist so that the axle is at suitable working height.
  1. Remove cover from the carrier rear face and drain lubricant.
  1. Perform the inspection before disassembly. Refer to Cleaning and Inspection.
  1. Remove rear wheels and brake drums.
  1. Working through cover opening, remove pinion shaft lock bolt and remove the pinion shaft and pinion gears.


  1. Push axle shaft inward until C-locks at button end of the shaft are clear of the side gear recess.

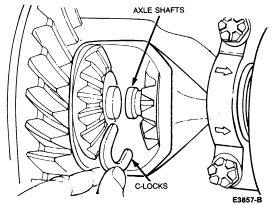
     CAUTION: Care should be taken not to damage wheel seals when removing axle shafts from axle housing. In addition, axle shafts should be completely removed from axle housing.

  1. Remove C-locks and pull axle shafts out of the housing.


  1. Make scribe marks on the driveshaft, yoke and rear axle circular companion flange to ensure proper alignment at assembly. Disconnect driveshaft from circular companion flange. Remove driveshaft assembly from vehicle. Insert an oil seal replacement tool in the transmission extension housing to prevent leakage.


  1. Mark one differential bearing cap to help position the caps properly during assembly.


  1. Loosen differential bearing cap bolts and bearing caps.

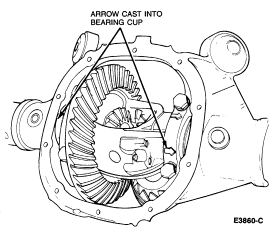
    Note direction of arrows on bearing caps. When assembled, the arrows must be pointing in the same direction as before removal.

  1. Pry differential case, bearing cups and shims out until they are loose in the bearing caps. Remove bearing caps and remove differential assembly from carrier.


  1. Inspect the differential bearings and cups for damage. If they are damaged, remove the differential bearings using Differential Side Bearing Remover T70P-4221-A and Step Plate T81P-4220-A.


  1. Install new bearings using Differential Side Bearing Replacer T57L-4221-A2.


  1. Mark circular companion flange in relation to the pinion shaft. Hold the rear axle companion flange with Companion Flange Holding Tool T78P-4851-A and remove the pinion nut. If a new gearset is being installed, the circular companion flange need not be marked.


  1. Remove circular companion flange with Companion Flange Remover T65L-4851-B or equivalent.


  1. With a soft-faced hammer, drive the pinion out of the front bearing cone and remove through the rear of the carrier.
  1. Remove pinion oil seal as outlined.

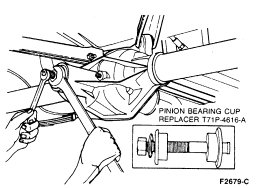
    NOTE: To ensure proper seating, clean bores before installing new cups.

  1. Inspect pinion bearing cups and if damaged remove from carrier casting by tapping alternately (with a brass drift of suitable length) on each side of the cups to prevent cups from cocking in the carrier bore.
  1. Install the new cups with Pinion Bearing Cup Replacer T71P-4616-A. Make sure the cups are properly seated in their bores. If a 0.038mm (0.0015 inch) feeler gauge can be inserted between a cup and the bottom of its bore at any point around the cup, the cup is not properly seated. Whenever the cups are replaced, the cone and roller assembly should also be replaced.


  1. To remove and install the pinion rear cone and roller assembly, use Pinion Bearing Cone Remover T71P-4621-B and Pinion Bearing Cone Replacer T53T-4621-C.


Pinion Rear Bearing Removal


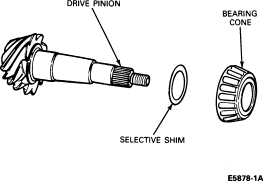
NOTE: Measure the shim, which is found under the bearing cone, with a micrometer and record the thickness (as a reference to be compared to the shim gauge reading prior to installing the bearing).

  1. Remove the selective shim from the drive pinion.


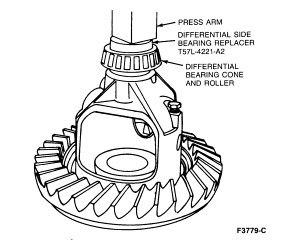
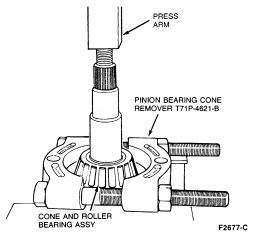
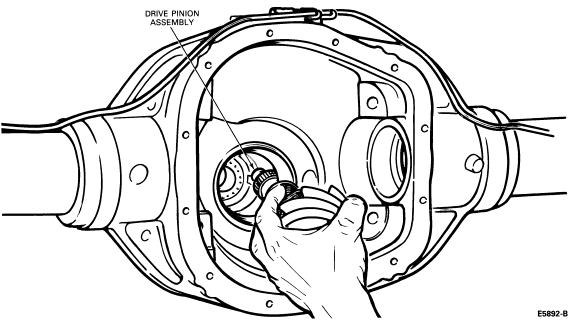
    NOTE: The same rear pinion bearing used in this procedure must be used in final assembly of the axle.

  1. Place the selected shim(s) on the pinion and press the pinion bearing cone and roller assembly until it is firmly seated on the shaft.


Pinion Rear Bearing Installation


  1. Check splines on pinion stem to be sure they are free of burrs. If burrs are evident, remove by using a fine crocus cloth, working in a rotational motion. Wipe pinion clean.

    Place a new collapsible spacer on pinion stem against the pinion stem shoulder.


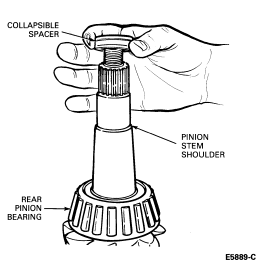
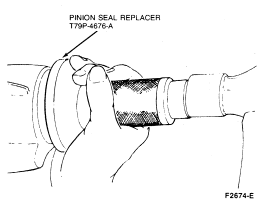
    NOTE: Clean the oil seal surface before installing the seal in the housing bore. Coat lips of seal with Premium Long-Life Grease XG-1-C (ESA-M1C75-B) or equivalent.

  1. Install the front pinion bearing and oil slinger in the housing bore and install the pinion seal on the Pinion Seal Replacer T79P-4676-A.


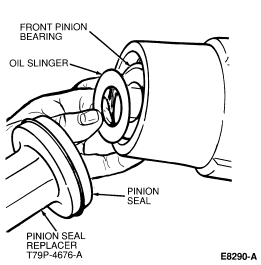
     CAUTION: Installation without the proper tool may result in early seal failure. If seal becomes cooked during installation, remove it and install new one.

  1. Install pinion seal in carrier.


  1. From rear of axle housing, install drive pinion assembly (drive pinion, shim(s), rear bearing cone and roller and collapsible spacer) into the housing pinion shaft bore.


  1. Apply a small amount of Rear Axle Lubricant to circular companion flange splines.

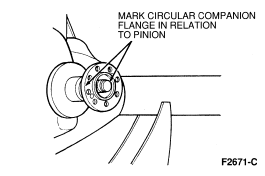
    NOTE: If a new circular companion flange is being installed, disregard the scribe mark on the pinion stem.

  1. Align mark on circular companion flange with mark on the pinion shaft.
  1. With drive pinion in place in housing, install companion flange using Companion Flange Replacer TOOL-4858-E or equivalent.

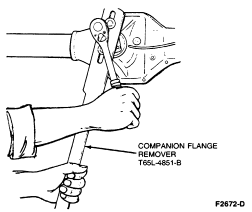
     CAUTION: The circular companion flange must never be hammered on or installed with power tools.

  1. Install a new pinion nut on pinion shaft (apply a small amount of lubricant on the washer side of nut).
  1. Hold the circular companion flange with Companion Flange Holding Tool T78P-4851-A while tightening the nut.


  1. Tighten pinion nut. Rotate pinion occasionally to ensure proper bearing seating. Take frequent pinion bearing torque preload readings until the original recorded preload reading is obtained.

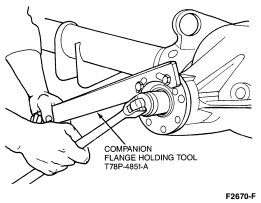
     CAUTION: Under no circumstances should the pinion nut be backed-off to reduce preload. If reduced preload is required, a new collapsible pinion spacer and pinion nut must be installed.

  1. If the original recorded preload is less than specification, tighten to 0.9-1.5 Nm (8-14 lb-in) bearings, 1.8-3.2 Nm (16-29 lb-in) new bearings. If the preload is higher than specification, tighten to original reading as recorded.
  1. Remove oil seal replacer tool from the transmission extension housing. Install the front end of the driveshaft on the transmission output shaft.
  1. Connect the rear end of the driveshaft to the circular companion flange, aligning the scribe marks on the driveshaft and circular companion flange. Tighten driveshaft-to-circular companion flange bolts to 95-130 Nm (71-95 lb-ft).

     CAUTION: Overfilling axle can cause axle vent or seal leakage.

  1. Fill axle with lubricant until fluid level is within 6-14mm (1/4-9/16 inch) below bottom of filter hole with the axle in operating position. Refer to Specifications. Install filter plug. Tighten to 20-41 Nm (15-30 lb-ft).
  1. Ensure axle vent is not plugged with debris.