A2 CHECK PRINTED CIRCUIT SUPPLY CIRCUITS
- Measure resistance of Circuit 640 (R/Y) between load side of Fuse 15
(10A) and each of the following pins of instrument cluster connectors J1 and J2.
J1 Pin 16 J2 Pin 8
- Is resistance less than one ohm for all circuits?
PINPOINT TEST B: FUEL LEVEL READS ERRONEOUSLY
B1 VERIFY POWER AT FUSE PANEL (LOAD SIDE)
- Use voltmeter to verify system voltage at load side of warning indicator Fuse 15 (10A).
- Is voltage present at load side of fuse
B2 VERIFY POWER AT FUSE PANEL (FEED SIDE)
- Use voltmeter to verify system voltage at feed side of warning indicator Fuse 15 (10A).
- Is voltage present at feed side of fuse?
B3 VERIFY POWER AT CLUSTER
- Instrument cluster connectors installed.
- Partially remove instrument cluster .
- Check for voltage at instrument cluster connector and gauge terminal.
- Use Rotunda Digital Volt-Ohmmeter 007-00001 or equivalent.
- Is voltage at instrument cluster connector and gauge terminal?
B4 VERIFY GROUND CIRCUIT AT CLUSTER
- Use Rotunda Digital Volt-Ohmmeter 007-00001 or equivalent to check continuity of instrument cluster and gauge ground circuits.
- Is there continuity?
B5 CHECK TEST BOX (LOW)
- Turn ignition switch to OFF position.
- Insert Rotunda Instrument Gauge System Tester 021-00055 or equivalent in sender circuit.
- Disconnect rear lamp wiring connector under instrument panel and connect tester to cluster side of connector.
- Set tester to 22 ohms.
- Turn ignition switch to RUN position, wait 60 seconds and read fuel gauge.
- Does fuel gauge read EMPTY?
B6 CHECK TEST BOX (RETEST)
- Turn ignition switch to OFF position.
- Turn ignition switch to RUN position.
- Tap lightly on instrument cluster , wait 60 seconds and read fuel gauge .
- Does fuel gauge read EMPTY?
B7 ANTI-SLOSH MODULE BYPASS TEST
- Turn ignition switch to OFF position.
- Remove instrument cluster and inspect instrument cluster printed circuit.
- Remove instrument cluster gauge amplifier and connect a jumper wire from Gauge Tester directly to fuel gauge 'SIG' terminal.
- Install instrument cluster.
- Turn ignition switch to RUN position and read fuel gauge .
- Does fuel gauge read EMPTY?
B8 CHECK TEST BOX (HIGH)
- Turn ignition switch to OFF position.
- With Rotunda Gauge System Tester 021-00055 or equivalent connected as in Step D1, set tester to 145 ohms.
- Turn ignition switch to RUN position.
- Wait 60 seconds and read fuel gauge .
- Does fuel gauge read FULL?
B9 ANTI-SLOSH MODULE BYPASS TEST
- Turn ignition switch to OFF position.
- Remove instrument cluster and inspect instrument cluster printed circuit.
- Remove instrument cluster gauge amplifier.
- Connect a jumper wire from tester to fuel gauge 'SIG' terminal.
- Turn ignition switch to RUN position and read fuel gauge .
- Does fuel gauge read FULL?
B10 INSPECT FUEL TANK
- Inspect fuel tank for damage or distortion.
- Is there damage?
B11 CHECK TEST BOX - EMPTY STOP
- Connect one lead of Digital Volt-Ohmmeter 007-00001 or equivalent to the
fuel sender signal lead and the other lead to ground.
NOTE: Float rod is against empty stop (closest to filter).
- Does ohmmeter read between 14-18 ohms?
B12 CHECK TEST BOX - FULL STOP
- Connect one lead of Digital Volt-Ohmmeter 007-00001 or equivalent to the
fuel sender signal lead and the other lead to sender ground.
NOTE: Float rod is against full stop.
- Does ohmmeter read between 155-165 ohms?
B13 CHECK FLOAT ROD LEVEL
- Connect one lead to Digital Volt-Ohmmeter 007-00001 or equivalent to the fuel sender signal lead and the other lead to sender ground.
- Slowly move float rod from full stop to empty stop.
- Does ohmmeter reading slowly decrease?
B14 CHECK ANTI-SLOSH/LOW FUEL WARNING
- Turn ignition switch to the OFF position.
- Connect Rotunda Instrument Gauge System Tester 021-00055 or equivalent in sender circuit.
- Disconnect Circuit rear lamp wiring connector under instrument panel and connect tester to cluster side of connector.
- Set tester to 56 ohms.
- Turn ignition switch to the RUN position, wait 60 seconds.
- Is low fuel indicator on?
B15 CHECK GAUGE AND INDICATOR
- Turn ignition switch to the OFF position.
- Reset tester to 33 ohms.
- Turn ignition switch to the RUN position.
- Wait 60 seconds.
- Is indicator on, and gauge showing 1/8 tank?
B16 CHECK INDICATOR
- With ignition switch in the ON position, ground indicator circuit between indicator and low fuel level warning switch .
- Is indicator on?
B17 CHECK INDICATOR BULB
- Turn ignition switch switch off.
- Remove instrument cluster as outlined.
- Remove indicator bulb using an ohmmeter check bulb continuity.
- Does bulb test OK?
PINPOINT TEST C: COOLANT TEMPERATURE READS ERRONEOUSLY
C1 CHECK POWER AT CLUSTER
- Turn ignition switch to the OFF position.
- Partially remove instrument cluster .
- Turn ignition switch to RUN position.
- Using a voltmeter check for voltage at cluster connector pin per chart.
Connector Pin Circuit Function J1 16 640 (R/Y) Ignition Voltage J1 15 563 (O/Y) Gauge Ground J1 14 39 (R/W) Coolant Temp Input
- Is system voltage present?
C2 CHECK CLUSTER GROUND
- Using an ohmmeter connected to a known good ground, connect other end to ground circuit per chart above.
- Is resistance .5 ohms or less?
C3 CHECK SENDER UNIT CIRCUIT AT LOW
- Insert Rotunda Instrument Gauge, System Tester 021-00055 or equivalent. Disconnect connector at water temperature indicator sender unit and connect tester to cluster side of connector. Set to 74 ohms.
- Turn ignition switch to RUN position.
- Does gauge read cold?
C4 CHECK SENDER UNIT CIRCUIT AT HIGH
- Set Gauge System Tester to 10 ohms.
- Does gauge read hot?
C5 CHECK COOLANT TEMPERATURE INPUT CIRCUIT
- With ignition switch in the RUN position, using a test lamp connected to known good ground, connect probe to sending unit connector.
- Did test lamp illuminate?
C6 CHECK CIRCUIT 39 (R/W)
- Turn ignition switch to OFF position. Remove instrument cluster as outlined.
- Turn ignition switch to RUN position. Using test lamp check Circuit 39 (R/W) at instrument
cluster connector per chart.
Connector Pin Circuit Function J1 16 640 (R/Y) Ignition Voltage J1 15 563 (O/Y) Gauge Ground J1 14 39 (R/W) Coolant Temp Input
- Did test lamp illuminate?
C7 CHECK COOLANT TEMPERATURE GAUGE
- Turn ignition switch to OFF position.
- Disconnect cluster connectors.
- Using an ohmmeter, check gauge for continuity at contact clips.
- Is there continuity at all clips?
C8 CHECK PRINTED CIRCUIT
- Reconnect cluster connectors.
- Using an ohmmeter, check for continuity from gauge contact clips to
cluster connectors per chart.
Connector Pin Circuit Function J1 16 640 (R/Y) Ignition Voltage J1 15 563 (O/Y)) Gauge Ground J1 14 39 (R/W) Coolant Temp Input
- Is there continuity at all circuits?
PINPOINT TEST D: OIL PRESSURE READS ERRONEOUSLY
D1 CHECK POWER AT CLUSTER
- Turn ignition switch to the OFF position.
- Partially remove instrument cluster .
- Turn ignition switch to RUN position.
- Using a voltmeter check for voltage at cluster connector pin per chart.
Connector Pin Circuit Function J2 4 640 (R/Y) Ignition Voltage J2 3 875 (BK/LB) Gauge Ground J2 2 31 (W/R) Oil Pressure Input
- Is system voltage present?
D2 TEST SENDER CIRCUIT AT LOW
- Place ignition switch in the ON position with engine OFF. Observe gauge performance.
- Does gauge read "L" or below?
D3 CHECK GAUGE RESPONSE
- Disconnect oil pressure sender and short the lead to engine ground.
- Does gauge indicate mid-scale or slightly above mid-scale?
D4 CHECK CIRCUIT 31 (W/R)
- Leave oil pressure input circuit shorted to ground.
- Turn ignition switch to the OFF position. Remove instrument cluster as outlined.
- Using an ohmmeter connected to a known good ground, connect second lead to Connector J2, Pin 2. Measure resistance.
- Is resistance .5 ohms or less?
D5 CHECK OIL PRESSURE GAUGE
- Disconnect instrument cluster connectors.
- Using an ohmmeter check gauge for continuity at contact clips.
- Is there continuity at all clips?
D6 CHECK PRINTED CIRCUIT
- Reconnect cluster connectors.
- Using an ohmmeter check for continuity from gauge contact clips to
cluster connectors per chart.
Connector Pin Circuit Function J2 4 640 (R/Y) Ignition Voltage J2 3 875 (BK/LB) Gauge Ground J2 2 31 (W/R) Oil Pressure Input
- Is there continuity at all circuits?
PINPOINT TEST E: CHARGE INDICATION READS ERRONEOUSLY
E1 LAMP CHECK NO. 1
- Engine OFF.
- Key in OFF position.
- Is charge indicator on?
E2 LAMP CHECK NO. 2
- Engine OFF.
- Key in RUN position.
- Is charge indicator on?
E3 LAMP CHECK NO. 3
- Key in RUN position.
- Engine running.
- Is charge indicator on?
E4 INOPERATIVE INDICATOR LAMP
- Key in ON position.
- Engine OFF.
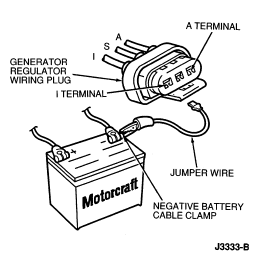
- Disconnect regulator connector and ground 'I' terminal.
- Is charge indicator on?
E5 CHECK CIRCUIT 904 (LG/R) FOR OPEN
- Turn ignition switch to the OFF position.
- Remove instrument cluster as outlined.
- Using an ohmmeter connected to a known good ground, connect second lead to pin per chart.
- Measure resistance.
CONNECTOR J1 Pin Circuit Function 10 904 (LG/R) Charge Indicator Input
- Is resistance 5 ohms or less?
E6 CHECK CIRCUIT 904 (LG/R) FOR SHORT
- Disconnect instrument cluster connectors.
- Disconnect voltage regulator connector.
- Using an ohmmeter connected to a known good ground, connect second lead to pin per chart.
- Measure resistance.
CONNECTOR J1 Pin Circuit Function 10 904 (LG/R) Charge Indicator Input
- Is resistance 5 ohms or less?
E7 CHECK CIRCUIT 16 (R/LG) FOR VOLTAGE
- Turn ignition switch to the RUN position.
- Using a test lamp connected to a known good ground, connect other end to
pin per chart.
CONNECTOR J1 Pin Circuit Function 11 16 (R/LG) Charge Indicator Input
- Did test lamp illuminate?
E8 CHECK CHARGE INDICATOR LAMP
- Remove charge indicator lamp bulb.
- Using an ohmmeter, check continuity of bulb.
- Is bulb continuity OK?
PINPOINT TEST F: SPEEDOMETER READS ERRONEOUSLY
F1 CHECK SPEED SIGNAL
- Raise drive wheels off the ground.
- Disconnect vehicle speed sensor connector.
- Connect an AC voltmeter between the two output pins on the automatic transmission mounted vehicle speed sensor (VSS).
- Operate vehicle.
- Is voltage between 1.3-6.1 volts AC?
F2 CHECK DRIVEN GEAR
- Disconnect vehicle speed sensor (VSS) from automatic transmission. Verify presence of speedometer gear with all teeth in good condition and presence of retainer clip.
- Are driven gear teeth OK and is clip present?
F3 CHECK DRIVE GEAR
- Verify presence of speedometer drive gear on output shaft .
- Is drive gear present?
F4 CHECK CIRCUIT 679 (GY/BK) FOR SHORT TO GROUND
- Turn ignition switch to the OFF position.
- Remove instrument cluster as outlined.
- Using an ohmmeter connected to a known good ground, connect second lead to Circuit 679 (GY/BK) per chart.
- Measure resistance.
Conn: Pin Circuit Function J1 4 54 (LG/Y) Power Input J1 6 676 (PK/O) Vehicle Speed Input (-) J1 7 640 (R/Y) Power Input J1 5 679 (GY/BK) Vehicle Speed Input (+)
- Is resistance 5 ohms or less?
F5 CHECK CIRCUIT 679 (GY/BK) FOR OPEN CIRCUIT
- Using a jumper wire connected to a known good ground, connect other end to Circuit 679 (GY/BK) at vehicle speed sensor connector.
- Measure resistance.
- Is resistance 300 ohms or less?
F6 CHECK CIRCUIT 676 (PK/O)
- Disconnect ohmmeter from Circuit 679 (GY/BK), connect ohmmeter to Circuit 676 (PK/O) per chart.
- Measure resistance to known good ground.
Conn: Pin Circuit Function J1 4 54 (LG/Y) Power Input J1 7 640 (R/Y) Power Input J1 6 676 (PK/O) Vehicle Speed Input (-) J1 5 679 (GY/BK) Vehicle Speed Input (+)
- Is resistance 5 ohms or less?
F7 CHECK CLIP TO CLUSTER CIRCUIT CONNECTOR
- Disconnect instrument cluster connectors.
- Using ohmmeter check speedometer for continuity from contact clips to printed circuit.
- Is there continuity at all clips?
F8 CHECK PRINTED CIRCUIT
- Reconnect cluster connectors.
- Using an ohmmeter check for continuity from speedometer contact clips to
cluster connectors per chart.
Conn: Pin Circuit Function J1 4 54 (LG/Y) Power Input J1 7 640 (R/Y) Power Input J1 6 676 (PK/O) Vehicle Speed Input (-) J1 5 679 (GY/BK) Vehicle Speed Input (+)
- Is there continuity at all circuits?
PINPOINT TEST G: ODOMETER READS ERRONEOUSLY
G1 CHECK SPEEDOMETER
- Road test vehicle.
- Is speedometer operating?
G2 CHECK ODOMETER
- Drive vehicle over a known distance.
- Is odometer reading accurately?
PINPOINT TEST H: TACHOMETER NOT REFLECTING ENGINE SPEED
H1 CHECK SUPPLY TO GAUGE
- Turn ignition switch to OFF position.
- Partially remove instrument cluster panel , as outlined, to gain access to the cluster connectors.
- Turn ignition switch to the RUN position.
- Using a voltmeter check voltage at Circuit 640 (R/Y) at Connector J2, Pin 4.
- Is battery voltage present?
H2 CHECK GAUGE GROUND
- Using an ohmmeter connected to a known good ground, connect second lead to Circuit 397 (BK/W) and 651 (BK/Y) at Connector J2, Pin 9 and Pin 11.
- Measure resistances.
- Are resistances 5 ohms or less?
H3 CHECK TACHOMETER INPUT CIRCUIT
- Turn ignition switch to OFF position.
- Disconnect cluster Connector J2.
- Disconnect ignition coil, or DIS.
- Using an ohmmeter, measure resistance of Circuit 11 (T/Y) from ignition coil Connector or DIS Connector to cluster J2 Connector.
- Is resistance 1.8K ohms or less?
H4 CHECK CLUSTER CLIP TO CLUSTER CIRCUIT CONNECTION
- Reconnect cluster Connector J2.
- Using an ohmmeter check for continuity from the tachometer connector clips to instrument cluster printed circuit.
- Is there continuity?
H5 CHECK PRINTED CIRCUIT
- Using an ohmmeter, check each circuit listed below for continuity from
gauge connector clips to cluster Connector J2.
Conn: Pin Circuit Function J2 1 397 (BK/W) and
651 (BK/Y)Ground J2 8 640 (R/Y) Run/Start Power J2 10 11 (T/Y) Tachometer Input
- Is there continuity at all circuits?
PINPOINT TEST I: ALL WARNING INDICATORS INOPERATIVE
I1 CHECK CLUSTER GROUND
- Turn ignition switch to OFF position.
- Partially remove instrument cluster as outlined.
- Using an ohmmeter connected to a known good ground, connect second lead to Circuit 57 (BK) at connector J1, Pin 12.
- Measure resistance.
- Is resistance 5 ohms or less?
I2 CHECK SUPPLY AT CLUSTER
- Turn ignition switch to RUN position.
- Using a test lamp check Circuits 54 (LG/Y) and 640 (R/Y) at Connector J1.
- Did test lamp illuminate?
PINPOINT TEST J: LOW COOLANT LEVEL INDICATION NOT OPERATING PROPERLY
J1 CHECK COOLANT LEVEL
- When the engine is cold, observe level of coolant in radiator coolant recovery reservoir .
- Is coolant level below FULL HOT mark?
J2 CHECK COOLANT LEVEL—ENGINE RUNNING
- Fill coolant to the FULL HOT mark on the radiator coolant recovery reservoir .
- Start vehicle and observe low coolant indicator .
- Does low coolant indicator illuminate then stay off?
J3 CHECK INDICATOR WIRING
- Turn ignition to RUN.
- Using a jumper wire, ground Circuit 794 (LB) wire at instrument cluster.
- Does indicator turn on?
J4 CHECK INDICATOR
- Turn ignition switch to RUN.
- Using a jumper wire, ground Circuit 794 (LB) wire at instrument cluster .
- Does indicator turn ON?
J5 CHECK VOLTAGE TO SENSOR CIRCUIT 640 (R/Y)
- Measure voltage on Circuit 640 (R/Y) at low coolant level warning sensor .
- Is voltage at least 10 volts?