Section 03-01A: Engine, 3.8L | 1994 Mustang Workshop Manual |
IN VEHICLE SERVICE
Intake Manifold
Upper
Removal
- Remove air cleaner outlet tube (9B659). Refer to Section 03-12.
- Disconnect accelerator cable (9A758) at throttle body (9E926)
. Disconnect speed control actuator (9A825)
, if equipped.
- Remove retaining bolts from accelerator cable bracket (9723)
and position cables aside.
- Disconnect vacuum lines at intake manifold (9424)
.
- Disconnect necessary electrical connectors.
- Disconnect one crankcase ventilation tube (6758)
at the upper intake manifold
and at positive crankcase ventilation valve (PCV valve) (6A666)
.
- Remove throttle body, if necessary.
- Remove the EGR valve (EGR valve) (9D475)
from the upper intake manifold
. Refer to Section 03-08.
- Remove the nut and bolt retaining engine support and wiring retainer
bracket located at the LH front of the intake manifold
and set aside with ignition wires.
- Remove upper intake manifold retaining bolts/studs.
- Remove upper intake manifold and intake manifold upper gasket (9H486)
.
| Item |
Part Number |
Description |
|
1A
|
N804839-S2
|
Bolt (6 Req'd)
|
|
2
|
9424
|
Lower Intake Manifold
|
|
3
|
—
|
Locating Pins (2 Req'd)
|
|
4
|
9H486
|
Intake Manifold Upper Gasket
|
|
5
|
9424
|
Upper Intake Manifold
|
|
A
|
|
Tighten in sequence in three steps:
· 10 Nm
(8 Lb-Ft)
· 20 Nm (15
Lb-Ft)
· 32 Nm (24 Lb-Ft)
|
Installation
NOTE: Use locating pins to secure position of intake manifold upper gasket
between intake manifolds
.
- Position intake manifold upper gasket and intake manifold
on top of lower intake manifold.
- Install bolts and stud bolts in original locations.
Tighten in sequence as listed under Step 18 in three steps:
- 10 Nm (8 Lb-Ft)
- 20 Nm (15 Lb-Ft)
- 32 Nm (24 Lb-Ft)
- Install engine support and wiring bracket and retaining nut and bolt to LH
front of the intake manifold. Tighten retainers to 20-30 Nm (15-22 lb-ft).
- Install the EGR valve as outlined in Section 03-08.
- Install throttle body, if removed. Cross-tighten retaining nuts to 20-30 Nm
(15-22 lb-ft).
| Item |
Part Number |
Description |
|
1
|
9424
|
Upper Intake Manifold
|
|
2
|
—
|
Stud (Part of 9424)
|
|
3
|
9E936
|
Throttle Body Gasket
|
|
4
|
9E926
|
Throttle Body
|
|
5A
|
N805620
|
Stud Bolt
|
|
6A
|
N804178
|
Nut (3 Req'd)
|
|
A
|
|
Tighten to 20-30 Nm (15-22 Lb-Ft)
|
- Connect rear crankcase ventilation tube
at positive crankcase ventilation valve
on the upper intake manifold
.
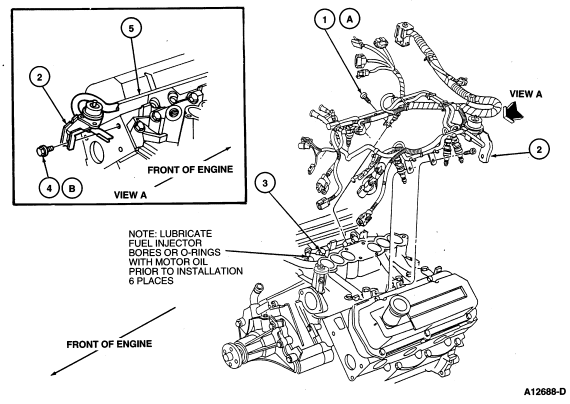
| Item |
Part Number |
Description |
|
1A
|
N805117-S8M
|
Bolt (4 Req'd)
|
|
2
|
9F792
|
Fuel Injection Supply Manifold
|
|
3
|
9424
|
Intake Manifold
|
|
4B
|
N606691-S2
|
Bolt
|
|
5
|
6049
|
Cylinder Head
|
|
A
|
|
Tighten to 8-11.5 Nm (6-8.5 Lb-Ft)
|
|
B
|
|
Tighten to 20-30 Nm (15-22 Lb-Ft)
|
- Connect necessary fuel charging wiring connectors.
- Connect necessary vacuum hoses.
- Position accelerator cable bracket
. Install and tighten retaining bolts to 14-20 Nm
(10-15 lb-ft).
- Connect accelerator cable at throttle body
. Connect speed control actuator
, if so equipped.
- Install air cleaner outlet tube. Refer to Section 03-12.
- Check and, if necessary, adjust engine idle airflow. Refer to Powertrain Control/Emissions Diagnosis Manual.
- Check and adjust accelerator cable if necessary. Refer to Section 10-02.
- Check and adjust speed control actuator if necessary. Refer to Section 10-03.
Lower
- Drain engine cooling system as outlined in Section 03-03.
- Remove upper intake manifold as outlined.
- Remove fuel injector (9F593)
and fuel injection supply manifold (9F792)
. Refer to Section 03-04A.
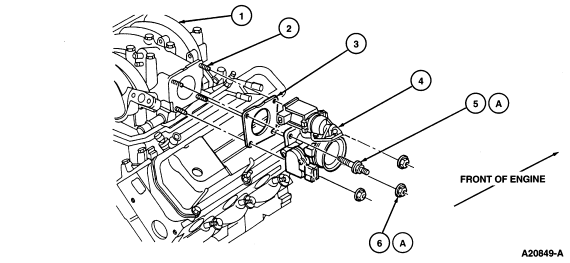
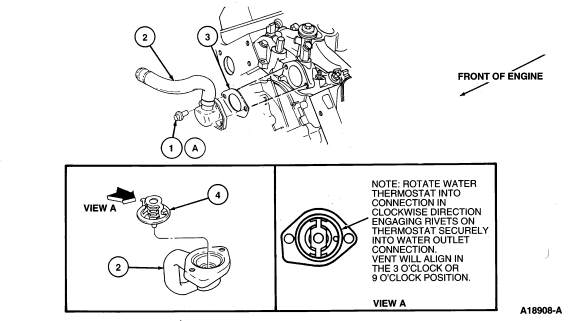
- Remove heater water outlet hose.
- Remove lower intake manifold retaining bolts/studs.
 CAUTION: The intake manifold is sealed at each end with RTV-type sealer. To
break the seal, it may be necessary to pry on the front of the intake manifold
with a screwdriver blade. If it is necessary to pry on the intake manifold use
care to prevent damage to machined surfaces.
CAUTION: The intake manifold is sealed at each end with RTV-type sealer. To
break the seal, it may be necessary to pry on the front of the intake manifold
with a screwdriver blade. If it is necessary to pry on the intake manifold use
care to prevent damage to machined surfaces.
- Remove lower intake manifold
.
- Remove and discard intake manifold gasket (9439)
and end seals.
- If lower intake manifold
is to be disassembled, perform the following:
| Item |
Part Number |
Description |
|
1A
|
—
|
Bolt (2 Req'd)
|
|
2
|
8592
|
Water Outlet Connection
|
|
3
|
8255
|
Water Outlet Connection Gasket
|
|
4
|
8575
|
Water Thermostat
|
|
A
|
|
Tighten to 20-30 Nm (15-22 Lb-Ft)
|
Installation
NOTE: Lightly oil all retaining bolt and stud threads before installation.
NOTE: When using silicone rubber sealer, assembly must occur within 15 minutes
after sealer application. After this time, the sealer may start to set-up, and
its sealing effectiveness may be reduced.
- The lower intake manifold, cylinder head (6049)
, and cylinder block mating surfaces should be clean and
free of old gasketing material. Use a suitable solvent to clean these surfaces.
- If intake manifold was disassembled:
- Apply a coat of Pipe Sealant with Teflon® D8AZ-19554-A or
equivalent meeting Ford specification WSK-M2G350-AZ and ESR-M18P7-A to the
threads of the engine coolant temperature sensor
, all vacuum fittings, heater elbows, and electrical
fittings, if equipped. Refer to Specifications.
- Install water outlet connection (note direction) and water outlet connection gasket (8255)
. Install water outlet connection
. Tighten retaining bolts to 20-30 Nm (15-22 lb-ft).
NOTE: Using solvent, clean sealing surfaces of cylinder heads
and intake manifold
before applying Silicone Sealer.
- Apply a dab of Gasket and Trim Adhesive D7AZ-19B508-B or equivalent meeting
Ford specifications ESR-M11P17-A and ESE-M2G52-A to each cylinder head mating
surface. Press new intake manifold gasket
into place, using location pins as necessary to aid in
assembly.
- Apply a 3-4mm (1/8 inch) bead of Silicone Rubber D6AZ-19562-BA or AA or
equivalent meeting Ford specifications ESB-M4G92-A or ESE-M4G195-A at each
corner where the cylinder head
joins the cylinder block (6010)
.
- Install front and rear intake manifold end seals.
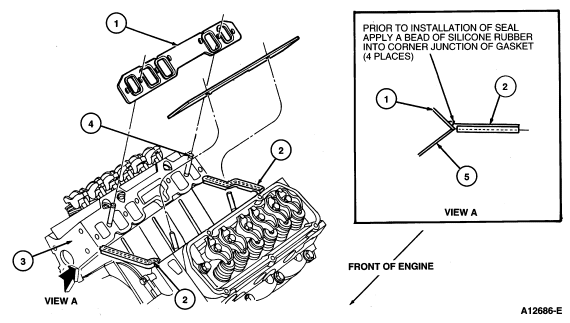
| Item |
Part Number |
Description |
|
1
|
9439
|
Intake Manifold Gasket
|
|
2
|
—
|
End Seal (Part of 9439)
|
|
3
|
6049
|
Cylinder Head
|
|
4
|
—
|
Locating Pin (4 Req'd)
|
|
5
|
6051
|
Head Gasket
|
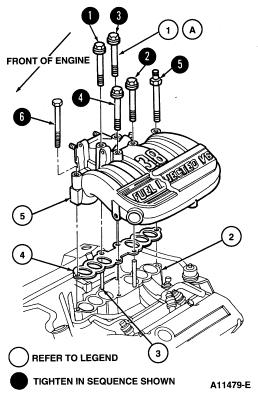
- Carefully lower intake manifold
into position on cylinder block
and cylinder head
. Use locating pins as necessary to guide intake manifold
.
- Install bolts and stud bolt in their original locations.
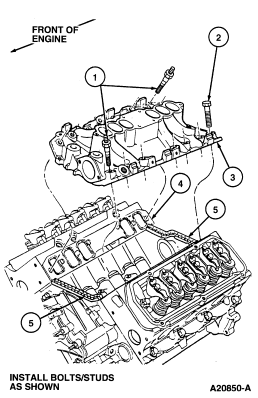
| Item |
Part Number |
Description |
|
1
|
M8X1.25X81
|
Stud Bolt (2 Req'd)
|
|
2
|
M8X1.25X55
|
Bolt (12 Req'd)
|
|
3
|
9424
|
Lower Intake Manifold
|
|
4
|
9439
|
Intake Manifold Gasket
|
|
5
|
—
|
End Seal (Part of 9439)
|
- Tighten bolts and stud bolt in numerical sequence to the following
specifications in two steps:
- 11 Nm (8 lb-ft).
- 20 Nm (15 lb-ft).
- Install front crankcase ventilation tube
so that the mounting bracket sits over the lower intake
manifold stud. Tighten nut on stud to 20-30 Nm (15-22 lb-ft).
- Install fuel injector and fuel injection supply manifold
. Tighten screws
to 8-11 Nm (6-8 lb-ft).
- Install upper intake manifold as outlined.
CAUTION: This engine has aluminum cylinder heads and requires a special
corrosion inhibiting coolant to avoid cooling system damage. Refer to Section 03-03 for the coolant specifications.
- Fill engine cooling system as outlined in Section 03-03.
- Start engine and check for leaks.