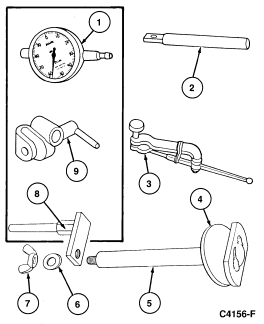
Section 08-00: Clutch System—Service
1994 Mustang Workshop Manual
ADJUSTMENTS

Bore and Face Runout Correction Procedure

Lift the clutch pedal (7519) to its uppermost position to disengage the clutch and brake pedal pivot shaft (7506) . Hold in this position and, with a rubber band or tape, disengage clutch release lever cable (7535) from clutch release shaft (7515) .

  1. On vehicles with five-speed transmission, remove the transmission and remove the flywheel housing (6392) from rear face of engine (6007) . Refer to Section 07-03.
  1. Inspect, clean and/or remove all nicks, burrs, paint and other foreign material from the following:
  1. Install the engine rear plate and flywheel housing , less the clutch release shaft , and clutch release hub and bearing (7548) to the engine, less the transmission.
  1. Install Clutch Alignment Tool D83P-6392-A or equivalent with dial indicator post attached through flywheel housing bore and onto the clutch pressure plate fingers. The oblong washer is to be forward of the clutch pressure plate fingers, while the round washer will remain on the rearward side with the tabs contacting the fingers. Tighten the nut on the end of the post assembly until the washers grip the clutch pressure plate fingers tightly.


    Item Part Number Description
    1 TOOL-4201-C Dial Indicator Assy
    2 T75L-4201-B Clutch Housing Alignment Adapter
    3 T75L-4201-A Clutch Housing Alignment Adapter
    4 Clamp
    5 D83P-6392-A Clutch Alignment Tool
    6 Washer
    7 Attaching Nut
    8 Base Post Part of TOOL-4201-C
    9 Universal Clamp Part of TOOL-4201-C


    Up, down or side movement of the post assembly must not be evident during the bore and runout test procedure. If any movement is detected, loosen the nut and rotate the post assembly to gain better mounting location on the pressure plate fingers. Otherwise, an erratic reading will result.

  1. To check face runout, install the dial indicator (part of Dial Indicator with Bracketry TOOL-4201-C) on the base post using the universal clamp and short extension bar, Clutch Housing Alignment Adapter T75L-4201-B provided with the alignment kit. Position the dial indicator so that the indicator button contacts a circumference just outside the transmission pilot hole. Tighten the universal clamp securely.


    Item Part Number Description
    1 Dial Indicator (Part of TOOL-4201-C)
    2 T75L-4201-B Clutch Housing Alignment Adapter
    3 Base Post (Part of TOOL-4201-C)
    4 Universal Clamp (Part of TOOL-4201-C)
    5 Indicator Button (Part of TOOL-4201-C)
    6 D83P-6392-A Clutch Alignment Tool
  1. Push the crankshaft (6303) rearward to remove any end play. Zero the dial indicator.
  1. Holding the crankshaft in the rearward position, rotate the crankshaft through one complete revolution by using a wrench on the crankshaft pulley attaching nut. The dial indicator should return to zero after one revolution unless end play or a loose alignment post has affected the reading.
  1. Record the greatest variation between indicator readings for one revolution. A small mirror will be necessary during this procedure to read the indicator through its complete rotation. Repeat procedure to verify reading.

    NOTE: The rubber band should be installed just snug enough to provide a light pressure of the lever tip on the bore of the flywheel housing . If rubber band is too tight, it may bind the dial indicator or distort reading during Step 9.

  1. After completion of the face runout check, install the dial indicator lever attachment to the dial indicator and position the assembly to check bore runout. The rubber band shown attached to the lever must be installed as indicated, prior to installation of the lever, to preload the dial indicator for bore readings.


    Item Part Number Description
    1 D83P-6392-A Clutch Alignment Tool
    2 Dial Indicator (Part of TOOL-4201-C)
    3 Base Post (Part of TOOL-4201-C)
    4 Support Bar (Part of TOOL-4201-C)
    5 Universal Clamp (Part of TOOL-4201-C)
    6 T75L-4201-A Clutch Housing Alignment Adapter
  1. Zero the dial indicator. Rotate the crankshaft through one revolution as in Step 7. Record the greatest variation between the indicator readings for the complete crankshaft revolution. Repeat procedure to verify reading.
  1. If the maximum variation measurements obtained in Step 8 show that face runout exceeds 0.254mm (0.010 inch) Total Indicator Runout (T.I.R.) and/or the bore runout in Step 10 exceeds 0.381mm (0.015 inch) T.I.R., replace the flywheel housing .

    NOTE: Remeasure new flywheel housing to ensure proper installation.

    Before assembly of the transmission to the flywheel housing , the front mounting face of the transmission should be inspected and cleaned. Any nicks, burrs, paint or foreign material must be removed to ensure alignment between these components. If flywheel housing to block dowels on the flywheel or rear face of the engine are missing or damaged, refer to Dowel Removal and Installation.