Section 07-01: Transmission, Automatic—AODE | 1994 Mustang Workshop Manual |
DIAGNOSIS AND TESTING
MLP Sensor Testing - Enhancement
MLP Tester Instructions
Transmission Tester Use For MLP Diagnosis
The Transmission Tester allows a technician to operate the electrical
portion of the manual lever position sensor. The MLP Tester usage is divided
into five steps:
- Preliminary Testing and Diagnosis.
- Transmission Tester Installation (Set-Up Procedure)
- Testing MLP Sensor.
- Voltage Tests—Park/Neutral, Backup Lamp and Optional
Circuits.
- Transmission Tester Removal and Clearing Diagnostic Trouble Codes (DTCs).
Preliminary Testing and Diagnosis
Before any diagnostic testing is done on a vehicle, some preliminary
checks must be performed as outlined below. Be sure to write down your
findings, especially any DTCs found, for future reference.
- Check transmission fluid level and condition.
- Check for add-on items (phones, computers, CB radio, etc).
- Visually inspect wiring harness and connectors.
- Check for vehicle modifications.
- Verify that the shift linkage is properly adjusted in OVERDRIVE.
- Verify that MLP Sensor is properly adjusted in NEUTRAL.
- Verify customer concern.
- Upshift, Downshift, Coasting, Engagement, Noise/Vibration
- Vehicle must be at a normal operating temperature.
- Perform vehicle On-Board Diagnostic.
- Record all DTCs.
- Service all non-transmission DTCs.
Transmission Tester Installation (Set Up Procedure)
Installing the Transmission Tester at the MLP Sensor CONNECTOR allows the
separation of the vehicle electronics from the MLP sensor electronics.
NOTE: During tester usage additional DTCs may be set. Therefore, it is
important that all codes are erased after service has been made. To verify
elimination of all DTCs, rerun On-Board Diagnostic.
NOTE: The following manuals should be available to assist in diagnosis of
electronically-controlled transmissions:
- Powertrain Control/Emissions Diagnosis Manual
- Service Manual
- Transmission Reference Manual
 CAUTION: Do not attempt to pry off connectors with a screwdriver. This
will damage the connector and could result in a transmission concern.
CAUTION: Do not attempt to pry off connectors with a screwdriver. This
will damage the connector and could result in a transmission concern.
- Disconnect vehicle harness at transmission MLP connector.
NOTE: For in-vehicle testing, use the transmission tester extension
cable.
CAUTION: Route all cables away from HEAT SOURCES.
- Set Bench/Drive switch to DRIVE mode. Install MLP Sensor Overlay onto
tester. Connect interface cable to transmission tester and then to the MLP
sensor connector. Refer to chart for the proper cable/application.
| Transmission |
Model Year |
Cable I.D. |
| E4OD |
1989-1993 |
A |
| AODE |
1992 ONLY |
A |
| AXODE |
1991-1992 |
A |
| AXODE/AX4S |
1993 & UP |
B |
| AODE |
1993 & UP |
C |
| AODE |
1993 & UP |
C |
| CD4E |
1993 & UP |
D |
- Turn test select switch to the MLP SENSOR TEST position.
- Plug transmission tester power supply plug into cigar lighter.
At this time, all LEDs should illuminate for a short period and then turn
off. This is the tester internal circuit check.
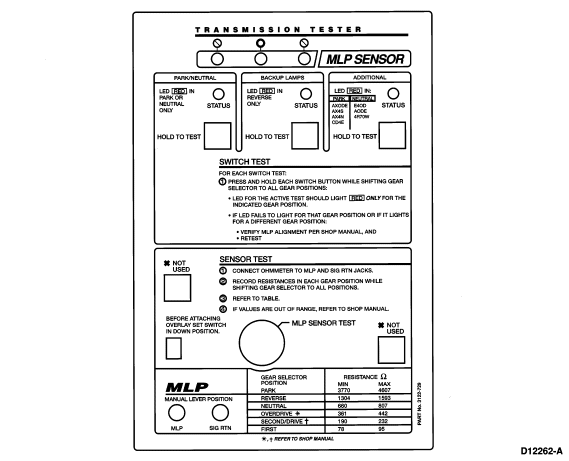
Testing MLP Sensor
Static testing procedures allow for shop testing of the transmission in
the vehicle or on the bench. Completion of these tests prove out the MLP sensor
electronically.
CAUTION: For resistance checks, be sure that the tester selector switch is set
to the "MLP SENSOR TEST" position or damage to the ohmmeter may result.
Resistance/Continuity Tests
- Using a digital volt/ohmmeter and the Transmission Tester, perform Pinpoint Test D
as indicated in the Service Manual or Transmission Reference
Manual based on the DTCs which were displayed.
- Perform services as indicated by the pinpoint tests. Always retest and
road test vehicle after any service.
MLP Sensor Resistance Tests
- Set ohmmeter to 1000 ohm range.
- Connect the positive lead of the ohmmeter to the MLP jack.
- Connect the negative lead of the ohmmeter to the SIGRTN jack.
- Move transmission range selector lever into each gear position.
- Record resistance at each position.
- Refer to the following chart for values.
If out of range, refer to Pinpoint Test
D in the service manual or
transmission reference manual.
| Transmission Range Selector Lever Position |
Resistance (ohms) |
| Minimum |
Maximum |
| PARK |
3770 |
4607 |
| REVERSE |
1304 |
1593 |
| NEUTRAL |
660 |
807 |
| OVERDRIVE*
|
361 |
442 |
| SECOND/DRIVE**
|
190 |
232 |
| MANUAL 1 |
78 |
95 |
* Same values for overdrive or O/D CANCEL (DRIVE)
on electronically controlled transmissions. D and Drive (O/D Cancelled) are in
the same transmission range selector lever position.
** Same values for SECOND (electronic
transmission) or DRIVE on transmissions with a
separate
DRIVE and OVERDRIVE position.
Voltage Tests—Park/Neutral, Backup Lamp and Optional
Circuits
NOTE: LED will turn RED when the circuit closes and turn OFF when the circuit
is open.
- Tester Select Switch to the MLP SENSOR TEST position.
- Press and HOLD each button while moving the transmission range selector
lever through EACH range.
- Monitor each LED.
- The status LED should indicate RED only in the indicated position. Refer to
overlay.
- If the LED does NOT indicate RED in the desired position, or indicates RED
in another position, first verify MLP alignment and then retest. If the sensor
fails, then replace.
Transmission Tester Removal and Clearing DTCs
CAUTION: Do not attempt to pry off connectors with a screwdriver. This
will damage the connector and could result in a transmission concern.
- Disconnect transmission tester from the MLP Sensor connector.
- Reinstall vehicle wiring harness. Verify connection by pulling up on the
harness.
- Disconnect transmission tester power lead from vehicle.
- Erase all DTCs using the procedures in the Powertrain Control/Emissions Diagnosis Manual
(Unlatch center button of tester while
codes are being displayed on a KOEO Self-Test).
- Rerun On-Board Diagnostic Tests to receive a pass code (111—
5.0L, P1111—3.8L).
- Verify that the customer concern has been eliminated.