Section 07-01A: Transmission, Automatic, A4LD | 1993 Mustang Workshop Manual |
CLEANING AND INSPECTION
Transmission
It is important to completely clean all transmission components,
including converter, cooler, cooler lines, main control valve body, governor,
all clutches and all check balls after any transmission servicing that
generates contamination. These contaminants are a major cause for recurring
transmission troubles and must be removed from the system before the
transmission is put back into service. The cleaning of debris from the direct
clutch check ball is often omitted. This omission can lead to a repeat
servicing of the transmission.
Clean the parts with suitable solvent and use moisture-free air to dry
off all the parts and clean out fluid passages.
The composition clutch plates, bands and synthetic seals should not
be cleaned in a vapor degreaser or with any type of detergent solution.
To clean these parts, wipe them off with a lint-free cloth. New clutch plates
or bands should be soaked in transmission fluid specified for that transmission
type for fifteen minutes before being assembled.
Control Valve Body
- Clean all parts thoroughly in clean solvent and blow dry with moisture-free
compressed air.
- Inspect all valve and plug bores for scores. Check all fluid passages for
obstructions. Inspect the check valve for free movement. Inspect all mating
surfaces for burrs or distortion. Inspect all plugs and valves for burrs or
scores. Use crocus cloth to polish valves and plugs. Avoid rounding the sharp
edges of the valves and plugs with the cloth. Replace the control valve body if
the bores are scored or if the valves are scored beyond the point of being able
to be cleaned.
- Inspect all springs for distortion. Check all valves and plugs for free
movement in their respective bores. Valves and plugs, when dry, must fall from
their own weight in their respective bores.
- Roll the manual valve on a flat surface to check for bent condition.
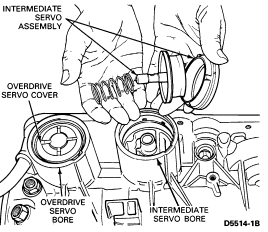
Overdrive and Intermediate Servos
- Inspect the servo bore for cracks, the servo piston for damage, and the
piston bore and servo piston stem for scores. Check fluid passages for
obstructions. Replace damaged seals.
- Check the servo spring and servo band strut(s) for distortion.
- Inspect the cover seal and gasket cover sealing surface for damage.
- Inspect the band lining for excessive wear and for proper bonding to the
metal band.
NOTE: Identify servo covers, pistons, and springs with a tag for proper
identification.
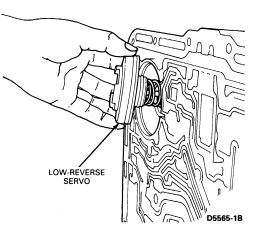
Low-Reverse Servo
- Inspect the bore for scores.
- Check the fluid passages for obstructions.
- Inspect the band for distortion. Inspect the band ends for cracks.
- Inspect the servo spring for distortion.
- Inspect the band lining for excessive wear and for proper bonding to the
metal band.
- Replace damaged cover seal.
- Replace piston seals if damaged.
Extension Housing
- Inspect housing for cracks. Inspect gasket surface for burrs or warpage.
- Inspect bushing for scores or wear. Replace if required.
- Inspect the rear seal for hardness, cracks, or wear. If the seal shows wear
or deterioration, replace the seal.
- Inspect the seal counterbore and remove all burrs and scores with crocus
cloth.
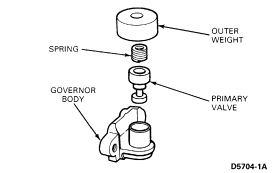
Governor
- Inspect the governor valves and bore for scores. Minor scores may be
removed from the valves with crocus cloth. Replace the governor if the valves
or body is deeply scored.
- Check for free movement of the valve in the bore. The valve should slide
freely of its own weight in the bore when dry. Inspect fluid passages in the
valve body and collector body for obstructions. All fluid passages must
be clean.
- Inspect the mating surfaces of the governor body and collector body for
burrs and distortion. Mating surfaces must be smooth and flat.
Pump
- Inspect mating surfaces of pump body and case for burrs.
- Inspect the drive and driven gear bearing surface for scores and check gear
teeth for burrs.
- Inspect the front pump seal for cuts or nicks, and pump bushing for scoring.
- Check fluid passages for obstructions.
- If any parts are found damaged or worn, replace the pump as a unit. Minor
burrs and scores may be removed with crocus cloth.
Reverse-High and Overdrive Clutches
- Inspect the drum band surface, bushing, and thrust surfaces for scores.
Minor scores may be removed with crocus cloth. Badly scored parts must be
replaced.
- Inspect the clutch piston bore and the piston inner and outer bearing
surfaces for scores.
- Check the fluid passages for obstructions. All fluid passages must be clean
and free of obstructions.
- Inspect the clutch plates for wear, scoring, and fit on the clutch hub
serrations. Replace all plates that are badly scored, worn, or do not fit
freely in the hub serrations.
- Inspect the clutch pressure plate for scores on the clutch plate bearing
surface. Check the clutch release spring for distortion.
- The clutch cylinders have check balls. Inspect the check balls for freedom
of movement and proper seating.
Forward Clutch
- Inspect the clutch cylinder thrust surfaces, piston bore, and clutch plate
serrations for scores or burrs. Minor scores or burrs may be removed with
crocus cloth. Replace clutch cylinder if it is badly scored or damaged.
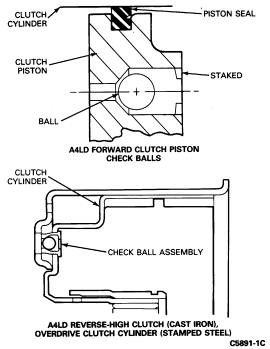
- Check fluid pressure in the clutch cylinder for obstructions. Clean out all
fluid passages. Inspect clutch piston for scores and replace if necessary.
Inspect the piston check ball for freedom of movement and proper seating.
- Check clutch release springs for distortion and cracks. Replace springs if
they are distorted or cracked.
- Inspect composition clutch plates, steel clutch plates, and clutch pressure
plate for worn or scored bearing surface. Replace all parts that are deeply
scored.
- Check clutch plates for flatness and fit on the clutch hub serrations.
Discard any plate that does not slide freely on the serrations or that is not
flat.
- Check clutch hub thrust surfaces for scores and clutch hub splines for wear.
- Check input shaft for damaged or worn splines. Replace shaft if the splines
are excessively worn. Inspect bushing in stator support for scores.
Overdrive One-Way Clutch and Planetary Rear One-Way Clutch
- Inspect outer and inner races for scores or damaged surface areas where
rollers contact races.
- Inspect rollers and springs for excessive wear or damage.
- Inspect spring and roller cage for bent or damaged spring retainers.
Converter and Oil Coolers
When internal wear or damage has occurred in the transmission, metal
particles, clutch plate material, or band material may have been carried into
the converter and oil coolers. These contaminants are a major cause of
recurring transmission troubles and must be removed from the system before the
transmission is put back into service.
Whenever a transmission has been disassembled to replace worn or damaged
parts or because the valve body sticks from foreign material, the converter,
oil coolers and oil cooler lines must be cleaned and flushed. Refer to
TSB91-19A, Article 87-2-16, page 43. Rotunda Torque Converter Cleaner 014-00028
or equivalent can be used. Under no circumstances should an attempt be made to
clean converters by hand agitation with solvent.
The lack of a drain plug in the A4LD converter increases the amount of
residual flushing solvent retained in the converter after cleaning. This
retained solvent is not acceptable and a method of diluting it is required. The
following procedure is to be used after removal of the A4LD torque converter
from the cleaning equipment.
- Thoroughly drain remaining solvent through the converter hub.
- Add 1.9L (2.0 U.S. quarts) of clean transmission fluid to the converter.
Agitate by hand.
- Thoroughly drain solution through the converter hub.
Converter End Play and One-Way Clutch Check
The Converter Clutch Torquing Tool T77L-7902-B and Converter Clutch
Holding Wire D84L-7902-A or an equivalent fabricated holding tool are used to
check the converter one-way clutch.
Directions for fabricating a holding tool are illustrated under Converter
One-Way Clutch Check below.
Converter End Play Check
- Insert torque converter End Play Checking Tool T80L-7902-A into the
converter impeller hub, until it bottoms.
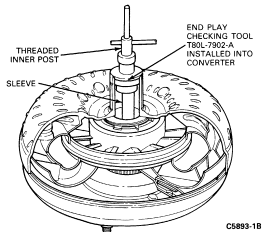
- Expand sleeve in the turbine spline by tightening the threaded inner post
until the tool is securely locked in the spline.
- Attach Dial Indicator With Bracketry TOOL-4201-C to the torque converter
End Play Checking Tool T80L-7902-A. Position the indicator button on the
converter impeller housing, and set the dial face at 0 (zero).
- Lift tool upward as far as it will go and note indicator reading. The
indicator reading is the total end play which the turbine and stator share.
Replace the converter unit if the total end play exceeds the limits. Refer to Specifications
at the end of this section.
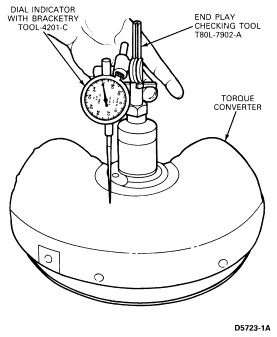
- Loosen threaded inner post to free tool, and remove the tool from the
converter.
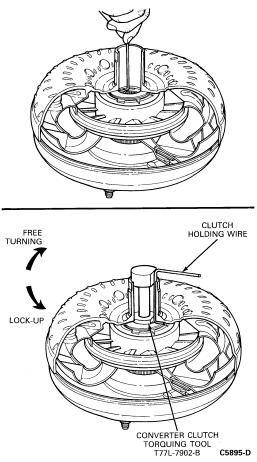
Converter One-Way Clutch Check
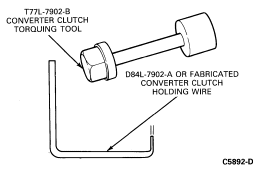
- Use Converter Clutch Holding Wire D84L-7902-A or equivalent or fabricate a
one-way clutch holding tool as shown below.
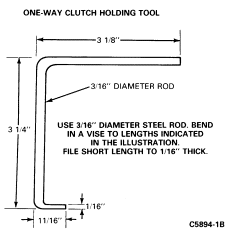
- Insert one-way clutch holding tool in one of the grooves in the stator
thrust washer.
- Insert the converter clutch torquing tool T77L-7902-B in the
converter impeller hub so as to engage the one-way clutch inner race.
- Attach a torque wrench to the one-way clutch torquing tool. With the
one-way clutch holding tool held stationary, turn torque wrench
counterclockwise. The converter one-way clutch should lock up and hold a 14 Nm
(10 ft-lb) torque. The converter one-way clutch should
rotate freely in a clockwise direction. Try the one-way clutch for lockup and
hold in at least five different locations around the converter.
- If the one-way clutch fails to lock up and hold at 14 Nm
(10 ft-lb) torque, replace the torque converter.
Converter One-Way Clutch Assembly
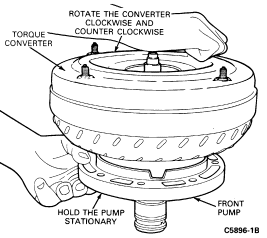
Stator to Impeller Interference Check
- Position front pump assembly on a bench with spline end of the stator shaft
pointing up.
- Mount a converter on the pump with splines on the one-way clutch inner race
engaging the mating splines of the stator support. The impeller hub will then
engage the pump drive gear.
- Hold pump stationary and try to rotate the torque converter both clockwise
and counterclockwise. The converter should rotate freely without any signs of
interference or scraping within the converter assembly.
- If there is an indication of scraping, the trailing edges of the stator
blades may be interfering with the leading edges of the impeller blades. In
such cases, replace the converter.
Pinion Carriers
Individual parts of the planet carriers are not serviceable.
- Check pins and shafts in planet assemblies for loose fit and/or complete
disengagement. Use a new planet assembly if either condition exists. Before
installing a planet assembly, the shaft retaining pins should be checked for
adequate staking. If necessary, replace planet carrier.
- Inspect pinion gears for damaged or excessively worn teeth.
- Check for free rotation of pinion gears.
Stator Support
- Inspect stator support splines for burrs and wear.
- Check oil ring grooves in stator support for nicks, burrs or damaged edges.
- Check front and rear bushings of stator support for wear or scoring.
- Check front pump support seal.
- Check seal rings for damage.