A2 STATIC FUEL PRESSURE CHECK
- Install Rotunda Fuel Pressure Tester 014-00748 or equivalent.
- Check for a connection at the FP lead. Ground FP lead if present. If no connection exists, check for separate connector located in the area. The test connector is a two pin connector. Use the "SPOUT" or similar connector to jumper this connection to run fuel pump.
- Turn the ignition key to the RUN position to operate the fuel pump.
- Verify that the observed fuel pressure is within specified limits for the engine being tested (refer to chart).
- Is the fuel pressure within specifications?
- If pressure is low, GO to A6.
A3 STATIC LEAKDOWN TEST
- Run fuel pump for 10 seconds and note pressure (ground FP lead of data link connector and turn ignition switch to the RUN position).
- Turn off pump and monitor pressure for 60 seconds. (Remove ground or turn ignition switch to the OFF position.)
- Does fuel line pressure remain within 34 kPa (5 psi) of shut off pressure for 60 seconds?
A4 VEHICLE LOAD TEST
- Remove and block vacuum hose to pressure regulator.
NOTE: Running vehicle under load with vacuum hose removed from fuel pressure regulator (road test) may give better results.
- Run vehicle at idle and then increase engine speed to 2000 rpm or more in short bursts.
- Does fuel system pressure remain within chart limits?
A5 FUEL PRESSURE REGULATOR CHECK
- Disconnect return line at fuel pressure regulator. Connect outlet of regulator to appropriate receptacle to catch return fuel.
- Turn on fuel pump (ground FP lead and turn ignition to the RUN position) and monitor pressure.
- Is fuel pressure within chart limits?
A6 CHECK FUEL PUMP
- Turn on fuel pump (ground FP lead and turn ignition to the RUN position).
- Raise vehicle on hoist and use stethoscope to listen to fuel tank to monitor fuel pump sound.
- Is fuel pump running?
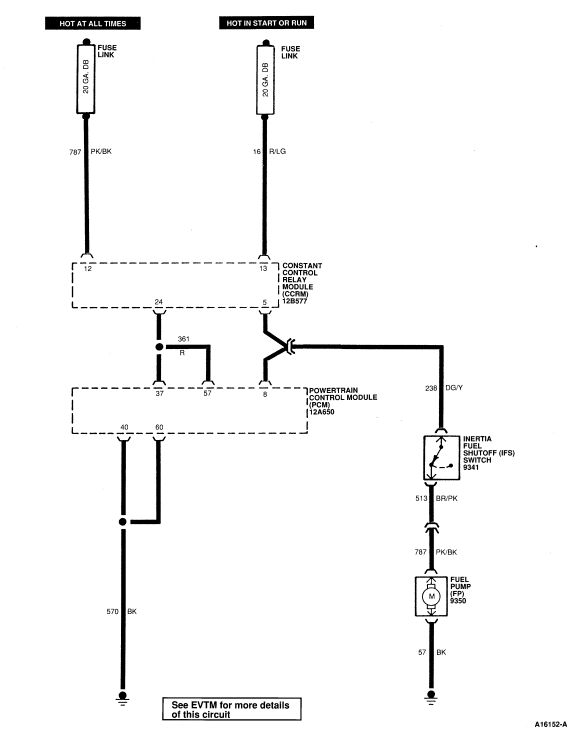
A7 INERTIA FUEL SHUTOFF (IFS) (9341) SWITCH AND GROUND CHECK
- Check inertia fuel shutoff switch to see if it is open.
- Check fuel pump ground connection in vehicle.
- Are inertia fuel shutoff switch and ground connections OK?
A8 VOLTAGE CHECK
- Check for continuity through fuel pump to ground by connecting to pump power wire lead as close to pump as possible.
- Check voltage as close to fuel pump as possible (Turn on pump as indicated in A6).
- Is voltage within 0.5 volt of battery voltage and is there continuity through pump?
- If pressure is not OK, RECHECK fuel pump connector for oversize connectors or other sources of open electrical circuit. SERVICE as required. GO to A3.
A9 PRESSURE REGULATOR CHECK
- Replace fuel filter (if not replaced previously) and recheck pressure as in A2. If pressure is not OK, continue. If pressure is OK, go to A3.
- Open return line at pressure regulator. Attach return fitting from regulator to suitable container to catch gasoline.
- Turn on fuel pump as in A2.
- Is fuel being returned from regulator with low pressure in system?
- If not OK, REPEAT Step A2
until trouble found.
- If trouble not located, REPLACE pump and REPEAT A2.
A10 PRESSURE REGULATOR LEAK TEST
- Open return line at pressure regulator and attach suitable container to catch return fuel. Line should be clear to observe fuel flow.
- Run fuel pump as in A2.
- Turn off fuel pump by removing ground from data link connector or turning ignition to OFF.
- Observe fuel return flow from regulator and system pressure when pump is off.
- Remove vacuum hose from fuel pressure regulator and check for presence of fuel in fitting (diaphragm leak).
- Is there return flow when pump is turned off and system pressure is dropping or fuel in regulator fitting?
- If not OK, REPEAT Step A2
.
A11 PUMP CHECK VALVE TEST
- Open pressure line from fuel pump and attach pressure gauge to line and block line to allow pressure build up.
- Operate pump momentarily as in A2 and bring pressure to about system pressure.
- Observe fuel pressure for one minute.
- Does pressure remain within 34 kPa (5 psi) of starting pressure over one-minute period?
A12 FUEL SYSTEM RESTRICTION OR USAGE TEST
- Replace fuel line filter (if not previously replaced during this procedure) and repeat test A5.
- Does system pressure remain within chart limits?
- CHECK for wrong size injectors. If no concern found, REPLACE pump and REPEATA4.
- If concern found, SERVICE and REPEAT A4.
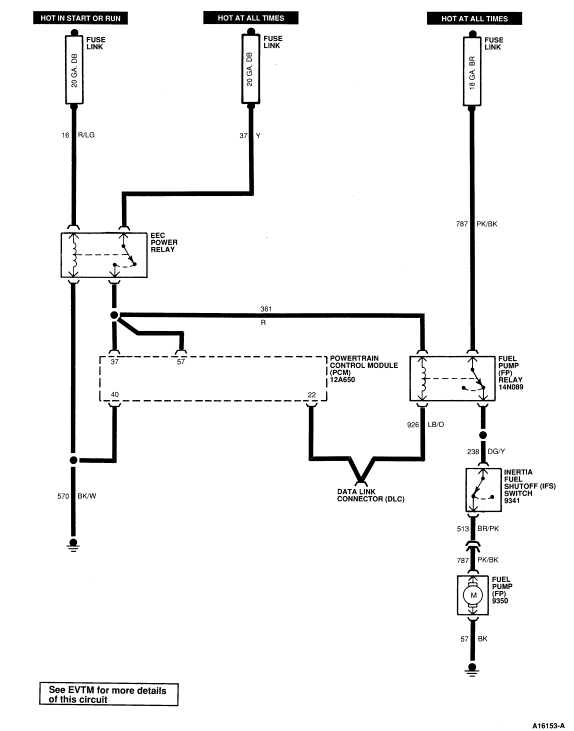
A13 RELAY TYPE CHECK
- Does vehicle use constant control relay module (CCRM) (12B577) for fuel pump control? Control module is located on upper radiator support bracket.
- If function OK, GO to A14.
A14 CONSTANT CONTROL RELAY MODULE FUNCTION TEST
- Ground fuel pump lead of data link connector.
- Connect DVOM to Pin 5 of CCRM connector with connector in place on module. Set DVOM to 20 VDC scale.
- Key ON, Engine OFF.
- Is voltage greater than 10.5 volts present at Pin 5?
A15 CONSTANT CONTROL RELAY MODULE SUPPLY VOLTAGE TEST
- Connect DVOM to Pin 8 of CCRM wiring harness and ground. Set DVOM to 20 VDC scale.
- Measure volts.
- Connect DVOM to Pin 12 of constant control relay module wiring harness and ground. Set DVOM to 20 VDC scale.
- Measure volts.
- Is voltage greater than 10.5 volts at each pin?
A16 CHECK VOLTAGE AT FUEL PUMP RELAY
- Key OFF.
- Battery fully charged
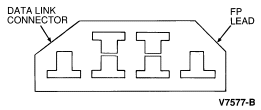
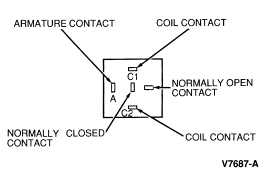
- Ground fuel pump lead of the VIP data link connector as shown.
- Key ON, Engine OFF.
- DVOM on 20 volt scale.
- Measure the voltage at the fuel pump relay contact "A" as shown.
- Is voltage greater than 10.5 volts?
A17 CHECK CHECK POWER SUPPLY TO FP RELAY
- Key OFF.
- Remove fuel pump relay.
- Key ON, Engine OFF.
- DVOM on 20 volt scale.
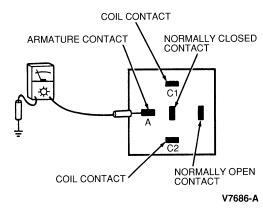
- Check relay socket for voltage at Pins C1, C2, and A or NO.
- Does relay socket have voltage at 2 pins as indicated?
A18 CHECK POWERTRAIN CONTROL MODULE (PCM) (12A650) RELAY AND WIRING
- Key OFF.
- Remove powertrain control module relay.
- Key ON, Engine OFF.
- DVOM on 20 volts.
- Check relay socket for voltage at Pins C1, or C2 and A or NO.
- Note which pins have voltage present (there should only be voltage at one pin if each pair, if voltage present at both pins of one pair, look for shorted wiring).
- Are voltages greater than 10.5 volts on relay socket?
A19 CHECK POWERTRAIN CONTROL MODULE (PCM) RELAY GROUND
- Key OFF.
- Powertrain Control Module relay removed.
- DVOM on low OHMS scale.
- Check PCM relay coil pin which did not have voltage in Step A18 (either C1 or C2) for ground.
- Is ground on coil pin of PCM relay less than 1 ohm?
GO to A2.
A20 CHECK FUEL PUMP OR POWERTRAIN CONTROL MODULE (PCM) RELAY OPERATION
- Remove relay from vehicle.
- Connect a +12 volt supply to terminal C1 as shown.
- Ground terminal C2 as shown.
- DVOM on 200 ohm scale.
- Measure the resistance between terminals A and NO as shown.
- Is resistance lower than 1 ohm with power on and greater than 10K ohms with power off?
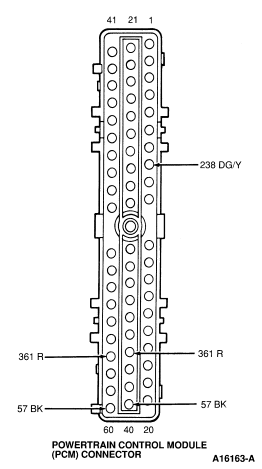
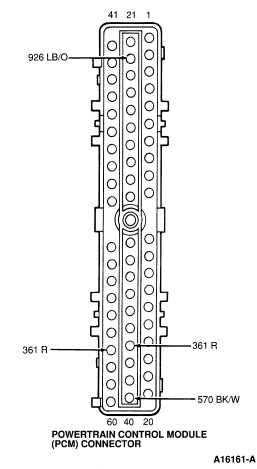
A21 CHECK VOLTAGE AT PIN 22 (PCM)
- Key OFF.
- Battery fully charged.
- Remove powertrain control module.
- Install Rotunda 60-Pin Breakout Box 007-00033 or Rotunda EEC-IV Monitor 007-0047C or equivalent.
- Key ON, engine OFF.
- DVOM on 20 volt scale.
- Measure the voltage on Pin 22 of the breakout box, or with EEC-IV Monitor, install the appropriate overlay according to engine size and year. Place selector switch "A" on Pin 22, "FP", turn EEC-IV Monitor power on and read voltage on Pin 22 from LCD readout.
- Is voltage greater than 10.5 volts?