Section 12-03B: Compressor and Clutch | 1994 Mustang Workshop Manual |
REMOVAL AND INSTALLATION
A/C Clutch
A/C Clutch and A/C Compressor Clutch Pulley
A disassembled view of the A/C clutch (2884)
assembly and related parts is shown following the Removal and
Installation procedure.
SPECIAL SERVICE TOOL(S) REQUIRED
| Description |
Tool Number |
| Spanner Wrench |
T70P-4067-A |
Removal
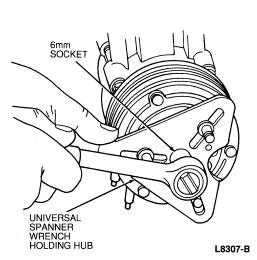
- Remove the A/C clutch retaining bolt. Use Spanner Wrench T70P-4067-A.
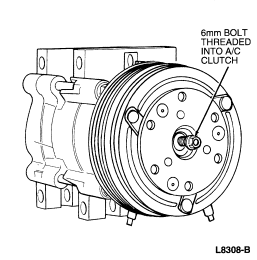
- Pull A/C clutch and A/C compressor clutch shims from A/C compressor shaft. If A/C clutch cannot be pulled from A/C compressor shaft, screw a 6mm bolt into the
shaft hole of the A/C clutch
to force the
A/C clutch from the shaft.
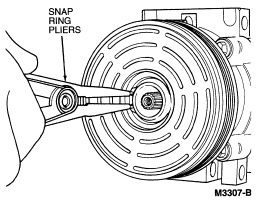
- Remove A/C compressor clutch pulley retaining snap ring.
- Pull the A/C compressor clutch pulley (2E884) assembly from A/C compressor (19703)
.
Installation
- Clean A/C compressor clutch pulley bearing surface of A/C compressor head
to remove any dirt or corrosion.
- Install A/C compressor clutch pulley
assembly on A/C compressor
. The bearing is a
slip-fit on the A/C compressor head and, if properly
aligned, it should slip on easily.
- Install A/C compressor clutch pulley retaining snap ring with bevel side of
snap ring out.
- Place one nominal thickness spacer A/C compressor clutch shim inside the
A/C clutch spline opening and slide the A/C clutch
on the end of the A/C compressor shaft.
- Thread a new 6mm A/C clutch retaining bolt into end of A/C compressor
shaft. Tighten A/C clutch retaining bolt to 11-13 Nm (8-10
lb-ft). DO NOT USE AIR TOOLS.
- Check A/C clutch air gap between A/C clutch and A/C clutch pulley mating
surfaces with a feeler gauge. The air gap should be between 0.35 and 0.85mm
(0.014 and 0.033 inch). Check at three locations equally spaced around the A/C compressor clutch pulley
.
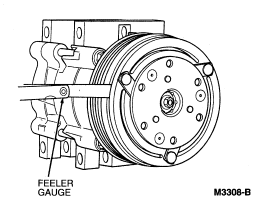
- If A/C clutch air gap is not within 0.35 to 0.85mm (0.014 to 0.033 inch),
repeat Steps 4 through 6 with various thickness A/C compressor clutch
shims until air gap is within specified limits.
- When installing a new A/C clutch
, cycle it ten times at idle to burnish the A/C clutch
and prevent slippage.
A/C Clutch—Disassembled View
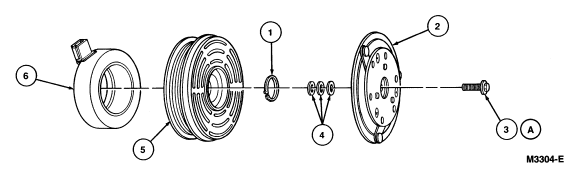
| Item |
Part Number |
Description |
|
1
|
N805338-S2
|
Pulley Snap Ring
|
|
2
|
2884
|
A/C Clutch
|
|
3A
|
N805332-S2
|
Bolt (6 mm)
|
|
4
|
2D884
|
A/C Compressor Clutch Shim Kit
|
|
5
|
2E884
|
A/C Compressor Clutch Pulley
|
|
6
|
2987
|
A/C Compressor Clutch Field Coil
|
|
A
|
—
|
Tighten to 11-13 Nm (8-10 Lb-Ft)
|
A/C Compressor Clutch Field Coil
NOTE: The A/C compressor clutch field coil (2987)
is pressed on the front head of the A/C compressor
.
Special service tools are required to remove and
install the A/C compressor clutch field coil
.
SPECIAL SERVICE TOOL(S) REQUIRED
| Description |
Tool Number |
| Shaft Seal Protector |
T89P-19623-CH |
| Differential Side Bearing Puller |
T77F-4220-B1 |
| Coil Pressing Tool |
T89P-19623-EH |
Removal
 CAUTION: Do not use air tools.
- Remove the A/C compressor
from the vehicle. Refer to Section 12-03A.
- Remove the A/C clutch
and A/C compressor clutch pulley
as outlined.
- Install Shaft Seal Protector for Coil Removal T89P-19623-CH on the nose
opening of the A/C compressor
.
- Install Differential Side Bearing Puller T77F-4220-B1 on the A/C compressor
. Place the tip of the puller forcing screw in the
center pilot of the shaft protector and the jaws of the puller around the back
edge of the A/C compressor clutch field coil
.
- Tighten the puller forcing screw to pull the A/C compressor clutch field coil
from the A/C compressor head.
Installation
CAUTION: Do not use air tools.
- Clean the A/C compressor clutch field coil mounting surface on
the front head to remove any dirt or corrosion.
- With the A/C compressor
in a vertical position (nose up), place the A/C compressor clutch field coil
in position on the A/C compressor front head. Make
sure the A/C compressor clutch field coil electrical connector is correctly
positioned.
- Place the Coil Pressing Tool T89P-19623-EH in position over the A/C
compressor nose and to the inner radius of the A/C compressor clutch field coil
.
- Position 2-Jaw Puller D80L-1002-L or equivalent on the A/C compressor
and the
Coil Pressing Tool T89P-19623-EH. The jaws of the puller
should be firmly engaged with the rear side of the A/C compressor front mounts.
The forcing screw must be piloted on the center
mark of the field coil replacer tool.
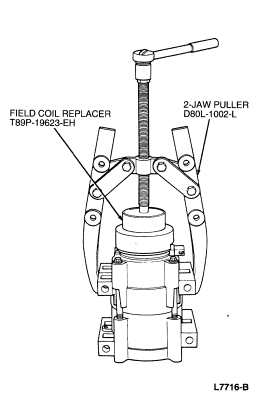
- Tighten the forcing screw with a hand wrench until the A/C compressor clutch field coil
is pressed on the A/C compressor front head. Check to make sure that the A/C compressor clutch field coil
bottoms against the head at all points around the A/C compressor clutch
field coil outer diameter.
- Install the A/C compressor clutch pulley
and A/C clutch
on the A/C compressor
as outlined. Adjust the air gap,
as necessary.
- Install the A/C compressor
as outlined.