Section 12-03A: Air Conditioning System—Manual A/C-Heater | 1994 Mustang Workshop Manual |
REMOVAL AND INSTALLATION
A/C System Filtering
 CAUTION: Follow all refrigerant system safety and service precautions as
outlined.
CAUTION: Follow all refrigerant system safety and service precautions as
outlined.
A Filter Kit should be installed in the refrigerant system
prior to the installation of the replacement A/C compressor (19703)
. The pancake filter, supplied with each kit, should be
temporarily installed in the liquid line between the A/C condenser core (19712)
and the A/C evaporator core orifice (19D990)
. The suction filter, supplied with each kit, should be
installed in the suction line between the suction accumulator/drier (19C836)
and the A/C compressor
. Install replacement A/C compressor
. Install the replacement A/C compressor
and the filters as outlined in the following procedure.
Filter Kit for systems with nylon lined suction hose is Ford part number
F2VY-19E773-C.
CAUTION: Follow all refrigerant system safety and service precautions outlined
in Section 12-00.
- Before removing any refrigerant system components, discharge the system
refrigerant following the approved recycling methods.
- Remove the suction accumulator/drier
and drain the oil into a calibrated container.
NOTE: Due to the internal design of the suction accumulator/drier
, it will be necessary to drill two 13mm (1/2-inch)
holes
in the suction accumulator/drier cylinder to drain the oil from the suction accumulator/drier
.
- Install a new suction accumulator/drier
and add new YN-12 refrigerant oil to replace the old
oil. The quantity of new oil to be added is the amount to match that drained
from the oil plus 60 ml (2 oz).
- Install a new A/C evaporator core orifice
. If the A/C evaporator core orifice
is located in the liquid line between the A/C condenser core
and the A/C evaporator core (19860)
, replace the liquid line assembly.
- Temporarily install the pancake filter in the liquid line between the A/C condenser core
and the A/C evaporator core orifice
. Be sure the filter inlet is toward the A/C condenser core
. Connections can be made using A/C Test Fitting Set,
D88P-19703-B, and flexible refrigerant hose of 2500 psi burst rating.
Individual fittings are also available.
- Remove the old A/C compressor
, as outlined and drain the oil into a calibrated
container.
- Drain the oil from the replacement A/C compressor
into a clean calibrated container.
NOTE: It will be necessary to transfer the A/C clutch (2884)
from the old A/C compressor
to the replacement A/C compressor
. Refer to Section 12-03B for FS-10 A/C Compressor.
- A new service replacement FS-10 A/C compressor
contains 207ml (7 oz) of refrigerant oil. If the amount
of oil drained from the removed A/C compressor
is between 90 and 148ml (3 to 5 oz), pour the same
amount of clean refrigerant oil into the new A/C compressor
. If the amount of oil drained from the old A/C compressor
is greater than 148ml (5 oz) of clean refrigerant oil
into the new A/C compressor
. If the amount of refrigerant oil drained from the old A/C compressor
is less than 90ml (3 oz), pour 90ml (3 oz) of clean
refrigerant oil into the new A/C compressor
. Use Motorcraft YN-12 Refrigerant Oil.
- Install the new A/C compressor
, as outlined. Be sure all mounting bolts are tightened
properly. Check the tension of the A/C compressor drive belt (8620)
. Adjust if necessary.
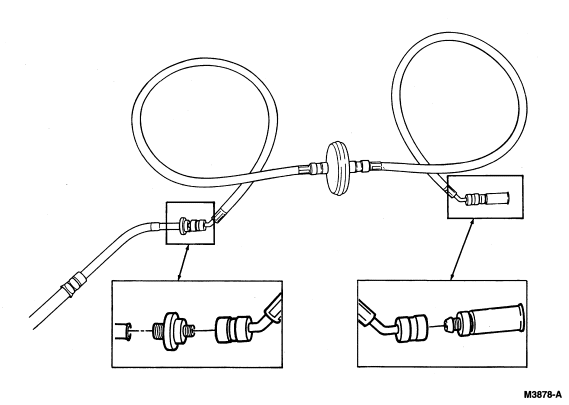
- Install the suction filter in the suction hose close to the A/C compressor
. Suction filter shown in the following illustration is
for nylon lined core hose. These filters have two grooves in the end tubes to
accommodate O-ring seals.
- Remove a length of suction hose (close to the A/C compressor end) to
accommodate the suction filter and install the filter using A/C hose clamps. Be
sure filter is correctly oriented for refrigerant system flow. Check the label
on the filter. If using the filter for a nylon lined hose, install O-ring seals
included in the kit (two on each filter tube).
- Leak test, evacuate, and charge the system as outlined in Section 12-00.
- Check all refrigerant system hoses, lines and the positioning of the newly
installed filters to be sure they do not interfere with other engine
compartment components. If necessary, use tie straps to make adjustments.
- Set the A/C control on MAX A/C, high A/C blower motor operation and
temperature control at full cold. Start engine and let it idle briefly. Make
sure the A/C system is operating properly.
- Gradually bring the engine up to 1200 rpm by running it at lower rpms for
short periods (first at 800 rpm, then at 1000 rpm). Set the engine at 1200 rpm
and run it for an hour with the A/C system operating.
- Stop the engine.
- Remove the refrigerant from the system using a recovery machine. Refer to
Section 12-00.
- Allow the engine to cool sufficiently to remove the fittings, flexible
hoses and pancake filter from the liquid line.
- Discard the pancake filter. It can be used one time only.
- Reconnect the liquid line back into the system.
- Evacuate, charge and leak test the system. Make any necessary adjustments.
- Check the operation of the system in all control function selector lever
positions.
Removal
NOTE: Replacement of the suction accumulator/drier is not required
when repairing the air conditioning system except when there is
physical evidence of system contamination from a failed A/C
compressor or damage to the suction accumulator/drier.
- Discharge the system following the recommended service procedures. Observe
all safety precautions. Refer to Section 12-00.
- Remove the drive belt. Refer to Section 03-05.
- On the 5.0L engine, remove the battery and the battery tray. Refer to
Section 14-01. On the 3.8L engine, remove the air cleaner assembly. Refer to
Section 03-12.
- Remove the A/C manifold and tube retaining bolt and remove the A/C manifold and tube (19D734)
. Cap the refrigerant lines and compressor manifolds to
prevent the entrance of dirt and moisture.
- Disconnect the A/C clutch wires at the field coil connector.
- Remove compressor retaining bolts.
3.8L Engine
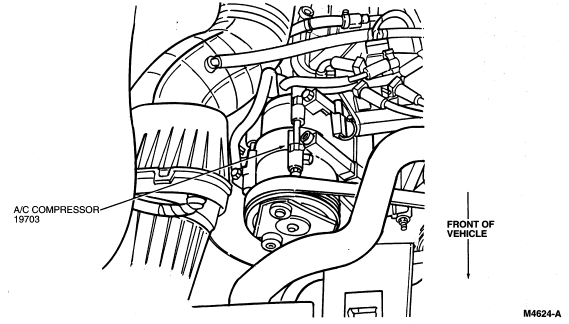
5.0L Engine
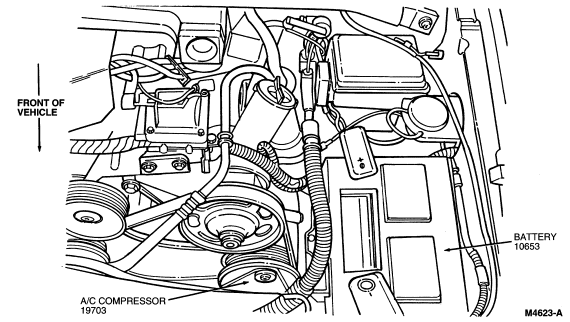
- Remove the FS-10 A/C compressor
from the vehicle.
Installation
- A new service replacement FS-10 A/C compressor
contains 295.7ml (10 oz) of the specified refrigerant
oil. Prior to installing the replacement A/C compressor
, drain four fluid ounces of refrigerant oil from the A/C compressor
. This will maintain the total system oil charge within
the specified limits.
- Reverse Removal procedure(s). Tighten compressor retaining bolts to
20-30 Nm (14.8-22.1 lb-ft).
- Using new O-ring seals lubricated with clean refrigerant oil,
connect the A/C manifold and tube to the A/C compressor
. Tighten each fitting to 17-23 Nm
(12.5-17.0 lb-ft).
- Connect the A/C clutch wires to the A/C compressor clutch field coil
connector.
- Install the drive belt
.
- Leak-test, evacuate and charge the system. Observe all safety precautions.
Refer to Section 12-00.
- Check the system for proper operation.