Section 12-03A: Air Conditioning SystemŚManual A/C-Heater | 1994 Mustang Workshop Manual |
REMOVAL AND INSTALLATION
A/C Evaporator Housing Assembly
NOTE: Whenever an A/C evaporator core (19860)
is replaced, it will be necessary to replace the suction accumulator/drier (19C836)
.
 CAUTION: If an evaporator leak is suspected, the A/C evaporator core
must be leak-tested before it is removed from the vehicle. Refer to
Section 12-00 for the leak-test procedure.
CAUTION: If an evaporator leak is suspected, the A/C evaporator core
must be leak-tested before it is removed from the vehicle. Refer to
Section 12-00 for the leak-test procedure.
Removal and Installation
- Disconnect battery ground cable (14301)
.
- Remove two console armrest mounting access covers (047A62)
at rear of console panel (045A36)
(snaps out) to gain access to armrest retaining bolts.
- Remove four armrest-to-floor bracket retaining bolts and remove armrest
assembly (snaps out of console).
- Remove console panel gear shift plate (044G24)
(snaps out). On vehicle equipped with manual
transmission, shift boot is attached to bottom of finish panel. Remove shift
knob and slide boot and console panel gear shift plate
up shift lever to remove.
- To remove console top panel (044D90)
, position parking brake lever in UP position. Remove
four retaining screws and lift console top panel
up. Disconnect necessary wire connectors.
- Remove two console-to-rear floor bracket retaining screws.
- Insert a small screwdriver into two notches at bottom of front upper finish
panel and snap out.
- Remove the radio chassis (18806)
if equipped. Refer to Section 15-01. If the vehicle is
not equipped with a radio chassis
, use a small screwdriver and pry radio cover finish
panel out of console.
- Flex glove compartment bin tabs inward. Drop down glove compartment (06010)
assembly. Remove two console-to-instrument panel
retaining screws.
- Remove four console bracket retaining screws. Remove console panel
from vehicle.
- Remove three bolts retaining steering column opening cover (3A673)
and reinforcement panel. Remove cover.
- Remove steering column opening reinforcement by removing two bolts.
- Remove two bolts retaining steering column opening reinforcement and remove
reinforcement.
- Remove six steering column retaining nuts (two retaining the hood release
mechanism and four retaining column to lower brake pedal (2455)
support). Lower steering column to floor.
- Remove upper and lower steering column shrouds (3530)
and disconnect wiring from turn signal and windshield wiper switch (13K359)
.
- Remove steering column through bolt and nut on engine compartment side of
cowl panel. Remove steering column from vehicle.
- Remove brake pedal support nut.
- Snap out instrument panel defroster opening grille (044E82)
.
- Remove screws from door speaker covers. Snap out speaker covers.
- Remove front screws retaining RH and LH scuff plates at cowl side trim
panels.
- Remove RH and LH cowl side trim panels.
- Disconnect wiring at RH cowl side.
- Remove cowl side retaining bolts (one each side).
- Remove five cowl top screws attachments.
- Gently pull instrument panel (04320)
away from RH side of cowl panel. Disconnect speedometer
cable, air conditioning controls and wire connectors.
- Place a drain pan or suitable container under the heater water hose
connections at the cowl panel.
- Discharge refrigerant from A/C system at service access gauge port valve
located on suction line. Observe all safety precautions. Refer to Section 12-00.
- Disconnect condenser to evaporator tube (19835)
and suction accumulator/drier inlet tube from A/C evaporator core
at cowl panel. Cap refrigerant lines and evaporator
core tube to prevent entrance of dirt and excess moisture.
- Once refrigerant is discharged from the system, remove high- and
low-pressure hoses. Use a backup wrench to prevent component damage. Cap hose
openings to prevent entrance of dirt and excess moisture.
- Disconnect heater water hoses (18472)
from heater core tubes and plug heater water hoses
with suitable 5/8-inch and 3/4-inch plugs.
Cap heater core tubes to prevent coolant loss from heater core (18476)
during removal of A/C evaporator housing (19850)
.
- Remove screw retaining A/C evaporator case support bracket (19A639)
to cowl top panel.
- Disconnect vacuum supply hose (black) from vacuum supply in engine
compartment.
- Working under the hood (16612)
, remove nut retaining A/C evaporator housing to cowl
panel.
- Inside passenger compartment, remove one nut and one screw retaining A/C evaporator case mounting bracket (19A865)
to cowl top panel.
- Remove one screw retaining A/C evaporator case mounting bracket
below A/C evaporator housing
to cowl panel.
- Carefully pull A/C evaporator housing
away from cowl panel and remove A/C evaporator housing
assembly from vehicle.
- To install, reverse Removal procedure. Check operation of all components.
- After service has been completed, check the coolant level in the radiator (8005)
and in the radiator coolant recovery reservoir (8A080)
. Fill as required with the recommended coolant mixture.
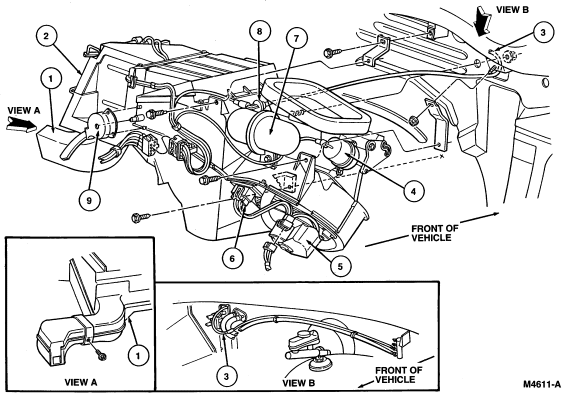
| Item |
Part Number |
Description |
|
1
|
18C433
|
Heater Outlet Floor Duct
|
|
2
|
19850
|
A/C Evaporator Housing
|
|
|
Ś
|
Heater Case
|
|
3
|
Ś
|
To Vacuum Source
|
|
4
|
18A318
|
Heater Air Inlet Duct Door (Part of 18A318)
|
|
5
|
19805
|
A/C Blower Motor
|
|
6
|
18591
|
Heater Blower Motor Switch Resistor
|
|
7
|
Ś
|
Vacuum Tank (Part of 18454)
|
|
8
|
Ś
|
Check Valve (Part of 18454)
|
|
9
|
19988
|
A/C Temperature Cable
|