Section 12-00: Climate Control System—Service | 1994 Mustang Workshop Manual |
SERVICE PROCEDURES
A/C Compressor
A/C Manifold and Tube Leak Test
- Tighten A/C manifold and tube retaining bolt to 18-23 Nm
(14-16 lb-ft).
- Add refrigerant to the system if necessary.
- Leak test the o-rings using Rotunda R-134a Halogen Leak Detector 161-R0010
or equivalent.
- If no leaks are found, the o-rings are good.
- If a leak is found at the A/C manifold and tube (19D734)
and the A/C manifold and tube retaining bolt is
tightened to 18-23 Nm (14-16 lb-ft), install new o-rings as
outlined. Then repeat the leak test.
External Leak Test
SPECIAL SERVICE TOOL(S) REQUIRED
| Description |
Tool Number |
| Pressure Test Plate |
T94P-19623-E |
NOTE: It may be necessary to remove the A/C compressor (19703)
from the vehicle for this test.
- If the A/C compressor
is on the vehicle, discharge the system following the
recommended service procedure.
- Remove the A/C manifold and tube attaching bolt and remove the A/C manifold and tube
from the rear head of the A/C compressor
. Install Rotunda Pressure Test Plate T94P-19623-E on
the rear
head of the A/C compressor
using the existing A/C manifold and tube retaining bolt.
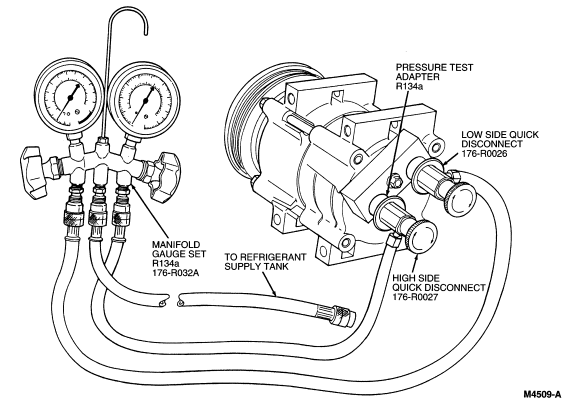
- Connect the high and low pressure lines of a manifold gauge set to the
corresponding fittings on the Pressure Test Plate.
- Attach the center hose of the manifold gauge set to a refrigerant container
standing in an upright position.
- Rotate A/C compressor shaft 10 complete revolutions to distribute oil within A/C compressor
.
- Open the low pressure gauge valve, the high pressure gauge valve and the
valve on the refrigerant container to allow the refrigerant vapor to flow into
the A/C compressor
.
- Using Rotunda Leak Detector, check for leaks at the A/C compressor shaft
seal and the A/C compressor center seal.
- If a shaft seal leak is found, install a new shaft seal following the
procedure given in in Section 12-03B. If an external leak is found at the
center joint of the A/C compressor
, install a new A/C compressor
assembly.
- Reinstall the A/C manifold and tube
, leak test, evacuate and charge system as outlined.
Observe all safety precautions.
A/C Compressor Leak Test
Rotating Torque Check
NOTE: It may be necessary to remove the A/C compressor
from the vehicle for this test.
The rotational torque of a used A/C compressor
should be checked if excessive drag is suspected.
- Remove refrigerant from the system following recommended service
procedures. Observe all safety precautions.
- Remove refrigerant hose and A/C manifold and tube
assembly from A/C compressor
. Use care not to allow dirt to enter A/C compressor
.
- With the A/C clutch (2884)
disengaged, rotate the A/C compressor shaft and note the
torque required to rotate the shaft one complete revolution. This is not the
starting torque.
- If the rotational torque exceeds specification 9 Nm (7
lb-ft), replace the A/C compressor
assembly.
- If the rotational torque is less than specified, excessive drag does not
exist in the A/C compressor
. Install the A/C manifold and tube
assembly and leak test, evacuate and charge the system.
- Check the system for proper operation.