Section 10-01: Fuel Tank, Filter and Electric Fuel Pump | 1994 Mustang Workshop Manual |
SERVICE PROCEDURES
Fuel System—Pressurized
Fuel Lines, Steel
EFI systems are equipped with an electric fuel pump (9350)
that provides fuel to the engine at higher pressure than
conventional fuel systems. For
electric fuel pump
diagnosis and testing, refer to Section 10-00. A fuel
return system is also provided. All fuel hose/tube connections are made with
push connect fittings, and all hoses are serviced as assemblies. The metal
tubes attached to the vehicle underbody may be serviced and repaired. The metal
underbody tubes must be cut and formed out of rolls of fuel system service
tubing available at the dealerships.
A damaged section of tubing can be cut out of the existing line and
replaced by a comparable service tubing section, spliced into the line by means
of threaded fasteners and connectors.
All replacement hoses must be serviced as
assemblies. Refer to Push Connect
Fitting Installation for connecting
procedure. Bulk fuel hose must not be used to service tubing in high pressure
fuel systems.
 WARNING: FUEL SUPPLY LINES ON VEHICLES EQUIPPED WITH FUEL INJECTED ENGINES WILL
REMAIN PRESSURIZED FOR LONG PERIODS OF TIME AFTER ENGINE SHUTDOWN. THE PRESSURE
MUST BE RELIEVED BEFORE SERVICING THE FUEL SYSTEM. REFER TO FUEL SYSTEM
PRESSURE RELIEF.
WARNING: FUEL SUPPLY LINES ON VEHICLES EQUIPPED WITH FUEL INJECTED ENGINES WILL
REMAIN PRESSURIZED FOR LONG PERIODS OF TIME AFTER ENGINE SHUTDOWN. THE PRESSURE
MUST BE RELIEVED BEFORE SERVICING THE FUEL SYSTEM. REFER TO FUEL SYSTEM
PRESSURE RELIEF.
Removal
- Drain the fuel from the fuel tank (9002)
as outlined.
- Disconnect the line(s) at the fuel tank
and at the
engine. Remove the lines from the holding clips along the
underbody. Remove all damaged hoses and tube sections.
Installation
NOTE: After disassembly of the flareless fitting joint, such as at the fuel
hose to fuel line connection, the flareless fitting can be reassembled. To
reassemble, reconnect the threaded fitting and seat the ferrule to be
finger-tight. When the ferrule is seated, draw the nut up approximately
one-sixth to one-third of a turn with a wrench to complete the tightening
operation.
- Cut a new section of tubing to approximately the same length as the section
to be replaced, allowing for the threaded connectors/fasteners.
- Bend the tube section to conform to the contour of the original tube.
- Square the ends of the cut tubing with a file. Remove burrs. Blow out any
particles with compressed air.
- Position the lines in the underbody clips. Do not tighten at this time.
- Assemble the fitting by sliding the nut over the tubing with threaded
(open) end out.
- Slide the ferrule on the tubing with the cutting edge out, the large head
end should be inside of the nut.
- Lubricate the ferrule and the threads on the fasteners with oil.
- Bottom the tube in the fitting, and tighten the nut until the ferrule just
grips the tube. When the tube can no longer be turned by hand, the ferrule has
started to grip the tube.
- After the ferrule grips the tube, tighten the nut one full turn.
- Tighten the fuel line to the underbody clips to secure the fuel lines.
- Fill the fuel tank
and check for leaks.
Fuel and Vapor Return Tubes
Vehicles equipped with nylon fuel tubes and push connect fittings have
three types of service that can be performed to the fuel lines: replacing nylon
tubing (splicing nylon to nylon), replacing push connector fittings and
replacing damaged push connect tube end. These methods follow:
Splicing Nylon to Nylon
- Relieve fuel system pressure as outlined. Read cautionary note prior to
relieving pressurized fuel system. If necessary, drain fuel from fuel tank
as outlined.
- Cut out damaged section of tubing and retain as a guide.
- Cut a section of service tubing (type 11 or 12 nylon available in 1/4 and
5/16 inch sizes) to the same length as the damaged section of tubing.
NOTE: To make hand insertion of the barbed connectors into the nylon easier,
the tube end must be soaked in a cup of boiling water for one minute
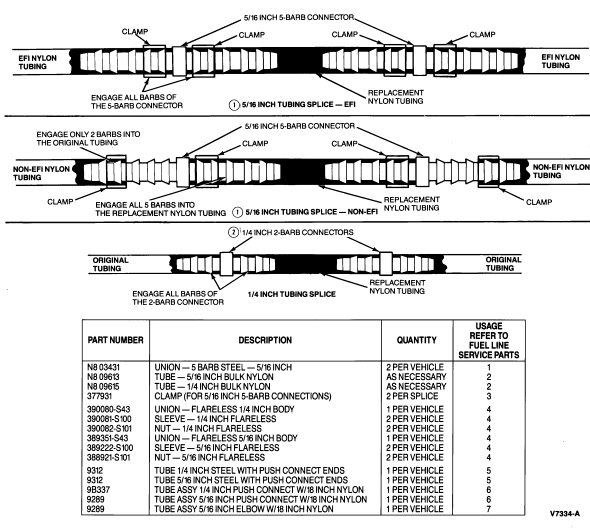
immediately before pushing the barbs into the nylon. The 5/16 inch barbed
connector is used for splicing 5/16 inch non-EFI and 5/16 inch EFI tubing.
- Select the proper (1/4 or 5/16 inch) barbed connectors for completing the
splice. Two connectors are required for each splice.
Splicing Service Combinations
CAUTION: Do not use any heating method except hot water to service nylon
tubing. Temperatures above 100°C (212°F)
cause the plastic to soften and it will not seal on the barbed connectors.
- Install the barbed connectors into each end of the replacement tubing using
boiling water as outlined.
- Install clips onto any tubes which might be difficult to access once the
final splices are completed.
- Install four keystone clamps loosely onto the original nylon tubing before
beginning Step 8.
- Complete the splice of the replacement nylon to the original nylon tubing
at both ends. (Use the boiling water method mentioned previously to get the
required number of barbs engaged, as shown in the illustration following Step
4).
- Tighten the clamps in the locations shown in the illustration following
Step 4.
- Install any remaining clips which were removed for this service and check
that the tubes are secure in the original clips.
- Fill fuel tank
, start engine and check for leaks.
Nylon Push Connectors
NOTE: Damaged push connectors must be discarded and replaced with new push
connectors. If only retaining clip is damaged, replace the clip.
- Relieve fuel system pressure as outlined. Read cautionary note prior to
relieving pressurized fuel system. If necessary, drain fuel as outlined.
- Disconnect the damaged push connector. Be sure to bend the shipping tab to
the side before removing retaining clip.
- Select the proper size replacement push connector and nylon tube assembly.
Refer to illustration showing Fuel Line Service Parts.
- Cut out a section of the original nylon tube to the same length as the
nylon tube attached to the new push connector.
NOTE: To make hand insertion of barbed connectors into the nylon easier, the
tube end must be soaked in a cup of boiling water for one minute immediately
before pushing the barbs into the nylon. The 5/16 inch barbed connector is used
for splicing 5/16 inch non-EFI and 5/16 inch EFI tubing. Refer to illustration
following Step 4, Splicing Nylon to Nylon procedure, for all splicing service
combinations.
- Install proper barbed connector into replacement nylon assembly.
- Install two keystone clamps loosely onto the original nylon tubing before
beginning Step 7.
- Complete the splice by connecting barbed connector to original nylon. Refer
to illustration following Step 4, Splicing Nylon to Nylon procedure, for the
proper barb insertion.
- Tighten clamps in locations shown in illustration following Step 4,
Splicing Nylon to Nylon procedure.
- Connect the new connector assembly to the steel tube end.
- Check that the underbody clips are properly securing the fuel tubes.
- Fill fuel tank
, start
engine and check for fuel leaks.