Section 05-02B: Axle, Integral Carrier — 8.8 Inch Ring Gear | 1994 Mustang Workshop Manual |
DISASSEMBLY AND ASSEMBLY
Axle Assembly
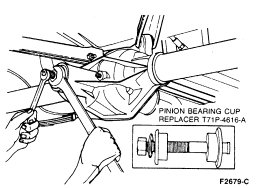
Pinion Bearing Cup Installation
SPECIAL SERVICE TOOL(S) REQUIRED
| Description |
Tool Number |
| Pinion Bearing Cup Replacer |
T71P-4616-A |
Install the new rear axle pinion bearing cups (4628)
with Pinion Bearing Cup Replacer
T71P-4616-A. Make sure the rear axle pinion bearing cups
are properly seated in their bores. If a
0.038mm (0.0015 inch) feeler gauge can be inserted between a rear axle pinion bearing cup
and the bottom of its bore at any point around the rear axle pinion bearing cup
,
the rear axle pinion bearing cup
is not properly seated. Whenever the rear axle pinion bearing cups
are replaced, the differential pinion bearings (4630)
should also be replaced.
Drive Pinion Shim Selection
SPECIAL SERVICE TOOL(S) REQUIRED
| Description |
Tool Number |
| Pinion Depth Gauge Set |
T79P-4020-A |
A drive pinion bearing adjustment shim (4663)
(0.254mm to 0.965mm (0.010 to 0.038 inch)) is used
between differential pinion bearing
and pinion head. The drive pinion bearing adjustment shim
compensates for machining variations in rear axle housing (4010)
, differential ring gear and pinion (4209)
and differential pinion bearings (4621)
. The correct drive pinion bearing adjustment
shim size will locate pinion for proper tooth contact with ring gear. Selecting
correct drive pinion bearing adjustment shim
when installing a new differential ring gear and pinion
can be done by using Pinion Depth Gauge Set T79P-4020-A
as follows:
- Assemble the appropriate aligning adapter, gauge disc and gauge block to
the screw as shown.
Rear Axle Pinion Depth Gauge Set—T79P-4020-A
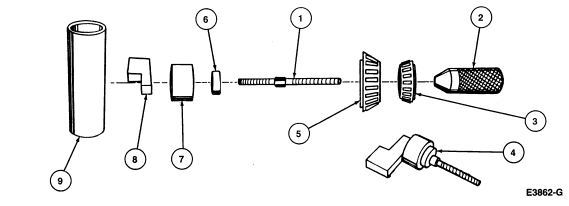
| Item |
Part Number |
Description |
|
1
|
T76P-4020-A9
|
Screw
|
|
2
|
T76P-4020-A11
|
Handle
|
|
3
|
4621
|
Differential Pinion Bearing
|
|
4
|
—
|
Assembled Tool
|
|
5
|
4630
|
Differential Pinion Bearing
|
|
6
|
T76P-4020-A3
|
Alignment Adapter (1.6120D)
|
|
7
|
T79P-4020-A18
|
Gauge Disc (1.884 Thick)
|
|
8
|
T76P-4020-A10
|
Gauge Block (1.700 Thick)
|
|
9
|
T79P-4020-A19
|
Gauge Tube
|
NOTE: The gauge block must be off-set to obtain an accurate reading.
- Place differential pinion bearing
(new, or used if in good condition) over aligning disc
and insert into rear axle pinion bearing cup
of the
carrier. Place differential pinion bearing
into the bearing cap and assemble the tool handle into
screw and tighten to 2.2 Nm
(20 lb-in).
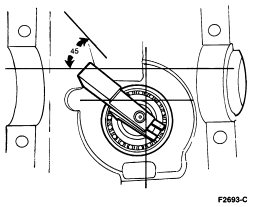
- Make sure that the gauge handle adapter screw, aligning adapter, gauge disc
and gauge block assembly are securely mounted
between the differential pinion bearing
and differential pinion bearing
. Check the tool handle torque prior to gauging to ensure
that bearings are properly seated.
This can affect final shim selection when improperly assembled. Clean rear axle pinion bearing cups
and differential pedestal surfaces
thoroughly. Apply only light oil film on bearing assemblies prior to gauging.
- The gauge block should then be rotated several half turns to ensure rollers
are properly seated in rear axle pinion bearing cups
. Rotational torque on the gauge assembly
should be 2.2 Nm
(20 lb-in) with new bearings. Final position should be
approximately 45 degrees across gauge tube to ensure
that gauge block is in-line with gauge tube high point. This area should be
used for drive pinion bearing adjustment shim
selection. Selection of drive pinion bearing adjustment shim
with gauge block not lined up with tube high point will
cause improper drive pinion bearing adjustment shim
selection and may result in axle noise.
NOTE: Shims must be flat. Do not use dirty, bent, nicked or mutilated drive pinion bearing adjustment shims
as a gauge.
- Use drive pinion bearing adjustment shims as the gauge for shim selection. This
will minimize errors in attempting to stack feeler gauge stock together or
simple
addition errors in calculating correct shim thickness.
NOTE: The same differential pinion bearing
used in this procedure must be used in final assembly of
the axle.
- It is important to feel a slight drag on the drive pinion bearing adjustment shim
for correct selection. Do not attempt to force the drive pinion bearing adjustment shim
between the gauge block and the gauge tube. This will
minimize selection of a drive pinion bearing adjustment shim
thicker than required which results in a deep tooth
contact in
final assembly of integral axles.
NOTE: A tooth pattern check with the marking compound and road testing is not
required when Pinion Depth Gauge Set T79P-4020-A
is used.
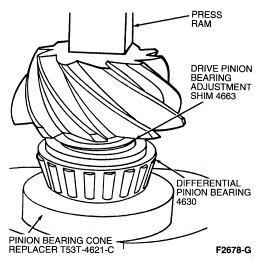
- Place the selected drive pinion bearing adjustment shims
on pinion shaft and press differential pinion bearing
until firmly seated on shaft.
Drive Pinion and Flange Yoke Seal Installation
SPECIAL SERVICE TOOL(S) REQUIRED
| Description |
Tool Number |
| Pinion Seal Replacer |
T79P-4676-A |
| Companion Flange Holding Tool |
T78P-4851-A |
- Place the drive pinion bearing adjustment shims
on the pinion and press the differential pinion bearing
until it is firmly seated on the shaft.
Pinion Rear Bearing Installation
- Check splines on pinion stem to be sure they are free of burrs. If burrs
are evident, remove by using a fine crocus cloth,
working in a rotational motion. Wipe pinion clean.
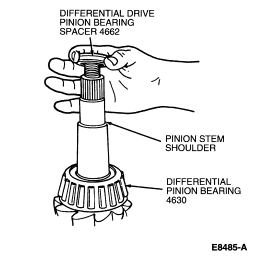
- Place a new differential drive pinion bearing spacer (4662)
on pinion stem against the pinion stem shoulder.
NOTE: Clean the flange yoke seal (4676)
surface before installing the rear axle drive pinion shaft oil slinger (4670)
in the rear axle housing
bore. Coat lips of rear axle drive pinion shaft oil slinger
with Premium Long-Life Grease XG-1-C or -K or equivalent
meeting Ford specification ESA-M1C75-B.
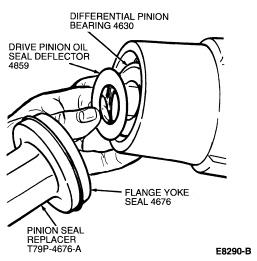
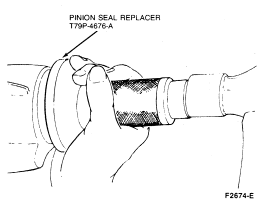
- Install the differential pinion bearing
and rear axle drive pinion shaft oil slinger
in the housing bore and install the rear axle drive pinion shaft oil slinger
on the Pinion Seal Replacer T79P-4676-A.
 CAUTION: Installation without the proper tool may result in early flange yoke seal
failure. If flange yoke seal
becomes cocked during installation,
remove it and install new one.
CAUTION: Installation without the proper tool may result in early flange yoke seal
failure. If flange yoke seal
becomes cocked during installation,
remove it and install new one.
- Install flange yoke seal
in rear axle housing
.
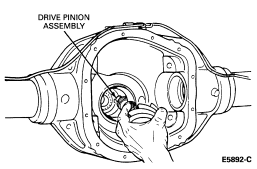
- From rear of rear axle housing
, install drive pinion assembly (drive pinion, drive pinion bearing adjustment shims
, differential pinion bearing
and differential drive pinion bearing spacer
) into the rear axle housing
pinion shaft bore.
Drive Pinion Assembly Installation
- Apply a small amount of rear axle lubricant to rear axle universal joint flange (4851)
splines.
NOTE: If a new rear axle universal joint flange
is being installed, disregard the scribe mark on the
pinion stem.
- Align mark on rear axle universal joint flange
with mark on the pinion shaft.
- With drive pinion in place in rear axle housing
, install rear axle universal joint flange
using Companion Flange Replacer TOOL-4858-E or
equivalent.
CAUTION: The rear axle universal joint flange
must never be hammered on or installed with power tools.
- Install a new pinion nut on pinion shaft (apply a small amount of
lubricant on the washer side of nut).
- Hold the rear axle universal joint flange
with Companion Flange Holding Tool T78P-4851-A while
tightening the nut.
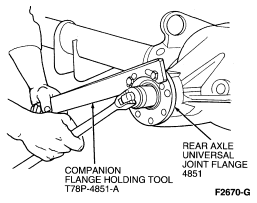
- Tighten pinion nut. Rotate pinion occasionally to ensure proper bearing
seating. Take frequent pinion bearing torque
preload readings until the original recorded preload reading is obtained.
CAUTION: Under no circumstances should the pinion nut be backed-off to reduce
preload. If reduced preload is required, a new differential drive pinion bearing spacer
and pinion nut must be installed.
- If the original recorded preload is less than specification,
tighten to 0.9-1.5 Nm (8-14 lb-in) bearings, 1.8-3.2 Nm
(16-29 lb-in) new bearings. If the preload is higher than
specification, tighten to original reading as recorded.
Differential Case Installation
Condition 1
Follow this procedure only when differential ring gear and pinion
replacement is required and the differential bearings (4221)
and differential case (4204)
do not require replacement.
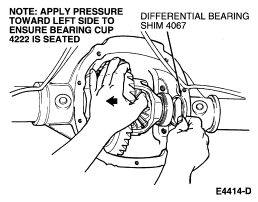
- Remove the differential caps and bolts. Identify the RH cap, RH differential bearing cup (4222)
and differential bearing shim (4067)
to keep these components as RH and LH sets.
- Remove the differential case
subassembly using the pry bar method. Reasonable effort
will be required to remove subassembly
if preload is within specification range. If subassembly can be removed by
hand, use Condition 2 for assembly.
- Replace the ring and pinion members utilizing the differential bearing shim
components from the original assembly and select the drive pinion bearing adjustment shim
as outlined.
( Differential bearing shim may be reused with the exception of drive pinion bearing adjustment shim
which will require regauging to specification before
assembly.)
NOTE: Tighten rear axle differential gear case bolts (4216)
in a crisscross pattern.
Condition 2
Follow this procedure when original differential bearing shims
are not available or when rear axle housing
, differential case
or differential bearing
replacement is required.
- With pinion depth set and pinion installed, place the differential
case/gear subassembly with differential bearings
and differential bearing cups
in rear axle housing
.
- Install a 6.74mm (0.265-inch) differential bearing shim
on the LH side.
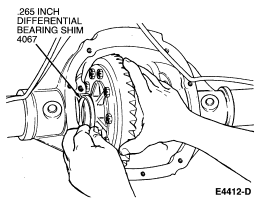
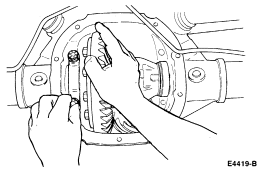
- Install LH bearing cap finger-tight.
- Install progressively larger differential bearing shims
on the RH side until the largest differential bearing shim
selected can be assembled with a slight drag feel.
- Install RH side bearing cap and differential bearing cap bolts. Tighten to
95-115 Nm (70-85 lb-ft).
- Rotate the assembly to ensure free operation.
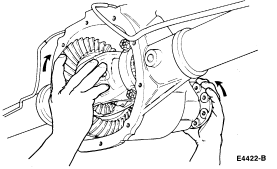
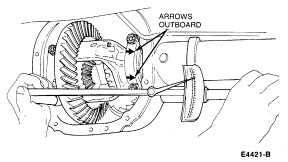
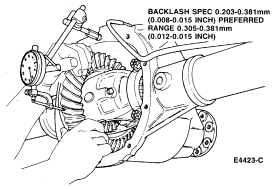
- Check gear and pinion backlash. If backlash is within specification, go to
Step 14. If backlash is not within
specification, go to Step 10. If zero backlash is measured, proceed with Step 8.
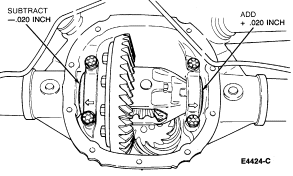
- If a zero backlash condition occurs, add 0.50mm (0.020 inch) to the RH side
and subtract 0.50mm (0.020) inch from the LH side to allow backlash indication.
- Check backlash as outlined in Step 7.
- If backlash is not to specification, correct backlash by increasing
thickness of one differential bearing shim
and decreasing thickness on the other differential bearing shim
by the same amount. Refer to the following illustrations
for approximate differential bearing shim change.
Adjusting Backlash
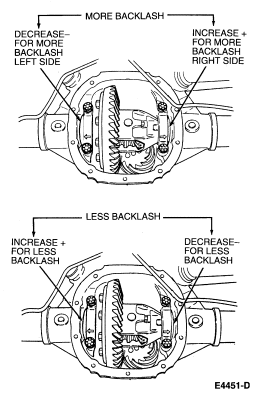
| Backlash Change Required |
Thickness Change Required |
| Inch |
mm |
Inch |
mm |
| 0.001 |
0.025 |
0.002 |
0.050 |
| 0.002 |
0.050 |
0.002 |
0.050 |
| 0.003 |
0.076 |
0.004 |
0.101 |
| 0.004 |
0.101 |
0.006 |
0.152 |
| 0.005 |
0.127 |
0.006 |
0.152 |
| 0.006 |
0.152 |
0.008 |
0.203 |
| 0.007 |
0.177 |
0.010 |
0.254 |
| 0.008 |
0.203 |
0.010 |
0.254 |
| 0.009 |
0.228 |
0.012 |
0.304 |
| 0.010 |
0.254 |
0.014 |
0.355 |
| 0.011 |
0.279 |
0.014 |
0.355 |
| 0.012 |
0.304 |
0.016 |
0.406 |
| 0.013 |
0.330 |
0.018 |
0.457 |
| 0.014 |
0.335 |
0.018 |
0.457 |
| 0.015 |
0.381 |
0.020 |
0.508 |
DIFFERENTIAL SHIM SIZE CHART
| Numbers of Stripes and Color Code |
Dimension A |
| Inch |
mm |
| 2—C-COAL |
0.3070—0.3075 |
7.7978—7.8105 |
| 1—C-COAL |
0.3050—0.3055 |
7.7470—7.7597 |
| 5—BLU |
0.3030—0.3035 |
7.6962—7.7089 |
| 4—BLU |
0.3010—0.3015 |
7.6454—7.6581 |
| 3—BLU |
0.2990—0.2995 |
7.5946—7.6073 |
| 2—BLU |
0.2970—0.2975 |
7.5458—7.5565 |
| 5—PINK |
0.2930—0.2935 |
7.4422—7.4549 |
| 4—PINK |
0.2910—0.2915 |
7.3914—7.4041 |
| 3—PINK |
0.2890—0.2895 |
7.3406—7.3533 |
| 2—PINK |
0.2870—0.2875 |
7.2898—7.3025 |
| 1—PINK |
0.2850—0.2855 |
7.2390—7.2517 |
| 5—GRN |
0.2830—0.2835 |
7.1882—7.2009 |
| 4—GRN |
0.2810—0.2815 |
7.1374—7.1501 |
| 3—GRN |
0.2790—0.2795 |
7.0866—7.0993 |
| 2—GRN |
0.2770—0.2775 |
7.0358—7.0485 |
| 1—GRN |
0.2750—0.2755 |
6.985—7.0485 |
| 5—WH |
0.2730—0.2735 |
6.9342—6.9469 |
| 4—WH |
0.2710—0.2715 |
6.8834—6.8961 |
| 3—WH |
0.2690—0.2695 |
6.8326—6.8453 |
| 2—WH |
0.2670—0.2675 |
6.7818—6.7945 |
| 1—WH |
0.2650—0.2655 |
6.731—6.7437 |
| 5—YEL |
0.2630—0.2635 |
6.6802—6.6929 |
| 4—YEL |
0.2610—0.2615 |
6.6294—6.6421 |
| 3—YEL |
0.2590—0.2595 |
6.5786—6.5913 |
| 2—YEL |
0.2570—0.2575 |
6.5278—6.5405 |
| 1—YEL |
0.2550—0.2555 |
6.4770—6.4897 |
| 5—ORNG |
0.2530—0.2535 |
6.4262—6.4389 |
| 4—ORNG |
0.2510—0.2515 |
6.3754—6.3881 |
| 3—ORNG |
0.2490—0.2495 |
6.3246—6.3373 |
| 2—ORNG |
0.2470—0.2475 |
6.2738—6.2865 |
| 1—ORNG |
0.2450—0.2455 |
6.2223—6.2357 |
| 2—RED |
0.2430—0.2335 |
6.1722—6.1849 |
| 1—RED |
0.2410—0.2415 |
6.1214—6.1341 |
- Install differential bearing shim
and bearing caps. Tighten caps to 95-115 Nm
(70-85 lb-ft).
- Rotate assembly several times.
- Recheck backlash as outlined in Step 7. If backlash is within
specification, proceed to Step 14. If not, repeat Step 10.
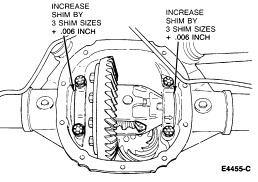
- Increase both LH and RH shim sizes by 0.1524mm (0.006 inch) and install for
correct differential bearing preload. Make sure the differential bearing shims
are fully seated and the assembly turns freely.
- Pattern legibility can be improved by connecting the driveshaft (4602)
and rotating both wheels (1007)
in the drive and coast direction.
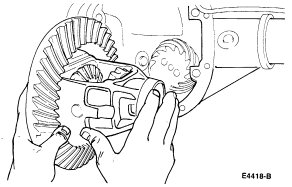
Tooth Contact Guidelines
Pattern inspection allows the technician to detect gross errors in set-up
prior to complete assembly. Pattern contact should be within the primary area
of the ring gear tooth surface avoiding "narrow" or
"hard" contact with the outer perimeter of tooth (top to root, toe to heel).
Pattern inspection should be on the drive (pull) side.
Correct assembly of drive pattern will result in satisfactory coast
performance. If gross pattern error is detected, with preferred backlash 0.305 to 0.381mm (0.012 to 0.015 inch), check drive pinion bearing adjustment shim
selection.
Axle Shaft Installation
CAUTION: Care must be taken not to let axle shaft splines damage inner wheel bearing oil seal (1177)
or rear wheel bearing (1225)
assembly.
NOTE: Check for presence of rear axle shaft o-ring (4A332)
on the spline end of the axle shaft (4234)
and install if not present.
- Carefully slide axle shaft
into rear axle housing
, without damaging rear wheel bearing
or inner wheel bearing oil seal
assembly. Start splines into differential side gear (4236)
and push firmly until the button end of axle shaft
can be seen in the differential case
.
- Install the rear axle shaft retaining u-washer (4N237)
on the button end of the axle shaft splines, then push
the axle shaft
outboard until the shaft splines engage and the rear axle shaft retaining u-washer
seats in the counterbore of the differential side gear
.
CAUTION: Differential pinion shaft lock pin (4241) must be tightened to specification using Stud
and Bearing Mount E0AZ-19554-BA or equivalent meeting Ford specification
WSK-M2G349-A1.
- Position the differential pinion shaft (4211)
through the differential case
and differential pinion gears (4215)
, aligning the hole in the shaft with the
differential pinion shaft lock pin hole. Install differential pinion shaft lock pin
and tighten to 20-41 Nm (15-30 lb-ft).
Cover Installation
NOTE: Axle housing cover (4033) assembly must be installed within 15 minutes of
application of the silicone rubber or new silicone rubber must be
applied.
CAUTION: Ensure machined surfaces on both axle housing cover
and rear axle housing
are clean before installing the new silicone rubber.
Inside of axle
must be covered when cleaning the machined surface to prevent axle
contamination. Tighten the axle housing cover bolts (4346)
in a crosswise pattern to ensure uniform
draw on axle housing cover
.
- Apply a continuous bead of Silicone Rubber
D6AZ-19562-AA or BA or equivalent meeting Ford specification ESE-M4G195-A and
ESB-M4G72-A. Install axle housing cover and tighten axle housing cover bolts
to 38-52 Nm (28-38 lb-ft).
Tighten ratio tag cover bolt (two o'clock position) to 24-38 Nm
(18-28 lb-ft).

- Add Rear Axle Lubricant XY-90-QL or -KL or equivalent meeting Ford
specification ESP-M2C154-A until it is 6-14mm (1/4-9/16-inch) below bottom of
fill hole. Add 118ml (4 oz) of Additive Friction Modifier C8AZ-19B546-A or
equivalent meeting Ford specification EST-M2C118-A for Traction-Lok axles.
Install fill plug and tighten to 20-41 Nm (15-30 lb-ft).
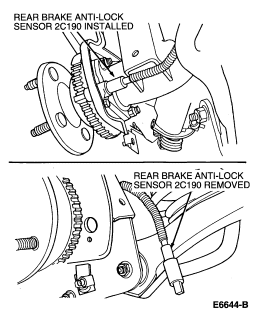
Sensor, Anti-Lock Brake
Installation
- Install rear brake anti-lock sensor (2C190)
.
- Tighten to 4.5-6.8 Nm (40-60 lb-in).