Section 03-07A: Ignition, Distributor
1994 Mustang Workshop Manual
REMOVAL AND INSTALLATION

Stator

 
SPECIAL SERVICE TOOL(S) REQUIRED
Description Tool Number
Axle Bearing/Seal Plate T75L-1165-B


Removal

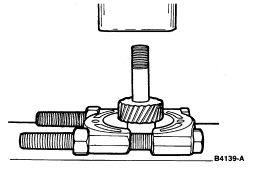
 CAUTION: Do not attempt to replace stator without an arbor press.

  1. Remove distributor cap (12106) , position the distributor cap and ignition wires aside away from the work area. Disconnect distributor (12127) from engine control sensor wiring (12A581) .
  1. Remove distributor rotor (12200) .
  1. Remove distributor from cylinder block (6010) as outlined.

    NOTE: Hold distributor drive gear to loosen armature screws. Do not hold armature.
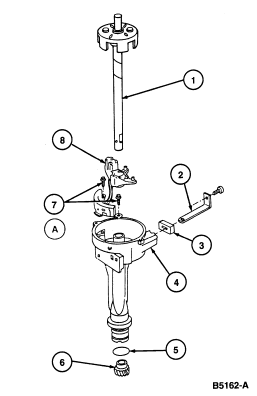
  1. Remove two screws holding armature and remove armature.
  1. To ease assembly, mark armature collar and distributor drive gear with a felt tip pen.
  1. Remove and discard pin in distributor drive gear and in collar.
  1. Invert distributor and place in Axle Bearing/Seal Plate T75L-1165-B and press off gear using the Pinion Bearing Cone Remover D79L-4621-A or equivalent.


  1. Remove armature.
  1. Deburr and polish shaft with emery paper and clean armature shaft. The shaft should slide freely on the distributor base.
  1. Remove shaft assembly.
  1. Remove two stator assembly screws and retain.
  1. Remove distributor stator (12A112) from top of distributor housing.
  1. Remove octane rod retaining screw and octane rod.
  1. Inspect distributor base bushing for wear or signs of excess heat concentration. Replace complete distributor if damaged.
  1. Inspect distributor base O-ring for cuts or damage and replace O-ring if necessary.
  1. Inspect distributor base for cracks and wear. Replace complete distributor if damaged.


Open Bowl Distributor


Item Part Number Description
1 Shaft (Part of 12127)
2 Octane Rod (Part of 12127)
3 Grommet (Part of 12127)
4 12127 Distributor
5 12143 Distributor Base O-Ring
6 Gear (Part of 12127)
7A Screws (2 Req'd) (Part of 12127)
8 12A112 Distributor Stator
A Tighten to 1.7-4.0 Nm (15-35 Lb-In)
 

Installation

  1. Place distributor stator over bushing and press into seat.
  1. Place stator connector in position. Tab in notch on distributor base and fastening eyelets aligned with screw holes.
  1. Position ignition wires away from moving parts.
  1. Install two stator retaining screws and tighten to 1.7-4.0 Nm (15-35 lb-in).
  1. Install octane rod and retaining screw. Tighten to 1.7-4.0 Nm (15-35 lb-in).
  1. Apply a light coat of Motor Oil XO-10W30-QSP or equivalent meeting Ford specification ESE-M2C153-E to distributor shaft below armature.
  1. Insert shaft through base bushing.
  1. Install collar and new roll pin.
  1. Place a 1/2-inch deep well socket over shaft; invert and place on arbor plate.


  1. Place the distributor drive gear on shaft end. Line up the mark on armature and gear.

    NOTE: The hole in the shaft and drive gear must be lined up as accurately as possible to ensure ease of roll pin insertion.

  1. Place a 5/8-inch deep well socket over the shaft and drive gear and press drive gear to align with original drill hole.

    NOTE: If the drive gear holes do not align, the drive gear must be removed and pressed on again. A drift punch will not align the holes.

     CAUTION: If drive gear is damaged, do not replace gear: serious engine damage may result. Replace complete distributor .


  1. Insert new roll pin through drive gear and shaft. Pin should have proper extrusion.
  1. Replace armature and tighten screws to 2.8-4.0 Nm (25-35 lb-in).

    NOTE: If the armature contacts the distributor stator , replace the entire distributor .

  1. Check distributor for free movement over full rotation of shaft.
  1. Install the distributor into cylinder block as outlined.
  1. Connect ignition control module (ICM) (12A297) to engine control sensor wiring .
  1. Replace distributor rotor .
  1. Replace distributor cap and tighten screws to 2.0-2.6 Nm (18-23 lb-in).
  1. Set initial engine ignition timing. Refer to Section 8A of the Powertrain Control/Emissions Diagnosis Manual.