Section 03-01A: Engine, 3.8L | 1994 Mustang Workshop Manual |
DISASSEMBLY AND ASSEMBLY
Oil Pump
Disassembly
- If necessary, remove oil bypass filter (6714)
.
- Remove oil pump and filter body (6603) to engine front cover retaining bolts and
remove oil pump and filter body
from engine front cover (6019)
.
- Lift pump gears out of pocket in oil pump and filter body
.
- Remove oil pump body seal (6C639) and discard.
- Clean sealing surfaces of engine front cover and oil pump and filter body
.
- Using a straightedge and feeler gauge, measure across mounting surface of engine front cover
for wear or warpage.
- If surface is out of flat by more than 0.04mm (0.0016 inch), replace the engine front cover
as outlined.
Assembly
 CAUTION: Failure to properly coat the oil pump gears may result in failure of
the pump to prime when engine is started.
CAUTION: Failure to properly coat the oil pump gears may result in failure of
the pump to prime when engine is started.
- Lightly pack gear pocket with petroleum jelly or coat all gear
surfaces with Engine Assembly Lubricant D9AZ-19579-D or equivalent meeting Ford
specification ESR-M99C80-A. Do not use chassis lubricants.
- Install gears in oil pump and filter body
pocket. Ensure petroleum jelly fills all voids between
gears and pockets.
- Position oil pump body seal and install oil pump and filter body
to engine front cover
using alignment dowels on engine front cover
.
- Tighten oil pump and filter body retaining bolts to 25-30 Nm
(18-22 lb-ft) for M8 bolts and 8-11 Nm (6-8 lb-ft) for M6
bolts.
Oil Pressure Relief Valve
Removal
- After drilling a hole through valve plug, remove plug with a slide hammer
or by prying.
- Remove spring and pressure relief valve from bore.
Inspection
- Thoroughly clean pressure relief valve bore and pressure relief valve to
remove any metal chips which may have entered bore as a result of drilling
operation.
- Inspect pressure relief valve and valve bore for wear, scoring or galling.
If inspection determines part(s) to be unserviceable, replace pressure relief
valve and/or oil pump and filter body
.
- Check clearance between pressure relief valve and bore. The valve should
slip into bore without side play or binding.
- Check spring for signs of fatigue or collapse.
Installation
- Lubricate pressure relief valve with engine oil and install in bore. The
end with
smaller diameter goes in first.
- Position spring in bore.
- Install a new plug. The plug can be tapped into bore using a plastic tipped
hammer. Ensure plug is 0-0.25mm (0-0.010 inch) below machined surface.
Oil Pump Intermediate Shaft
Removal
- Remove camshaft position sensor (CMP sensor) (6B288) and camshaft position sensor housing as outlined in Section 03-14.
- Separate oil pump intermediate shaft (6A618)
from camshaft position sensor housing shaft.
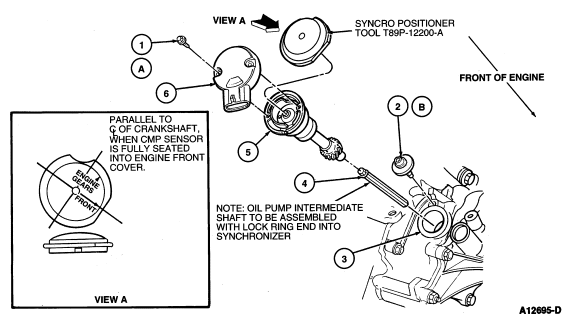
| Item |
Part Number |
Description |
|
1A
|
�
|
Screw and Washer (2 Req'd)
|
|
2B
|
12270
|
Hold-Down Clamp
|
|
3
|
6019
|
Engine Front Cover
|
|
4
|
6A618
|
Oil Pump Intermediate Shaft
|
|
5
|
�
|
Housing (Part of 6B288)
|
|
6
|
6B288
|
Camshaft Position Sensor
|
|
A
|
|
Tighten to 2.5-3.5 Nm (22-31 Lb-In)
|
|
B
|
|
Tighten to 20-30 Nm (15-22 Lb-Ft)
|
Installation
- Push lock ring end of oil pump intermediate shaft into
camshaft position sensor housing shaft.
NOTE: Install camshaft position sensor housing/ oil pump intermediate shaft
as an assembly, ensuring that end of oil pump intermediate shaft
is seated in oil pump drive gear.
- Install oil pump intermediate shaft and camshaft position sensor
as outlined in Section 03-14.
- Install hold-down clamp (12270). Tighten to 20-30 Nm (15-22 lb-ft).
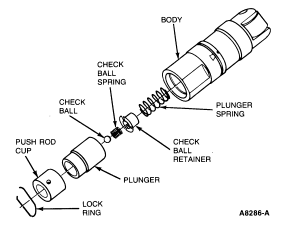
Hydraulic Valve Tappet
The internal parts of each hydraulic valve tappet (6500)
are matched sets. Do not intermix the parts. Keep the valve tappets
intact until they are to be cleaned. Valve tappets should always be tested after assembly. Refer to the cleaning,
inspection and test procedures in Section 03-00.
Disassembly
Disassemble and assemble each valve tappet separately. Identify the valve tappets
so they can be installed in their original bores.
- Grasp the lock ring with needlenose pliers to release it from the groove.
It may be necessary to depress the plunger to fully release lock ring.
- Remove the push rod cup, metering valve (disc), plunger and spring.
- Remove the plunger assembly, the check valve and the check valve retainer
and plunger spring. Carefully remove the plunger spring, the check valve
retainer and the check valve disc from the plunger.
Assembly
- Place the plunger upside down on a clean work bench.
- Place the check valve (disc or ball check) in position over the oil hole on
the bottom of the plunger. Set the check valve spring on top of the check valve
(disc or ball check).
- Position the check valve retainer over the check valve and spring and push
the retainer down into place on the plunger.
- Place the plunger spring and then the plunger (open end up) into the valve
tappet body.
- Position the metering valve (disc) in the plunger, and then place the push
rod cup in the plunger.
- Depress the plunger and position the closed end of the lock ring in the
groove of the valve tappet body. With the plunger still depressed, position the
open ends of the lock ring in the groove. Release the plunger and then depress
it again to fully seat the lock ring.
- Use the Hydraulic Tappet Leakdown Tester TOOL-6500-E or equivalent to fill
the valve tappets
with test fluid.
Cylinder Block Assembly
Disassembly
- Mount the engine in a work stand and remove all parts not furnished with
the new cylinder block (6010)
, following the procedures in Removal and Installation.
- Remove the cylinder head to block dowels (6A008)
and the cylinder block drain plugs.
- Remove the used cylinder block
from the work stand.
Assembly
- Clean the gasket and seal surfaces of all serviceable parts and assemblies.
- Position the new cylinder block
in a work stand and install the cylinder head to block dowels
and cylinder block drain plugs.
- Transfer all serviceable parts removed from the used cylinder block
, following the procedures in Removal and Installation.
- Check all assembly clearances and correct as necessary.
Cylinder Block, Bare
Before replacing a cylinder block
, determine if it is serviceable. If so, make the necessary
service. Refer to Section 03-00.
Disassembly
- Completely disassemble the used engine, following the procedures in Removal
and Installation.
- Remember to ridge ream the cylinder bores before removing pistons (6108)
.
- Remove the cylinder head to block dowels
and the cylinder block drain plugs.
Assembly
- Clean the gasket and seal surfaces of all serviceable parts and assemblies.
- Position the new cylinder block
in a work stand and install the cylinder head to block dowels
and the cylinder block drain plugs.
- Transfer all serviceable parts removed from the used cylinder block
, following the procedures in Removal and Installation.
- Check all assembly clearances and correct as necessary.