Section 03-01A: Engine, 3.8L
1994 Mustang Workshop Manual
IN VEHICLE SERVICE

Pistons and Connecting Rods


Removal

  1. Drain engine cooling system. Refer to Section 03-03.
  1. Remove intake manifolds (9424) as outlined.
  1. Remove cylinder heads (6049) as outlined.
  1. Remove oil pan (6675) as outlined.
  1. Before removing piston (6108) , inspect top of each cylinder bore. If a ridge has formed at the top of the cylinder it must be removed before piston removal. Remove ridge as follows:
    1. Turn crankshaft (6303) until piston to be removed is at bottom of cylinder bore.
    1. Place a clean shop cloth over piston head to collect cuttings.
    1. Remove ridge using Rotunda Cylinder Ridge Reamer 014-00292 or equivalent. Never cut into ring travel area more than 0.8mm (1/32 inch) when removing ridge.
  1. Turn crankshaft until piston to be removed is at the low point of its travel.

    If more than one piston is being removed, identify the piston and connecting rod caps by numbering 1 through 3 from front to rear on RH bank and 4 through 6 from front to rear on LH bank. This will make sure each component is installed in its original position during assembly.

  1. Remove connecting rod cap retaining nuts and cap.
  1. Install ignition wire spark plug boots over connecting rod cap studs and push piston out through the top of the cylinder bore. Use care to prevent damage to bearing surfaces.
  1. Install connecting rod cap and hold in position with cap retaining nuts.
  1. If piston is to be disassembled, refer to Piston, Disassembly.
  1. Inspect cylinder bore. If new piston rings are to be installed on the piston , a cross-hatch pattern should be obvious on the cylinder bore wall.

    If honing is required, remove glaze from cylinder bore wall using spring-loaded hone. Follow manufacturer's instructions when using this type of equipment.

    After honing, thoroughly clean cylinder bore using a detergent and water solution.


Installation

Lightly oil all retaining bolt and stud threads before installation except those specifying special sealant.

  1. Lubricate cylinder bore wall and piston with Engine Assembly Lubricant D9AZ-19579-D or equivalent meeting Ford specification ESR-M99C80-A.
  1. Install ignition wire spark plug boots or suitable protection on connecting rod (6200) .

     CAUTION: As piston is tapped into bore with a hammer handle, guide connecting rod onto crankshaft journal to avoid damage to bearing surfaces.

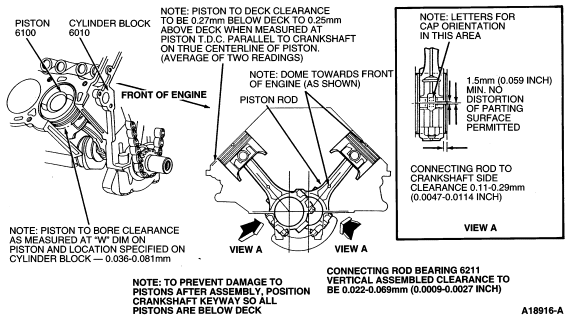
    NOTE: Install pistons in the same cylinders from which they were removed or to which they were fitted. If a connecting rod is transposed from one cylinder block (6010) or cylinder to another, new bearings should be fitted and connecting rod should be numbered to correspond with new cylinder number.

  1. Install piston with notch in piston dome facing the front of engine, using Rotunda Piston Ring Compressor 014-00290 or equivalent.
  1. Check connecting rod bearing clearances. Refer to Section 03-00.
  1. Lubricate bearing surfaces with Engine Assembly Lubricant D9AZ-19579-D or equivalent meeting Ford specification ESR-M99C80-A.
  1. Ensure connecting rod is seated on crankshaft journal. Install connecting rod cap.

    Tighten retaining nuts to 41-49 Nm (31-36 lb-ft). Back-off nuts two or three turns. Final tighten to 41-49 Nm (31-36 lb-ft).

  1. If necessary, check connecting rod side clearance as outlined in Section 03-00.
  1. Install oil pump screen cover and tube (6622) with a new oil pump inlet tube gasket (6626) .

    Tighten oil pump screen cover and tube support bracket retaining nut to 40-55 Nm (30-40 lb-ft).

  1. Install oil pan.
  1. Check piston deck clearance and bore clearance as outlined as shown.


  1. Install cylinder heads as outlined.
  1. Install intake manifold as outlined.
  1. Fill crankcase with the correct amount of specified oil.
  1. Fill cooling system with the specified engine coolant.
  1. Start engine and check for oil and coolant leaks.