Section 07-03: Transmission, Manual—T5OD
1994 Mustang Workshop Manual
INSTALLATION

Transmission

  1. Make sure that the mounting surface of the transmission and flywheel housing (6392) are free of dirt, paint and burrs. Install two guide pins in the flywheel housing lower mounting bolt holes. Raise the transmission and move forward on the guide pins until the input shaft splines enter the clutch hub splines and the case (7005) is positioned against the flywheel housing . Do not let transmission hang.
  1. Install the two upper transmission-to-flywheel housing retaining bolts snugly, and remove the two guide pins. Install the two lower retaining bolts. Tighten all retaining bolts to 61-88 Nm (45-65 lb-ft).
  1. Using a transmission jack, raise the transmission until the shift control selector lever and housing (7210) can be secured. Install and tighten the retaining bolts and washers to 31-43 Nm (23-32 lb-ft).
  1. Connect the speedometer cable (17260) and speedometer driven gear retainer (17292) to the extension housing (7A039) . Tighten the retaining screw to 6-13 Nm (54-115 lb-in).
  1. Using a transmission jack, raise the rear of the transmission and install the transmission support. Install and tighten retaining bolts to 68-95 Nm (51-70 lb-ft).
  1. With the extension housing resting on the engine rear support, install the transmission extension housing support retaining nut. Tighten the nut to 34-48 Nm (26-35 lb-ft).
  1. Connect the backup lamp switch (15520) wiring harness.
  1. Install the dual converter Y pipe (5F250) . Tighten the retaining bolts to 27-41 Nm (20-30 lb-ft).
  1. Remove the extension housing installation tool and slide the forward end of the driveshaft (4602) over the transmission output and fifth gear drive shaft (7061) . Connect the driveshaft to the rear axle universal joint flange (4851) . Ensure driveshaft index marks align. Tighten bolts to 95-130 Nm (71-95 lb-ft).
  1. Fill the transmission to 2.6L (5.6 pt) with Synthetic MERCON® Multi-Purpose Automatic Transmission Fluid XT-2-QDX or MERCON® equivalent.

    NOTE: Apply Pipe Sealant with Teflon® D8AZ-19554-A meeting Ford specification WSK-M2G350-AZ and ESR-M18P7-A or equivalent to the transmission case plug (7A010) in a clockwise direction prior to installation.

  1. Install transmission case plug. Tighten to 17-29 Nm (12-22 lb-ft).
  1.  CAUTION: Gearshift lever (7210) must only be installed in one direction (from LH side of the gearshift lever).
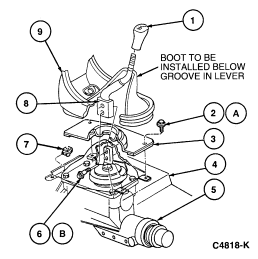
    Lower the vehicle. While working from inside the vehicle install the two bolts retaining the gearshift lever to transmission. tighten to 31-43 Nm (23-31 lb-ft).
  1. Install console panel gear shift plate (044G24) and gearshift lever boot (7277).
  1. Install the gearshift lever knob (7213) by rotating clockwise until required installation torque increases; then turn gearshift lever knob an additional 180 degrees and align graphics to front of vehicle.


    Item Part Number Description
    1 7213 Gearshift Lever Knob
    2 N605892-S2 Bolt (4 Req'd)
    3 7277 Gearshift Lever Boot
    4 11135 Front Floor Pan
    5 7003 Transmission
    6 N803948-S100 Bolt (2 Req'd)
    7 N623332-S2 J-Nut (4 Req'd)
    8 7210 Gearshift Lever
    9 044G24 Console Panel Gear Shift Plate
    A Tighten to 4.1-9.5 Nm (37-84 Lb-In)
    B Tighten to 31-43 Nm (23-31 Lb-Ft)
  1. Check the shift and crossover motion for full shift engagement and smooth crossover operation.
  1. Connect the battery ground cable. Refer to Section 14-01.