Section 06-07: Brake System, Power
1994 Mustang Workshop Manual
REMOVAL AND INSTALLATION

Brake Booster, Vacuum


Removal

  1. Disconnect the battery cables.
  1. Disconnect manifold vacuum hose from power brake booster check valve (2365) .
  1. Remove the brake tubes from the primary and secondary outlet ports of the brake master cylinder (2140) .
  1. Remove two nuts attaching brake master cylinder to power brake booster (2005) assembly, and remove brake master cylinder .
  1. If equipped with a manual transmission, disconnect clutch cable routing bracket from body side rail and move cable toward engine to gain maneuvering room for power brake booster .
  1. Disconnect accelerator cable (9A758) at dash panel (01610) and accelerator pedal and shaft (9725) and position out-of-the-way to gain maneuvering room for power brake booster .
  1. Working inside vehicle below dash panel , remove stoplight switch wiring connector from stoplight switch (13480) . Remove hairpin retainer and outer nylon brake master cylinder push rod spacer (2B129) from pedal pin. Slide the stoplight switch off brake pedal pin just far enough for outer arm to clear pin. Remove stoplight switch . Be careful not to damage stoplight switch during removal.

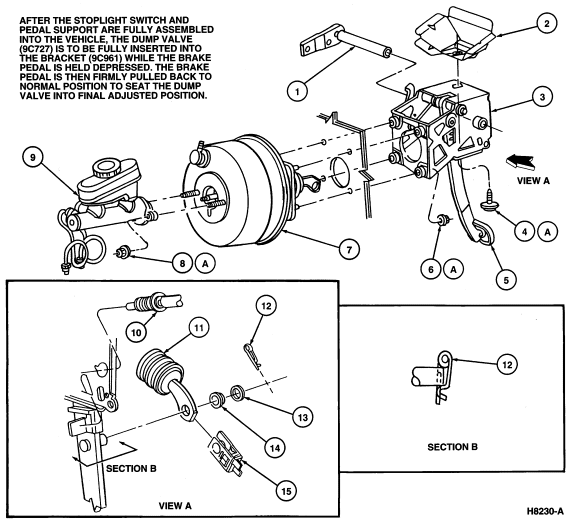
    Slide the booster push rod brake master cylinder push rod bushing (2474) off the brake pedal pin.

  1. Loosen the brake pedal support to cowl screw at least two turns. Loosen the four booster stud nuts that secure the pedal support bracket (01508) to the power brake booster and dash panel .
  1. Inside the engine compartment, move power brake booster forward until the booster studs clear the dash panel . Rotate front of power brake booster inboard (toward engine), and remove power brake booster by raising up until clear.
 

Installation

  1. Working inside vehicle, install booster push rod and brake master cylinder push rod bushings on brake pedal pin.
  1. Feed power brake booster into dash panel , starting with smallest dash panel hole. Feed the next stud through the slotted hole, then feed the last two studs through longer holes in dash panel .
  1. Working inside vehicles, pull booster studs through holes in the pedal support bracket .
  1. Install booster-to-dash panel retaining nuts. Tighten to 21-29 Nm (16-21 lb-ft). Position stoplight switch so that it straddles booster push rod with stoplight switch slot toward pedal blade and hole just clearing pin. Slide stoplight switch completely onto pin. Be careful not to bend or deform stoplight switch . Install brake master cylinder push rod spacer on pin, and secure all parts to pin with hairpin retainer. Make sure retainer is fully installed and locked over pedal pin. Install stoplight switch wiring connector on stoplight switch . Tighten brake pedal support to pedal support bracket screw to 21-29 Nm (16-21 lb-ft).
  1. Connect manifold vacuum hose to power brake booster check valve .
  1. Install brake master cylinder assembly to booster studs. Tighten to 21-29 Nm (16-21 lb-ft).
  1. Install brake tube fittings into ports. Tighten to 14-24 Nm (11-17 lb-ft).
  1. Bleed brake system as outlined in Section 06-06.
  1. Attach accelerator cable to the accelerator pedal and shaft and pedal support bracket . Secure clutch cable routing bracket to the body side rail.
  1. Connect battery (10653) cables.
  1. Start engine and check power brake function.


Power Brake System


Item Part Number Description
1 7515 Clutch Release Shaft
2 Cowl Bracket (Part of 01608)
3 01508 Pedal Support Bracket
4A N807798-S2 Screw
5 2455 Brake Pedal
6B N805367-S2 Nut (4 Req'd)
7 2005 Power Brake Booster
8C 382802-S191 Nut (4 Req'd)
9 2140 Brake Master Cylinder
10 9C727 Speed Control Dump Valve
11 Push Rod (Part of 2140)
12 380699-S100 Clip
13 2B129 Brake Master Cylinder Push Rod Spacer
14 2A309 Brake Master Cylinder Push Rod Bushing
15 13480 Stoplight Switch
A Tighten to 21-29 Nm (16-22 Lb-Ft)