Section 05-00: Axle and Driveshaft—Service | 1994 Mustang Workshop Manual |
Rear axle concerns can be diagnosed and corrected quickly if the proper procedure is followed. Being able to perform a good diagnosis is not just handy, but necessary to eliminate guesswork and save time.
This Section defines various possible rear axle conditions and tests for identifying the cause, and the service procedure. The four rear axle conditions that will be reviewed are:
The diagnostic material also deals with concern analysis; that is, uncovering the original cause of a concern so that repeat service can be avoided. However, the purpose of this Section is to provide information on service steps of special importance.
U-Joint Inspection
With driveshaft (4602) removed, inspect rear axle shaft universal joints (4249) for freedom of movement. Manipulate rear axle shaft universal joint in each direction of rotation. If rear axle shaft universal joint feels stiff or has a "lumpy" or "gritty" feel in any direction, replace rear axle shaft universal joints .
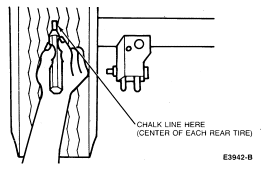
Alignment Inspection, Rear Axle
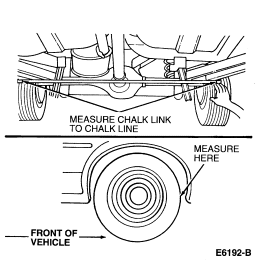
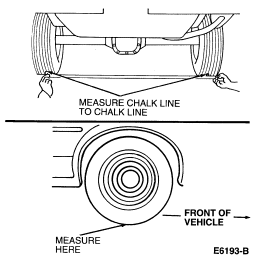

Example:
Toe in occurs when the front reading is less than the rear reading.
Example:
Positive (+) camber is when the bottom reading is less than the average of the front and rear readings. Negative (-) camber is when the bottom reading is greater than the average of the front and rear readings.
If the rear axle housing does not meet this specification, it must be replaced.
Noise Acceptability
A gear-driven unit, especially an automotive drive axle, will produce a certain amount of noise. Some noise is acceptable and may be audible at certain speeds or under various driving conditions such as a newly paved blacktop road. The slight noise is in no way detrimental to operation of the rear axle and must be considered normal.
With the Traction-Lok limited slip differential axle, slight chatter noise on slow turns after extended highway driving is considered acceptable and has no detrimental effect on the locking axle function.
Preliminary Diagnosis
Question the Customer
The preliminary diagnosis begins with the service technician asking the customer enough diagnostic questions, especially for conditions of noisy operation and/or vibration.
Always ask the customer about:
All of this information should be written on the service order so that the diagnostician (foreman or technician) will know where to start looking. Whoever is doing the diagnosis must be able to identify the axle concern from what is written on the order following the road test.
It is, of course, preferable to have the customer demonstrate the symptom on a road test whenever possible.
Axle Diagnosis Check Sheet
If there is enough reason to suspect an axle concern, the service technician should also initiate an Axle Diagnosis Check Sheet.
It is most important to record all the information related to the concern to diagnose it accurately and quickly.
Road Test
A road test is a must for any customer concern of noise and/or vibration that is not eliminated by the on-hoist check of chassis components. The Diagnosis Check Sheet is arranged to record the conditions that may be heard or felt during this test.
The Diagnosis Check Sheet lists four operating conditions or modes in
which some axle noises come and go: Drive, Cruise, Coast and Float.
| Mode | Conditions |
|---|---|
| DRIVE | Accelerating the vehicle; a definite throttle depression applying engine torque. |
| CRUISE | Maintaining a constant speed with the throttle applied. |
| COAST | Decelerating with the throttle closed. |
| FLOAT | Controlled deceleration; backing the throttle continually to prevent either braking or accelerating torque from the engine. |
It is important to a good diagnostic check to operate in all four modes
and check off those in which the noise occurs. Write down the
kilometers-per-hour (miles-per-hour) range at which both noise and vibration
occur. On vehicles equipped with overdrive transmissions, it is also important
that rear axle noise be evaluated with the transmission in DIRECT DRIVE and not in OVERDRIVE. Transmission
noise can be mistaken for rear axle noise when in overdrive. 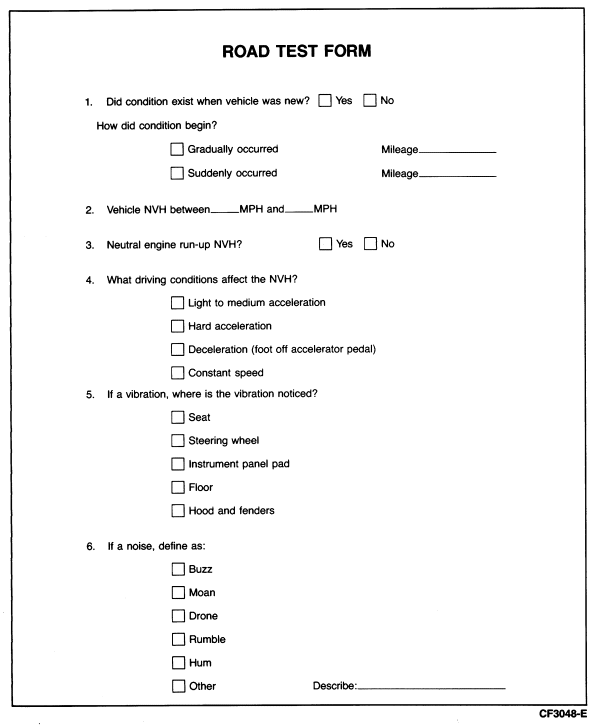
Analysis of Leakage
Most rear axle leakage conditions can be corrected without a teardown. However, it is important to clean up the leaking area enough to identify the exact source.
A plugged or seized jiggle cap vent will cause excessive seal lip wear due to internal pressure buildup. When a leak occurs, check cap by pressing down on it with index finger. If the cap moves up and down freely, it is working properly. If it does not move freely, it must be replaced.
Check axle lubricant level. Adjust as required to 6-14mm (1/4 inch) below bottom of fill plug hole.
Flange Yoke Seal
When the flange yoke seal leaks, it is usually because it was not installed carefully or properly, or because of poor quality on the seal journal surface.
Any damage to the seal bore (dings, dents, gouges, etc.) will distort the seal casing and allow leakage past the outer edge of the flange yoke seal .
The seal lip can be torn, cut or gouged if it is not assembled carefully. The spring that holds the seal lip against the rear axle universal joint flange may be knocked out and allow leakage past the lip.
The rubber lips can occasionally become hard (like plastic) accompanied by cracks at the oil lip contact point. The contact point on the rear axle universal joint flange is usually black, indicating excessive heat. Marks, nicks, gouges or rough surface texture on the seal journal of the circular companion flange will also cause leaks. Excessive seal lip wear will be noted. The rear axle universal joint flange should be replaced if any of these conditions exist.
Metal chips or sand, trapped at the sealing lip also may cause oil leaks. This can cause a wear groove on the rear axle universal joint flange and heavy seal lip wear.
If the rear axle housing vent
is plugged with dirt and debris, the rear axle housing
will be pressurized and may result in excessive seal wear and
seal leakage. 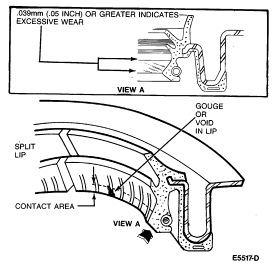
Drive Pinion Nut
On some high mileage units, there have been instances of oil leaking past the threads of the pinion nut. The condition can be corrected by removing the nut and applying Pipe Sealant With Teflon® D8AZ-19554-A or equivalent meeting Ford specification WSK-M2G350-AZ and ESR-M18P7-A on the threads and nut face.
NOTE: Be sure to follow the correct procedure for setting the bearing preload when the nut is installed.
Inner Wheel Bearing Oil Seal
Inner wheel bearing oil seals are susceptible to the same kinds of damage as flange yoke seals if improperly installed. The seal bore must be clean and the lip handled carefully to avoid cutting or tearing it. Axle shaft journal surface must be free of nicks, gouges and rough surface texture.
Casting Porosity (Holes in Casting)
Occasionally, there will be a leaking through small pockets in the rear axle housing metal. These pockets (casting leakage) are caused by gas bubbles in the casting process and are known technically as a porous condition or porosity.
Because there is always the danger of changing the rear axle housing sound characteristics if torn down to replace the differential case (4204) , service is preferable. There are two recommended types of service.
Weld Leaks
Most minor weld leaks can be corrected with epoxy sealer Metallic Plastic
C7AZ-19554-A or equivalent. This includes the "puddle" or fill welds that join
the axle shaft tube to the rear axle housing
on integral axles. They sometimes leak and can be sealed
easily. Remember, if a weld is broken, the rear axle housing
must be replaced. The alignment is too critical for field
service. 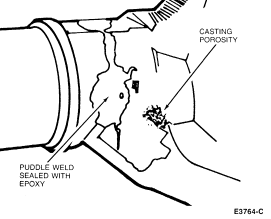
Axle Vent
There have been some occurrences of lubricant leaking through the rear axle housing vent . This may be caused by a clogged or sticking axle vent cap. If this is the case, the rear axle housing vent should be replaced, using Stud and Bearing Mount E0AZ-19554-BA or equivalent meeting Ford specification WSK-M2G349-A1, on threads to ensure retention.
Analysis of Vibration
Few vibration conditions are caused by the rear axle housing . On a vibration concern, follow the diagnosis procedure in Section 00-04 unless there is a clear reason to suspect the rear axle housing .
In fact, most vibration in the "rear end" is caused by tires or driveline angle.
Traction-Lok Differential
 WARNING: NEVER RUN ENGINE WITH ONE WHEEL OFF THE GROUND. A VEHICLE EQUIPPED
WITH A TRACTION-LOK DIFFERENTIAL WILL ALWAYS HAVE BOTH WHEELS DRIVING. IF,
WHILE THE VEHICLE IS BEING SERVICED, ONLY ONE WHEEL IS RAISED OFF THE FLOOR AND
THE REAR AXLE SHAFT
IS DRIVEN BY THE ENGINE, THE WHEEL ON THE FLOOR COULD DRIVE
THE VEHICLE OFF THE STAND OR JACK.
WARNING: NEVER RUN ENGINE WITH ONE WHEEL OFF THE GROUND. A VEHICLE EQUIPPED
WITH A TRACTION-LOK DIFFERENTIAL WILL ALWAYS HAVE BOTH WHEELS DRIVING. IF,
WHILE THE VEHICLE IS BEING SERVICED, ONLY ONE WHEEL IS RAISED OFF THE FLOOR AND
THE REAR AXLE SHAFT
IS DRIVEN BY THE ENGINE, THE WHEEL ON THE FLOOR COULD DRIVE
THE VEHICLE OFF THE STAND OR JACK.
WARNING: DO NOT BALANCE THE REAR WHEELS AND TIRES WHILE THEY ARE MOUNTED ON THE
VEHICLE. POSSIBLE TIRE DISINTEGRATION AND/OR DIFFERENTIAL FAILURE COULD RESULT,
CAUSING PERSONAL INJURY AND/OR EXTENSIVE COMPONENT DAMAGE. USE OFF-VEHICLE
WHEEL AND TIRE BALANCER ONLY.
Tires
CAUTION: Some vehicles are equipped with directional tires (see tire rotation
arrows on tire sidewall). If a directional tire is removed for service, it must
be remounted in its original location.
Vibration is a definite concern with modern, high mileage tires if they are not "true" both radially and laterally. They are more susceptible to vibration around the limits of radial and lateral runout of the tire and wheel (1007) assembly. Also, they require more accurate balancing. Wheel and tire runout checks, truing and balancing are normally done before axle inspection.
Sometimes a vibration concern can be corrected by properly rotating or inflating the tires. The best tires should be on the rear to minimize vibration especially on vehicles with rear coil springs.
Driveline Angle
An incorrect driveline (pinion) angle can often be detected by the driving condition when vibration occurs:
When it is certain that the tires and driveline angle are not the cause, inspect the axle shaft and rear axle shaft universal joints . Refer to Section 00-04.
Axle Shaft Runout
Runout of the axle shaft at either end is an infrequent, but possible cause of rear end vibration. It is advisable to check the axle shafts for runout of:
Refer to Section 00-04, for the checking procedures and special service tool for axle shaft runout.
NOTE: If the axle shaft assembly is removed, check runout of the shaft itself. The forged (unmachined) part of the shaft is allowed to have as much as 3.0mm (0.120 inch) runout. This will not cause a vibration condition by itself.
Drive Pinion Stem and Rear Universal Joint Flange
Rear axle universal joint flange runout should be checked when all other checks have failed to show the cause of vibration.
Another cause of excessive rear axle universal joint flange runout is improper installation of the pinion seal. If the spring on the seal lip is dislodged, it will jam up and cock the flange. Check that possibility before replacing the gearset because of rear axle universal joint flange runout.