Section 04-00: Suspension—Service | 1994 Mustang Workshop Manual |
DIAGNOSIS AND TESTING
Inspection and Verification
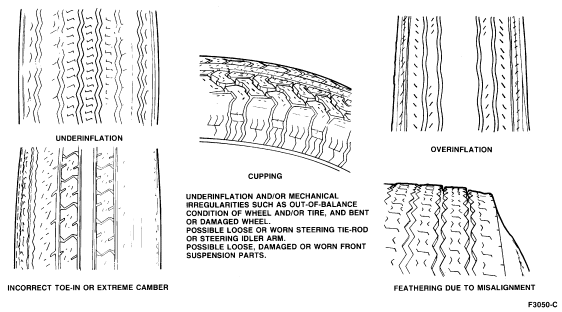
Tire Wear
Inspect tires for wear. Abnormal or excessive wear may be caused by
incorrect wheel alignment, wheel/tire imbalance or improper tire pressure.
Typical wear patterns are shown.
Vibration and Roughness
NOTE: Do not align the vehicle for vibration concerns. Vibration cannot be
improved or eliminated by alignment.
If vehicle vibration persists after the wheels have been balanced, it may
be caused by either tire or wheel runout. The vibration may also be caused by
irregular tire wear, damage to the tire tread or sidewall, a bent or unbalanced
driveshaft, engine vibration, or misindexed tires and wheels.
Road Test
The road test and customer interview (if available) provide information
needed to identify the condition and give direction to the correct starting
point for diagnosis.
- Make notes throughout diagnosis routine. Make sure to write down even the
smallest bit of information, it may turn out to be the most important.
- Road test the vehicle and define the condition by reproducing it several
times during the road test.
- During road test, determine if the condition is related to engine torque
load, vehicle speed or engine speed.
Torque Sensitive
Condition increases or decreases with engine torque load.
Vehicle Speed Sensitive
Condition increases or decreases with vehicle speed.
Engine Speed Sensitive
Condition increases or decreases with engine rpm.
Do not touch anything until a road test and a thorough visual inspection
of the vehicle have been performed. Leave the tire pressures and vehicle load
just where they were when the condition was first observed. Adjusting tire
pressures, vehicle load or making other adjustments may reduce the condition's
intensity to a point where it cannot be identified clearly. It may also inject
something new into the system, preventing proper diagnosis.
Make a visual inspection as part of the preliminary diagnosis
routine, writing down anything that does not look right. Note tire pressures,
but do not adjust them yet. Note leaking fluids, loose nuts and/or bolts, or
bright spots where components may be rubbing against each other. Check the
luggage compartment or cargo area for unusual loads.
Front End Inspection
Do not check and adjust front-wheel alignment without first making
the following inspection for front end damage or wear:
- Check for specified air pressures in all four tires.
- Raise the front of the vehicle off the floor. Refer to Section 00-02. Check
the front suspension lower arm ball joint and mounts for looseness, wear and
damage. Check the mountings. Tighten all loose nuts and bolts to specification.
Replace all worn parts. Refer to Section 04-01.
- Check the steering gear (3504)
mountings and all steering linkage connections for
looseness. Tighten all mountings to specification. If any of the linkage is
worn or bent, replace the parts. Refer to Section 11-02.
- Grasp upper and lower surfaces of tire, shake each wheel to check wheel
bearing end play. If any in-and-out free play is noticed, replace worn or
damaged front wheel bearings (1215)
. Refer to Section 04-01.
- Check the action of the shock absorbers (18080)
and front shock absorbers (18124)
and the condition of their attachments.
Refer to Shock Absorber Checks as outlined. A sticking or binding shock absorber
may not allow the vehicle to settle in a normal, level
position, possibly affecting the front wheel alignment.
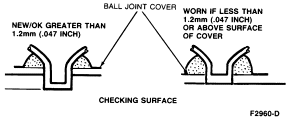
Ball Joint, Lower—Inspection
Refer to Section 04-01 for service to the balljoint assembly.
- Support the vehicle in normal driving position with the vehicle weight on
the wheels (1007)
.
- Attach a dial indicator at the front suspension lower arm ball joint (3050)
to be checked in such a way as to measure the lateral
movement between the front wheel spindle (3105)
and the front suspension lower arm (3078)
.
- Grasp the tire at the top and bottom and slowly move tire in and out. Note
reading (radial play) on the dial indicator. If the reading exceeds 0.4mm
(0.015 inch), replace the driveshaft bearing retainer circlip (3Z498)
. Refer to Section 04-01 for Service procedures.
Shock Absorber Checks
All vehicles are equipped with gas-pressurized hydraulic shock absorbers
. These shock absorbers
are not adjustable or refillable and cannot
be serviced.
- Oil Leak: A light film of oil (weepage) on the upper portion
of the shock absorber
is permissible and is a result of proper shock
lubrication. Weepage is a condition in which a film of oil accumulates on the
thin tube (body) and is normally noticed due to the collection of dust in this
area. Shock absorbers
which exhibit this weepage condition are functional units and should
not be replaced. Leakage is a condition in which the entire shock body is
covered with oil and the oil will drip from the shock onto the pavement. If
condition exists:
- Ensure that fluid observed is not from sources other than the shock absorber
.
- Replace the worn or damaged shock absorber
.
- Vehicle Sag: Many times shock absorbers
are replaced in an effort to solve a
vehicle sag concern. Shock absorbers
by design are hydraulic damping units only, and unlike suspension
springs, do not support any suspension loads. Therefore, replacing a shock absorber
will not correct a vehicle sag concern.
- Replacement in Pairs: In the past is was recommended that shock absorbers
be replaced in pairs if one unit became
unserviceable. Improved sealing, due to new materials and design and improved
rod machining and hardening techniques along with improved manufacturing
quality checks, have added to the functional reliability of shock absorbers
. Therefore, shock absorbers
no longer need to be replaced in pairs when
only one unit is not serviceable.
Vehicle Inspection
- Check all tires for proper inflation pressure.
- Check tire condition to confirm proper front-end alignment, tire balance
and overall tire condition such as separation or bulges.
- Check the vehicle for optional suspension equipment such as heavy duty
handling or trailer tow suspensions. These suspensions will have a firmer ride
feeling than standard suspensions.
- Check vehicle attitude for evidence of possible overload or sagging. Check
luggage compartment area.
- Road test vehicle to confirm customer concern after performing above Steps.
Before replacing a front shock absorber
, check the action of the shock absorber
as follows:
Hoist Check
- Noise: Noise can be caused by loose suspension or front shock
absorber attachments. Verify that all attachments or the suspension components
and front shock absorbers
are tight. Check front shock absorbers
for external damage.
- Bottom/Hopping: Check condition of the rubber suspension
travel stops (jounce/rebound bumpers). Replace if worn or missing. Examine for
evidence of previous overload or damaged components.
- Force-Check: Support rear suspension lower arm (5A649)
or rear axle housing (4010)
, and remove lower shock attachment. Stroke shock
absorber body using as much travel as possible. The action should be smooth and
uniform throughout each stroke. Damping forces should be equivalent on both
sides of the vehicle.
- Replace only the worn or damaged shock absorber
. Shock absorbers do not require replacement in
pairs, unless both units are worn or damaged.
Bench Test
With the
shock absorber right side up (as installed in vehicle), extend it
fully. Then turn the
shock absorber upside down and fully compress it. Repeat this
procedure at least three times to ensure that any trapped air has been
expelled. Now place the
shock absorber right side up in a vise and hand stroke the
shock absorber. Check the shock absorber insulators for the following
types of damage and wear:
- If the
shock absorber is properly primed, in its installed position and there
is a lag or a skip occurring near mid-stroke of the shaft, reverse travel
direction.
- If there is any seizing during the shaft full travel, except at either end
of the travel.
- If upon the shaft fast, reverse stroke, there is any noise encountered
other than a faint swish, such as a clicking sound.
- If there are excessive fluid leaks and the shock absorber actions remain
erratic after purging air, replace the shock absorber. Refer to Section 04-01
for front or Section 04-02 for rear.