 CAUTION: After installing rocker arms
, do not rotate crankshaft
until valve tappets
have had sufficient time to bleed down. To do otherwise may cause
serious valve damage. Manually bleeding down will reduce waiting time.
CAUTION: After installing rocker arms
, do not rotate crankshaft
until valve tappets
have had sufficient time to bleed down. To do otherwise may cause
serious valve damage. Manually bleeding down will reduce waiting time.
Section 03-00: Engine—Service | 1994 Mustang Workshop Manual |
Check the lift of each lobe in consecutive order and make a note of the readings.
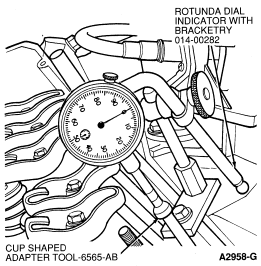
NOTE: If lift on any lobe is below specified service limits, camshaft and valve tappet operating on worn lobe(s) must be replaced, as well as any valve tappet showing pitting or having contact face worn flat or concave. Refer to Inspection, Camshaft and Hydraulic Valve Tappets.
CAUTION: After installing rocker arms
, do not rotate crankshaft
until valve tappets
have had sufficient time to bleed down. To do otherwise may cause
serious valve damage. Manually bleeding down will reduce waiting time.
Hydraulic Valve Tappet
Hydraulic valve tappet noise may be caused by any of the following:
Excessive collapsed valve tappet gap may be caused by loose rocker arm bolts/nuts, incorrect initial adjustment, or wear of valve tappet face, or worn roller valve tappets , push rods , rocker arm seat or valve tip. With valve tappet collapsed, check gap between valve tip and rocker arm to determine if any other valve train parts are damaged, worn or out of adjustment.
A sticking valve tappet plunger may be caused by dirt, chips, or varnish inside the valve tappet . The sticking can be corrected by disassembling the valve tappet and removing the dirt, chips or varnish that are causing the condition.
A valve tappet check valve that is not functional may be caused by an obstruction such as dirt or chips preventing it from closing when the camshaft lobe is lifting the valve tappet , or it may be caused by a broken check valve spring.
Air bubbles in the lubrication system will prevent the valve tappet from supporting the valve spring load. This may be caused by too high or too low an oil level in the oil pan (6675) , or by air being drawn into the system through a hole, crack or leaking gasket on the oil level indicator tube (6754) .
If the leakdown time is below the specified time for used valve tappets , noisy operation may result. If no other cause for noisy valve tappets can be found, the leakdown rate should be checked and any outside the specification should be replaced.
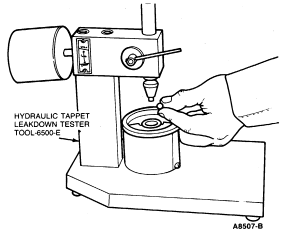
Assembled valve tappets can be tested with Hydraulic Tappet Leakdown Tester TOOL-6500-E or equivalent to check the leakdown rate. The leakdown rate specification is the time in seconds for the plunger to move a specified distance while under a 22.7 kg (50 lb) load. Test the tappets as follows:
Leakdown Testing
NOTE: Do not mix parts from different valve tappets . Parts are select-fitted and are not interchangeable.
NOTE: Valve tappets cannot be checked with engine oil in them. Only testing fluid can be used.
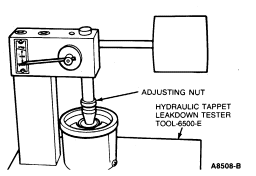
Use center mark on pointer scale as Stop Timing point instead of original Stop Timing mark at top of scale.