Section 12-03A: Air Conditioning System | 1993 Mustang Workshop Manual |
REMOVAL AND INSTALLATION
Fixed Orifice Tube
The fixed orifice tube located in the liquid line cannot be serviced in
detail as a component of the line. If replacement is necessary, the line and
tube must be replaced as an assembly, or an orifice tube replacement service
kit may be used as an optional service procedure. The procedures for each type
of service follow:
Liquid Line and Orifice Tube Assembly Replacement
- Discharge refrigerant from A/C system following recommended service
procedures. Observe all safety precautions.
- Disconnect refrigerant line at condenser outlet connection using procedure
and one of spring lock coupling tools shown in the Spring Lock Coupling
illustration.
- Disconnect refrigerant line at tube-O end using a wrench on each side of
tube-O fittings. Remove line from vehicle.
- Route new refrigerant line (and integral fixed orifice tube) with
protective caps installed.
- Remove protective caps and connect new refrigerant line into system using
new O-rings lubricated with clean refrigerant oil. Connect spring lock coupling
as shown in the Spring Lock Coupling illustration.
- Leak test, evacuate and charge refrigerant system following recommended
service procedures. Observe all safety precautions.
Fixed Orifice Tube Replacement Kit
- Discharge the A/C refrigerant system. Refer to System Discharging in
Section 12-00. Observe all safety precautions.
- Remove the liquid line from the vehicle.
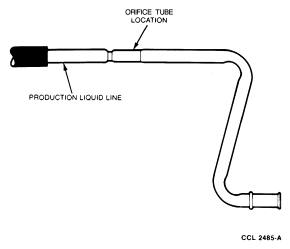
- Locate the orifice tube by the three indented notches or circular
depression in the metal portion of the liquid line.
Orifice Tube
- Note the angular position of the ends of the liquid line so that it can be
reassembled in correct position.
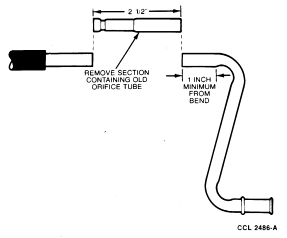
- Cut a 63.5mm (2-1/2 inch) section from tube at orifice tube location. Do
not cut closer than 25.4mm (1 inch) from the start of a bend in tube.
Orifice Tube Section Removed From Liquid Line
- Remove orifice tube from housing with pliers. The orifice tube removal tool
cannot be used.
- Flush the two pieces of liquid line to remove any contaminants.
- Lubricate O-rings with clean refrigerant oil and assemble orifice tube kit
(with orifice tube installed) to liquid line. Ensure flow direction arrow is
pointing toward evaporator end of liquid line, and taper of each compressor
ring is toward compression nut.
Orifice Tube Kit—Disassembled
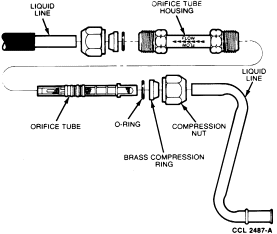
NOTE: The inlet tube will be positioned against the orifice tube tabs when
correctly assembled.
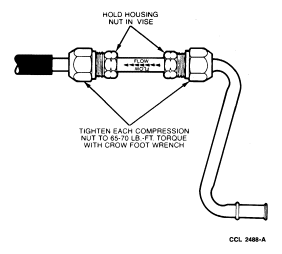
- While holding hex of tube in a vise, tighten each compression nut to 88-94 Nm
(65-69 lb-ft) with a crowfoot wrench.
Tube Kit Installed
- Assemble liquid line to vehicle using new O-rings lubricated with clean
refrigerant oil. Use only specified O-rings at spring lock coupling.
- Leak test, evacuate and charge system following approved procedures.
- Check system for proper operation.