Section 12-03A: Air Conditioning System | 1993 Mustang Workshop Manual |
REMOVAL AND INSTALLATION
Evaporator Core
NOTE: Whenever an evaporator core is replaced, it will be necessary to replace
the suction/accumulator drier.
Removal
- Remove evaporator case as outlined.
- Remove four screws retaining air inlet duct to evaporator case. Remove duct.
- Remove foam seal from evaporator core tubes.
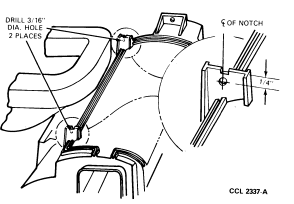
- Drill a 3/16-inch hole in both upright tabs on top of evaporator case as
shown.
Drilling Holes in Evaporator Case Tabs
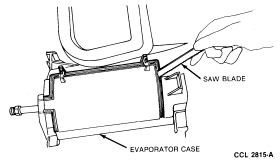
- Using a small saw blade, cut top of evaporator case between raised outlines
as shown.
Cutting Evaporator Case
- Remove two screws retaining blower motor resistor to evaporator case.
Remove resistor.
- Fold cutout flap from opening and lift evaporator core from case.
Removing Evaporator Core from Case

Installation
- Transfer two foam core seals to new evaporator core.
- Position evaporator core in case and close cutout cover.
- Install a spring nut (Part No. 381863-S2) on each of two upright tabs.
Securing Cutout Cover in Closed Position
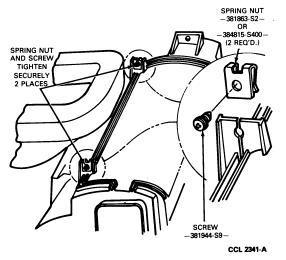
NOTE: Ensure hole in spring nut is aligned with 3/16-inch hole drilled in tab.
Then, install and tighten a screw (Part No. 381944-S9) in each spring nut
(through hole in tab to secure cutout cover in closed position).
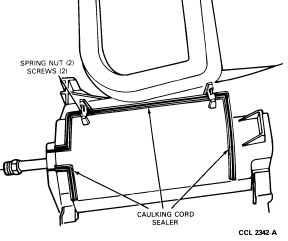
- Install Caulking Cord D6AZ-19560-A (ESB-M4G32-A) or equivalent to seal
evaporator case against leakage along cut line.
Caulking Cord Installation
- Using new caulking cord (rope sealer), assemble air inlet duct to
evaporator case (four screws).
- Install blower motor resistor (two screws).
- Install foam seal over evaporator core and heater core tubes.
- Install evaporator case assembly.