Section 01-17A: Convertible
1993 Mustang Workshop Manual
REMOVAL AND INSTALLATION

Window Valance, Rear

Tools Required:


Removal

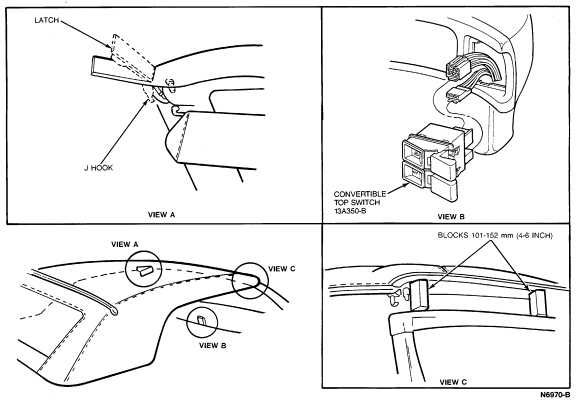
  1. Disengage RH and LH top latches by rotating the handles inward.

    NOTE: This action will relieve tension on rear window.

  1. While raising convertible top place 101-152mm (4-6 inch) blocks under front of top.


  1. Disconnect battery ground cable.
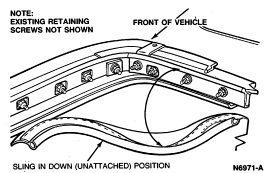
  1. Remove retaining screws and unclip sling at quarter and rear belt areas. Lower sling to stowage area. Save retaining screws.


  1. Remove nut and washer assemblies from all tacking strips on quarter side panels and at bottom of rear valance assembly. Remove tacking strips.
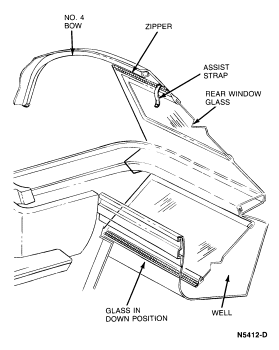
  1. Unzip rear window and place on bench.


     CAUTION: Do not bend or damage tacking strips during removal.
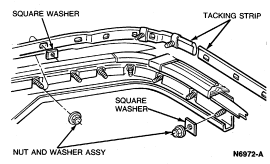
  1. Carefully remove staples from tacking strip and rear window valance and save tacking strip.


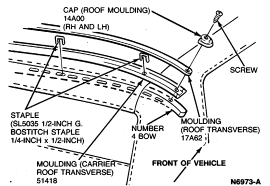
  1. Remove caps and screws from No. 4 bow.


  1. Slide moulding (roof transverse) out of moulding (carrier roof transverse).
  1. Carefully remove retaining staples from moulding (carrier roof transverse).
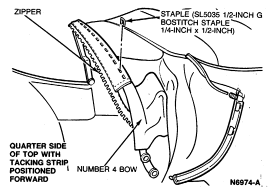
  1. Position RH and LH quarter sides forward.
  1. Remove retaining staples from zipper on No. 4 bow and discard zipper.


Installation

  1. Position old valance on new valance and trace square cutout holes onto new valance.

    NOTE: Staples should be shot off in a row, leaving minimal gap of 6.35mm (1/4 inch) between each staple.

  1. Staple tacking strip to new valance using Bostitch® staple (1/4 inch X 5/16 inch) with Bostitch® Staple Gun T28-7 or equivalent.
  1. Measure end to end on No. 4 bow and mark centerline with grease pencil.
  1. Measure end to end on valance and mark centerline with a grease pencil on zipper portion of valance.
  1. Position zipper portion of valance on No. 4 bow, aligning centerline of valance (zipper portion) with centerline of No. 4 bow.

    NOTE: Staples should be shot off in a row, leaving minimal gap (approximately 6.35mm (1/4 inch)) between each staple.

  1. Using Bostitch® Staple Gun T28-7 or equivalent, staple zipper portion of valance to No. 4 bow with Bostitch® staple (1/4 inch X 1/2 inch).
  1. Trim off excess material on zipper.
  1. Move RH and LH quarter sides back into proper position.

    NOTE: Use Rear Window Defroster Repair D8AZ-19562-AA (ESB-M4J58-A) with Rotunda RTV Dispenser 021-00031 or equivalent, on top of carrier roof transverse, to prevent leaks where stapled.

  1. Position moulding (carrier roof transverse) above convertible top material on No. 4 bow and staple with Bostitch® staple (1/4 inch x 1/2 inch).

    NOTE: Wipe any excessive silicone rubber off convertible top and/or transverse.

  1. Slide roof transverse moulding into carrier roof transverse moulding, and attach with roof moulding caps and screws.
  1. Install rear window valance in proper position and zip.
  1. Finger-tighten nut and washer assemblies for tacking strips on quarter side panels and at bottom of rear window assembly.
  1. Remove blocks used to relieve tension and open latches, lower top in position and lock (closed latches).

     CAUTION: Ensure rear window valance has no visible buckles or sags.

  1. Adjust and secure all tacking strips on quarter side panels and at bottom of rear window valance assembly.
  1. Cling on sling well and attach with retaining screws.
  1. Connect battery ground cable.
  1. Check convertible top function by performing lowering and raising procedure.