Section 17-01: Lighting, Exterior
1993 Mustang Workshop Manual
REMOVAL AND INSTALLATION

Headlamps, Aerodynamic


Headlamp Assembly

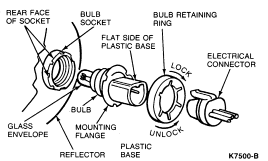
 WARNING: THE REPLACEABLE HALOGEN HEADLAMP BULB CONTAINS GAS UNDER PRESSURE. THE BULB MAY SHATTER IF THE GLASS ENVELOPE IS SCRATCHED OR THE BULB IS DROPPED. HANDLE BULB CAREFULLY. GRASP BULB ONLY BY ITS PLASTIC BASE. AVOID TOUCHING GLASS ENVELOPE. KEEP BULB OUT OF REACH OF CHILDREN.


Removal and Installation

  1. Place the headlamp switch in the OFF position.
  1. Remove the electrical connector from the bulb by pulling it rearward.
  1. Remove three nut and washer assemblies from the rear of the headlamp assembly.
  1. Remove the headlamp assembly by pushing forward on the bulb and socket assembly. For ease of removal, it may be necessary to loosen the attachments of the adjacent parking lamp and cornering lamp assemblies.
  1. Remove the three clips attaching the headlamp to the black ring assembly by prying them out from the base using a flat-blade screwdriver. This completes the removal of the headlamp. Save the clips for the installation of the new headlamp.
  1. To install the aerodynamic headlamp, ensure that the black rubber shield is securely crimped to the headlamp, then reverse Removal procedure.
  1. After headlamp installation, check headlamp aim and adjust as necessary.
  1. Turn headlamp switch on and check for proper operation.


Bulb Replacement


Removal

  1. Make sure headlamp switch is in OFF position.
  1. Lift hood and locate bulb installed in rear of headlamp body.
  1. Remove electrical connector from bulb by grasping wire firmly and snapping connector rearward.
  1. Remove bulb retaining ring by rotating counterclockwise (when viewed from rear) about one-eighth turn and sliding ring off plastic base. Keep ring as it may be used again to retain new bulb.
  1. Carefully remove headlamp bulb from socket in reflector by gently pulling straight out of socket. Do not rotate bulb during removal.


Installation

  1. With flat side of plastic bulb base facing upward, insert glass envelope of bulb into socket. Turn base slightly to left or right, if necessary, to align grooves in forward part of plastic base with corresponding locating tabs inside socket. When grooves are aligned, push bulb firmly into socket until mounting flange on base contacts rear face of socket.
  1. Slip bulb retaining ring over rear of plastic base against mounting flange. Lock ring into socket by rotating ring clockwise. A stop will be felt when retaining ring is fully engaged.
  1. Push electrical connector into rear of plastic base until it snaps and locks into position.

    NOTE: A correctly aimed headlamp normally need not be re-aimed after installation of this bulb. A burned out bulb should not be removed from the headlamp reflector until just before a replacement bulb is to be installed. Removal of a bulb for an extended period of time may allow contaminants (dust, moisture, smoke) to enter the headlamp body and affect the performance of the headlamp. When servicing the headlamp bulb, energize the bulb only while it is contained within the headlamp body.

  1. Turn headlamps on and check for proper operation.