Section 13-03: Fuel Gauge | 1993 Mustang Workshop Manual |
REMOVAL AND INSTALLATION
 WARNING: FUEL SUPPLY LINES WILL REMAIN PRESSURIZED FOR LONG PERIODS OF TIME
AFTER ENGINE SHUTDOWN.
WARNING: FUEL SUPPLY LINES WILL REMAIN PRESSURIZED FOR LONG PERIODS OF TIME
AFTER ENGINE SHUTDOWN.
This pressure must be relieved before servicing the fuel system. A valve
is provided on the fuel rail assembly for this purpose. Attach EFI and CFI Fuel
Pressure Gauge T80L-9974-B to fuel diagnostic valve on fuel rail assembly.
Pressure in fuel system may now be released.
Fuel Sender Unit
Tools Required:
- EFI and CFI Fuel Pressure Gauge T80L-9974-B
- Fuel Tank Sender Wrench D84P-9275-A
- Rotunda Fuel Storage Tanker 034-00002
- Rotunda Fuel Storage Tanker Adapter Hose 034-00012
Removal
- Place vehicle on hoist. Do not raise.
- Depressurize fuel system as outlined.
- Remove the fuel from the fuel tank using Rotunda Fuel Storage Tanker
034-00002 and Adapter Hose 034-00012 or equivalent.
- Raise vehicle on hoist. Refer to Section 00-02.
- Support fuel tank and remove fuel filler tube and fuel tank retaining
straps. Lower fuel tank. Remove fuel lines, vent hose and electrical connector.
- Move fuel tank to workbench.
- Remove any dirt that has accumulated around the sender unit so that it will
not enter the tank or connections.
- Turn the sender unit locking ring counterclockwise using Fuel Tank Sender
Wrench D84P-9275-A or equivalent and remove the locking ring, sender unit and
seal ring. Discard seal ring.
Installation
- Clean the fuel gauge sender unit mounting surface at the fuel tank.
- Apply a light coating of Premium Long-Life Grease XG-1-C (ESA-M1C75-B) or
equivalent on new seal ring, and install in ring groove.
- Install fuel sender. Ensure locating keys align in keyways and seal remains
in groove.
- Install retaining ring. Hold sender unit in position and turn retaining
ring against stops using Fuel Tank Sender Wrench D84P-9275-A or equivalent.
- Install fuel tank in vehicle. Connect fuel lines, vent hose and electrical
connector.
- Secure fuel tank with retaining straps.
- Lower vehicle. Install filler tube. Add a minimum of 38L (10 gal) of fuel.
- With EFI and CFI Fuel Pressure Gauge T80L-9974-B installed, turn ignition
switch from the Off position to the On position for three second intervals
until fuel pressure builds to 241 kPa (35 psi).
- Start engine and check for fuel leaks.
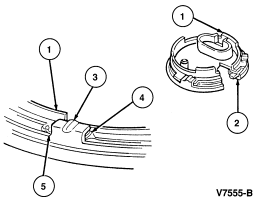
| Item |
Part Number |
Description |
|
1
|
9C385
|
Locking Ring
|
|
2
|
9276
|
Gasket
|
|
3
|
—
|
Tab
|
|
4
|
—
|
Stop
|
|
5
|
—
|
Detent
|