Section 12-03B: Compressor and ClutchŚ10P15C | 1993 Mustang Workshop Manual |
REMOVAL AND INSTALLATION
Shaft Seal and Seat
Tools Required:
- Shaft Key Remover T81P-19623-NH
- Snap Ring Pliers T71P-19703-T
- Shaft Seal Seat Remover T87P-19623-BR
- Shaft Seal Remover T91P-19623-AH
- Shaft Seal Protector T71P-19703-H
- Shaft Seal Replacer T92P-19623-BH or T87P-19623-C
- Rotunda Electronic Leak Detector 055-00015
Removal
The refrigerant system must be discharged and the compressor removed from
the vehicle to perform the shaft seal replacement operation.
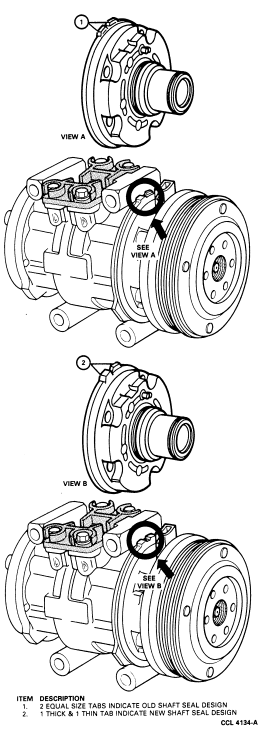
The 10P15C compressor uses two different shaft seals. The shaft seal
identification marks are located on the compressor front head.
Compressor Shaft Seal Identification
Compressor Clamped in Vise for Disassembly
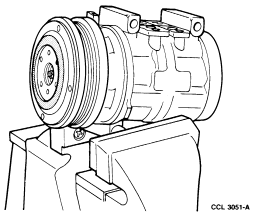
- Clamp the compressor in a vise as shown in the previous
illustration and remove clutch hub as outlined.
- Clean compressor front hub area to remove any accumulation of oil and dirt.
- Carefully remove felt and retainer from inside nose of compressor.
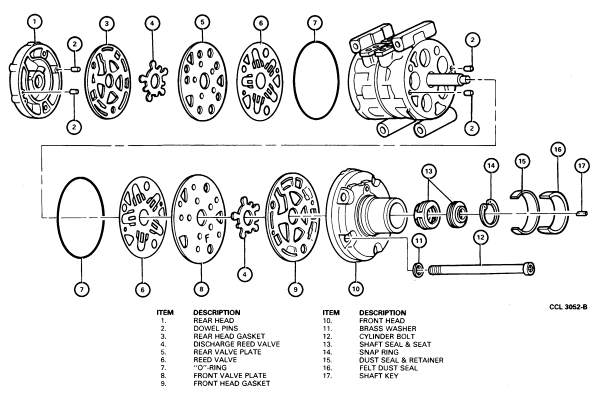
Compressor Disassembled
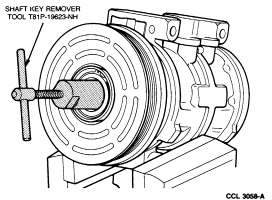
- Remove shaft key with Shaft Key Remover T81P-19623-NH.
Shaft KeyŚRemoval
- Remove shaft seal seat retaining snap ring with Snap Ring Pliers
T71P-19703-T and Snap Ring Remover T89P-19623-DH as follows:
- Insert tip of Snap Ring Remover T89P-19623-DH into one of snap ring eyes.
- Rotate Snap Ring Remover tool to position tool tip and snap ring eye
closest to compressor shaft, while allowing clearance for snap ring with the
seal seat flange.
- Pull Snap Ring Remover tool up quickly, while keeping tool shaft against
side of nose opening, and remove snap ring.
Seal Seat Retaining Snap RingŚRemoval
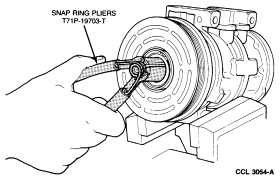
Removing Seal Seat Snap Ring Using T89P-19623-DH
- Clean inner bore of compressor nose to prevent dirt from entering
compressor when shaft seal seat is removed.
- Remove shaft seal seat with Shaft Seal Seat Remover T87P-19623-BR.
Shaft Seal Seat Removal

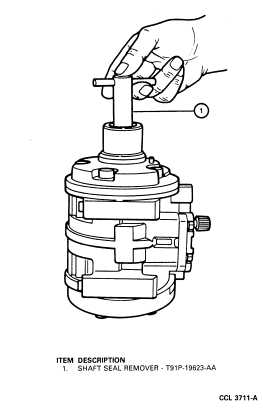
- Insert Shaft Seal Remover T91P-19623-AH into compressor nose opening on top
of shaft seal. Turn tool 45 degrees while pushing tool inward until tool
engages tangs of seal. Then pull shaft seal from compressor with tool.
Shaft Seal Removal
Installation
 CAUTION: DO NOT TOUCH the sealing surface of the shaft seal or seal seat with
bare hands. To do so will damage the sealing surface.
CAUTION: DO NOT TOUCH the sealing surface of the shaft seal or seal seat with
bare hands. To do so will damage the sealing surface.
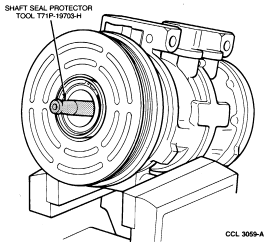
- Place Shaft Seal Protector T71P-19703-H over the end of the compressor
shaft.
Shaft Seal Protector Installed
- Lubricate new shaft seal with clean refrigerant oil and place it on
protector.
NOTE: Check the thin edge of the shaft seal protector for burrs or other
damage. Replace the tool if burrs are found as the burrs could damage the
internal sealing portion of the shaft seal assembly during installation.
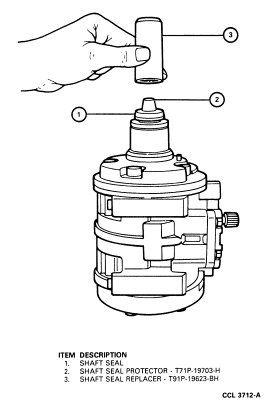
- Using Shaft Seal Replacer T92P-19623-BH insert the shaft seal into
compressor. Rotate seal on compressor shaft while pushing inward until the
flats of the shaft are aligned with flats of the shaft seal and the seal is
positioned against the stops on the shaft.
Shaft SealŚInstallation
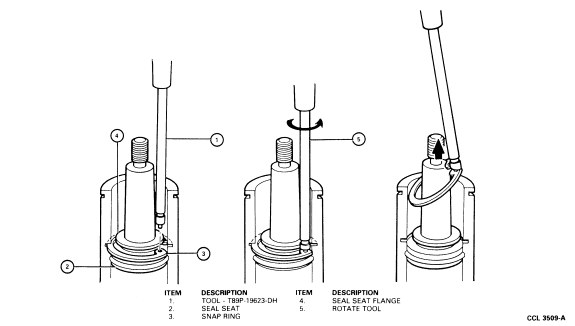
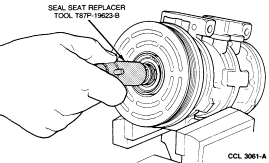
- Attach shaft seal seat to Shaft Seal Seat Replacer T87P-19623-B and
lubricate seal seat and inside of compressor nose with clean refrigerant oil.
Then insert seal seat into compressor. Push seal seat in against seal.
Shaft Seal SeatŚInstallation
- Install seal seat retaining snap ring into nose of compressor and push snap
ring into groove with handle end of Shaft Seal Remover/Replacer T87P-19623-C.
Pushing Seal Seat Snap Ring into Groove

- Install shaft key with rounded end inward.
- Rotate compressor shaft 10 revolutions with clutch hub to distribute oil in
compressor.
- Leak test shaft seal with Rotunda Leak Detector 055-00015 or equivalent as
outlined under Compressor External Leak Test.
- Install a new felt strip and the original retainer into nose of compressor.
- Install clutch shims and clutch hub as outlined. Check clutch air gap and
adjust as necessary.