Section 12-03A: Air Conditioning System | 1993 Mustang Workshop Manual |
REMOVAL AND INSTALLATION
Evaporator Case Assembly
NOTE: Whenever an evaporator core is replaced, it will be necessary to replace
the suction accumulator/drier.
 CAUTION: If an evaporator leak is suspected, the core must be leak tested
before it is removed from the vehicle. Refer to Section 12-00 for the leak test
procedure.
CAUTION: If an evaporator leak is suspected, the core must be leak tested
before it is removed from the vehicle. Refer to Section 12-00 for the leak test
procedure.
Removal
- Remove instrument panel and lay it on front seat. Refer to Section 01-12.
- Discharge refrigerant from A/C system at service access gauge port valve
located on suction line. Observe all safety precautions.
- Disconnect liquid line and accumulator/drier inlet tube from evaporator
core at dash panel. Cap refrigerant lines and evaporator core tube to prevent
entrance of dirt and excess moisture.
- Once refrigerant is discharged from the system, remove high and
low-pressure hoses. Use a backup wrench to prevent component damage. Cap hose
openings to prevent entrance of dirt and excessive moisture.
- Disconnect heater hoses from heater core tubes and plug hoses with suitable
5/8-inch and 3/4-inch plugs. Cap heater core tubes to prevent coolant loss from
heater core during removal of evaporator case.
- Remove screw retaining air inlet duct and blower housing assembly support
brace to cowl top panel.
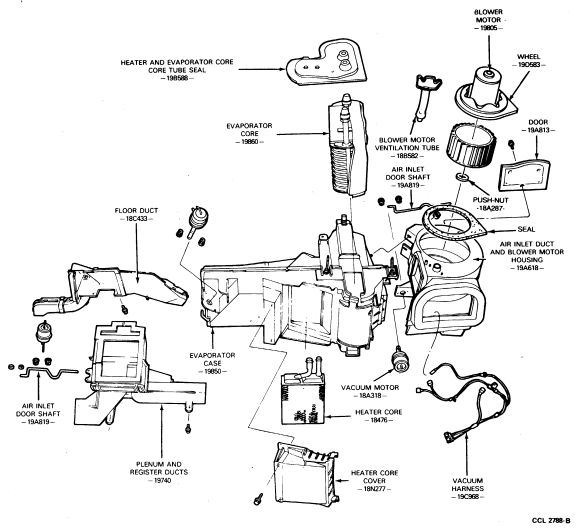
Manual A/C-Heater Evaporator Case Assembly Components
- Disconnect vacuum supply hose (black) from in-line vacuum check valve in
engine compartment.
- Disconnect blower motor wires from wire harness. Disconnect wire harness
from blower motor resistor.
- Working underhood, remove two nuts retaining evaporator case to dash panel.
- Inside passenger compartment, remove two screws retaining evaporator case
support brackets to cowl top panel.
- Remove one screw retaining bracket below evaporator case to dash panel.
- Carefully pull evaporator case away from dash panel and remove evaporator
case assembly from vehicle.
Installation
- Position evaporator case assembly in vehicle. Install screws retaining
evaporator case support brackets to cowl top panel.
- Check evaporator case drain tube to ensure it is through dash panel and is
not pinched or kinked.
- Install one screw retaining bracket below evaporator case to dash panel.
- Working underhood, install two nuts retaining evaporator case to dash
panel. Tighten four nuts and two screws in engine compartment. Also, tighten
two screws in passenger compartment and two support bracket retaining screws.
- Connect blower motor wire harness to resistor and blower motor.
- Connect black vacuum supply hose to vacuum check valve in engine
compartment.
- Using new O-rings lubricated with clean refrigerant oil, connect liquid
line and suction accumulator inlet to evaporator core tube. Tighten liquid line
to 15-18 Nm (12-13 lb-ft) and accumulator to evaporator line
to 28-36 Nm (21-26 lb-ft) using a backup wrench to prevent
component damage.
- Connect high and low-pressure refrigerant hoses using new O-rings dipped in
refrigerant oil. Use a backup wrench to prevent component damage.
- Install instrument panel. Refer to Section 01-12.
- Connect heater hoses to heater core and fill cooling system as necessary to
specified level.
- Leak test, evacuate and charge refrigerant system following recommended
procedures and safety precautions.