Section 12-03A: Air Conditioning System | 1993 Mustang Workshop Manual |
REMOVAL AND INSTALLATION
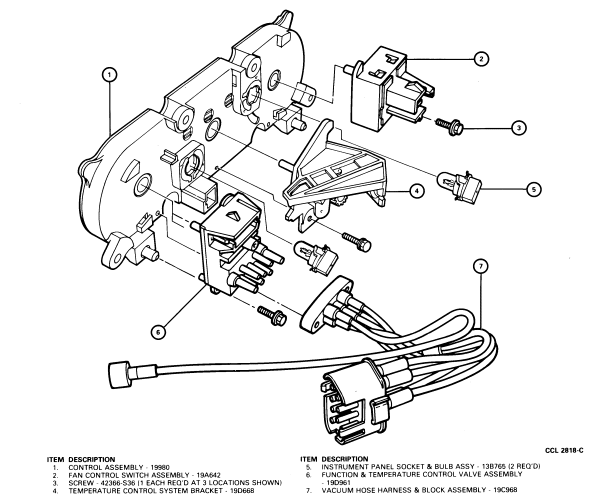
Instrument Panel Control Assembly—Electrical and Vacuum Switches
Refer to Instrument Panel Control Assembly—Disassembled
View for an illustration of electrical switches, vacuum switch, illumination
bulb male connector, illumination bulbs, and gear-operated temperature control
cable mechanism.
Instrument Panel Control Assembly—Disassembled View
Removal and Installation
- Remove control assembly as outlined.
- Remove knobs as required. Refer to Control Assembly Knobs Removal.
- Remove component being serviced as follows:
- Blower Switch—Remove one screw.
Rotate switch in a counterclockwise direction to clear upper retaining flange.
Then slide switch upward and out of its lower retaining flange.
- Function Selector Electro Vacuum Switch—Remove one screw. Rotate switch clockwise until it clears its
upper and lower retaining flanges. Lift switch so that location pin in its
lower, inner corner clears arc-shaped slot in back surface of control assembly.
- Illumination Bulbs—Each bulb has a
moulded-in configuration which provides a go/no-go means of controlling bulb
positioning in socket, as well as alignment of its electrical contacts with
printed circuitry on backside of control assembly. To remove a bulb, twist in a
counterclockwise direction and lift bulb out of socket. The temperature control
cable mechanism should be moved completely to the right or left to permit
access to bulb being serviced. The male connector for the bulbs is moulded into
the control assembly.
- Temperature Control Cable Mechanism—(The control cable will have been disconnected during removal
of control assembly). To remove mechanism, remove retaining screw. Rotate
assembly in a counterclockwise direction to free it from upper and lower
retainers.
- To install any of the components detached from the back of the control
assembly, reverse Removal procedure.