Section 12-00: Climate Control System—Service | 1993 Mustang Workshop Manual |
REFRIGERANT SYSTEM SERVICE
Spring Lock Coupling
Tools Required:
- Spring Lock Coupling Tools T81P-19623-G1, T81P-19623-G2, T83P-19623-C,
T85L-19623-A
To Disconnect Coupling
- Discharge refrigerant from system with a refrigerant recycling machine. Fit
Spring Lock Coupling Tools T81P-19623-G1 (3/8-inch), T81P-19623-G2 (1/2-inch),
T83P-19623-C (5/8-inch) or T85L-19623-A (3/4-inch) to the coupling.
- Close tool and push into open side of cage to expand garter spring and
release female fitting.
NOTE: The garter spring may not release if the tool is cocked while pushing it
into the cage opening.
- After garter spring is expanded, pull fitting apart.
- Remove tool from disconnected coupling.
To Connect Coupling
- Check to ensure that garter spring is in cage of male fitting. If garter
spring is missing, install a new spring by pushing it into cage opening. If
garter spring is damaged, remove it from cage with a small wire hook (do not
use a screwdriver) and install a new spring.
- Clean all dirt or foreign material from both pieces of coupling.
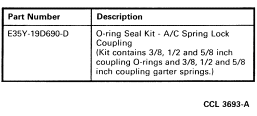
- Lubricate and install new green O-rings on male fitting.
Use only the specified green O-rings as they
are made of a special material. The use of any O-ring other than the
specified green O-ring may allow the connection to leak intermittently during
vehicle operation. Refer to service parts list.
Service Parts List
- Lubricate male fitting and O-rings and inside of female fitting with clean
refrigerant oil.
- Install plastic indicator ring into cage opening if indicator ring is to be
used.
- Fit female fitting to male fitting and push until garter spring snaps over
flared end of female fitting.
If plastic indicator ring is used, it will snap out of cage
opening when coupling is connected to indicate engagement.
- If indicator ring is not used, ensure coupling engagement by visually
checking to verify garter spring is over flared end of female fitting.
Fixed Orifice Tube Replacement Kit Installation
- Discharge the A/C refrigerant system. Refer to System Discharging.
- Remove the liquid line from the vehicle.
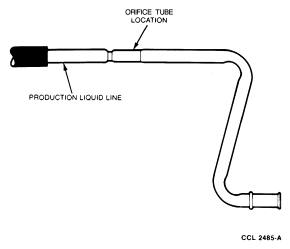
- Locate the orifice tube by the three indented notches or a circular
depression in the metal portion of the liquid line.
Orifice Tube Location
- Note the angular position of the ends of the liquid line so that it can be
reassembled in correct position.
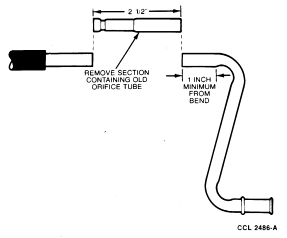
- Cut a 63.5mm (2 1/2 inch) section from tube at orifice tube location. Do
not cut closer than 25.4mm (1 inch) from the start of a bend in tube.
Orifice Tube Section Removed From Liquid Line
- Flush the two pieces of liquid line to remove any contaminants.
- Lubricate fitting O-rings with clean refrigerant oil and assemble orifice
tube kit (with orifice tube installed) to liquid line as shown in. Ensure flow
direction arrow is pointing toward evaporator end of liquid line, and taper of
each compression ring is pointing toward compression nut.
Orifice Tube Kit Disassembled
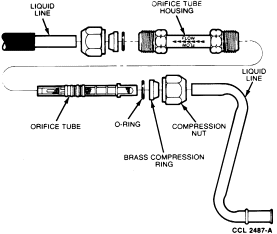
NOTE: The inlet tube will be positioned against the orifice tube tabs when
correctly assembled.
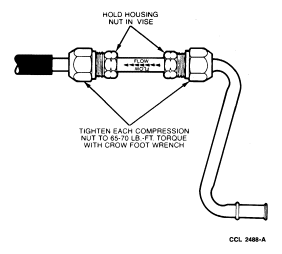
- While holding hex of tube in a vise, tighten each compression nut to 88-94 Nm
(65-70 lb-ft) with a crow foot wrench.
Orifice Tube Kit Installed
- Assemble liquid line to vehicle using new green O-rings lubricated with
clean refrigerant oil. Use only specified green O-rings at spring lock coupling.
- Leak test, evacuate and charge system following approved procedures.
- Check system for proper operation.
Suction Accumulator/Drier Replacement Guidelines
Replacement of the suction accumulator/drier is necessary anytime a major
component of the refrigerant system is replaced. A major component includes
condenser, compressor, evaporator core or a refrigerant hose/line. An orifice
tube or O-ring is not considered a major component but the orifice tube should
be replaced whenever the compressor is replaced for lack of performance.
In addition to the preceding condition, the accumulator/drier should also
be replaced if one of the following conditions exist:
- The accumulator/drier is perforated.
- The refrigerant system has been opened to the atmosphere for a period of
time longer than required to make a minor repair.
- There is evidence of moisture in the system such as internal corrosion of
metal refrigerant lines or the refrigerant oil is thick and dark.
NOTE: The compressor oil from vehicles equipped with an FX-15 compressor may
have a dark color while maintaining a normal oil viscosity. This is normal for
this compressor because carbon from the compressor piston rings will discolor
the oil.
When replacing the suction accumulator/drier, the procedure given here
must be followed to ensure that the total oil charge in the system is correct
after the new accumulator/drier is installed.
- Drain the oil from the removed accumulator/drier into a suitable measuring
container. Drill one or two 1/2 inch holes in the bottom of the old
accumulator/drier to ensure that all the oil has drained out.
- Add the same amount of clean new refrigerant oil plus two fluid ounces to
the new accumulator/drier. Use only the oil specified for the specific vehicle
being serviced (Motorcraft YN-9 or an equivalent oil containing the same
additives).
Opposition to Charging From Small Containers
The refrigerant charge level of A/C systems currently being used is
critical to optimum performance. Either an under-charge or an over-charge will
adversely affect performance. Using small cans to charge these systems is not
recommended because the charge level cannot be accurately controlled. A
charging cylinder or a charging station is the only recommended method.
Refrigerant System Purging to Remove Moisture Vapor
The triple evacuation procedures should be used when there are definite
indications of moisture in the system.
The principle of the three evacuations is simple. Evacuate the system for
at least 10 minutes.
The first purge with new, dry Refrigerant-12 mixes with the moisture and
removes most of the moisture when the refrigerant is removed.
With the next evacuation, approximately 10 percent of the remaining air
and moisture vapors remain.
The second purge with new, dry Refrigerant-12 will mix with this 10
percent, and will be removed when the refrigerant is recycled. The third
evacuation will finish the job by drawing out practically all the remaining
vapors.
If any water was present in the system at the start of this procedure,
most of it will still be there. A short period of vacuum is not long enough to
boil and vaporize the water. The Refrigerant-12 purges, in passing over the
liquid, will absorb only a relatively small amount of water.
This procedure is effective only when no water is in the system and
should not be used if there is any indication of water in the system.