Section 10-01: Fuel Tank, Filter and Electric Fuel Pump | 1993 Mustang Workshop Manual |
REMOVAL AND INSTALLATION
Fuel Tubes—Nylon
 CAUTION: Ford approved nylon fuel tubing is made from material which has been
tested and proven to be acceptable for use with commercially available fuels.
It is also resistant to most environmental conditions. Avoid using alternate
tubing materials, as this could pose a hazard in service.
CAUTION: Ford approved nylon fuel tubing is made from material which has been
tested and proven to be acceptable for use with commercially available fuels.
It is also resistant to most environmental conditions. Avoid using alternate
tubing materials, as this could pose a hazard in service.
CAUTION: Nylon fuel tube must not be serviced using hose and hose clamps.
Should the plastic tubes, push connect fittings or steel tube ends become
damaged and leak, approved service parts shown in the illustration must be used
to service the fuel lines.
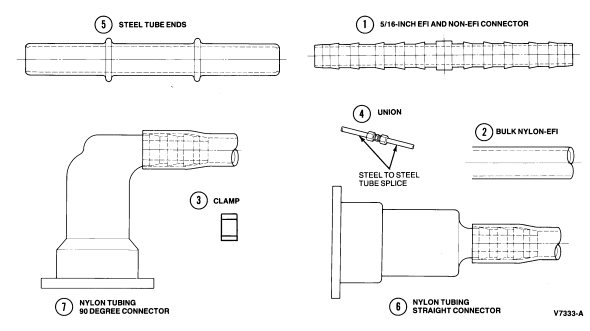
Fuel Line Service Parts
CAUTION: The plastic fuel lines can be damaged by torches, welding sparks,
grinding and other operations which involve heat and high temperatures. If any
service operation will be used which involves heat and high temperatures locate
all fuel system components, especially the plastic fuel lines to ensure they
will not be damaged. It is recommended that the plastic fuel tubes be removed
from the vehicle if a torch or high heat producing equipment is to be used for
service in the following areas:
- Exhaust or suspension components in proximity to fuel tubes
- Floorpan under vehicle and inside the passenger compartment (RH
side)
- Rocker panel (RH side)
- Underbody frames, rails and crossmembers (RH side)
- Dash panel, under vehicle or inside the passenger
compartment (lower RH side)
- Front or rear wheel house/fender apron (RH side)
Removal
- Depressurize fuel system as outlined under Fuel System Pressure Relief.
- Drain fuel from fuel tank as outlined under Fuel Tank, Removal.
- Disconnect the push connect fittings from the tubes at the tank.
- On some vehicles it is necessary to lower the fuel tank and disconnect the
push connect fittings from the sender.
- Remove the RH front fender liner from inside the front wheel housing if
required to expose the fuel line routing.
- Disconnect the spring lock couplings from the engine tubes at the front of
the vehicle.
- Cut the push pins off between each plastic wrap-around clip and the body.
Remove the screws from any wrap-around clips. Drill the pop rivets out of any
clips. All clips can be reused.
Installation
- Secure the fuel tube assembly to the underbody near the center of the
vehicle using a clip/retainer and pop-rivet. Refer to the appropriate system
illustration for the correct location for this first clip.
- Moving rearward, install all additional clips as shown on the system
illustration. The wrap-around clips must be secured with new push-in pins. All
clips must be located between the paired upsets located on the fuel tube.
- Route the tube assembly forward to the front structure and into the RH
front wheel housing.
NOTE: All clips must be located between the paired upsets in the tube assembly.
- Install the special metal clip and secure it with a screw to attach the
tube assembly in the depression under the front structure rearward of the wheel
housing.
- On pressurized fuel systems, connect the plastic tube push connect fittings
to the metal tubes or engine tubes at the front of the vehicle and to the fuel
tank, pump and filter at the rear of the vehicle.
- Return the drained fuel to the fuel tank.
- Check the fuel tubes and push connect fittings for proper function. The
push connect fittings must be installed so that the second bead on the tube is
inside the end of the fitting. Pull back on the fitting to ensure that it is
completely installed.
- Install the fender liner in the RH front wheel housing.