Section 07-01B: Transmission, Automatic—AOD
1993 Mustang Workshop Manual
REMOVAL AND INSTALLATION

Extension Housing


Removal

NOTE: Remove any interfering exhaust system components.

  1. Raise the vehicle on a hoist or stands. Refer to Section 00-02.
  1. Disconnect the parking brake cable from the equalizer, if so equipped.
  1. Disconnect the driveshaft from the rear axle flange and remove it from the transmission. To maintain driveline balance, mark the rear driveshaft yoke and axle companion flange so the driveshaft can be installed in its original position.
  1. Disconnect the speedometer cable from the extension housing.
  1. Disconnect manual linkage cable from support bracket. Remove bracket.
  1. Remove the engine rear insulator-to-extension housing retaining bolts.
  1. Place a jack under the transmission and raise it just enough to remove the weight from the engine rear insulator.
  1. Remove the nuts that retain the engine rear insulator to the crossmember and remove the insulator.
  1. Place a drain pan under the rear of the transmission case.

    NOTE: The extension housing bolts have been coated with a sealant. More break torque may be required to remove these bolts.

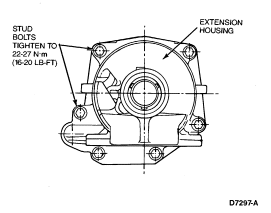
    NOTE: Identify location of two stud bolts for proper installation.

  1. Lower the transmission and remove the extension housing retaining bolts. Slide the extension housing off the output shaft and allow the fluid to drain.


  1. Remove and discard extension housing gasket.
 

Installation

  1. Clean the mounting surface on the transmission and on the extension housing. Remove any sealant from the bolts and the case bolt holes. Position a new gasket on the transmission. Coat the bolts with Threadlock and Sealant E0AZ-19544-AA (ESE-M4G204-A) or Pipe Sealant with Teflon® D8AZ-19554-A (ESG-M4G194-A and ESR-M18P7-A) or equivalent.
  1. Hold the extension housing in place and secure it with the retaining bolts. Install stud bolts in their proper location. Tighten to 22-27 Nm (16-20 lb-ft).
  1. Raise the transmission high enough to position the engine rear support on the crossmember.
  1. Secure the insulator to the crossmember with the retaining nuts. Tighten the nuts to 34-47 Nm (26-34 lb-ft).
  1. Lower the transmission and remove the jack. Install engine rear insulator-to-extension housing retaining bolts. Tighten the bolts to 68-95 Nm (50-70 lb-ft).
  1. Secure the speedometer cable to the extension housing with the retaining bolt.
  1. Install manual linkage support bracket and manual linkage cable. Adjust linkage. Refer to Section 07-05.
  1. If so equipped, connect the parking brake cable to the equalizer.
  1. Install the driveshaft in the transmission and connect shaft to rear axle flange. Install driveshaft so that index marks, made during removal, are correctly aligned. Refer to Section 05-01.

    NOTE: Lubricate yoke splines with Premium Long Life Grease XG-1-C (ESA-M1C75-B) or equivalent.

  1. Install any exhaust system components that were removed.
  1. Lower the vehicle. Fill the transmission to the proper level with Synthetic MERCON® Multi-Purpose Automatic Transmission Fluid E6AZ-19582-B (ESR-M2C163-A2) or equivalent. Start the engine and shift the transmission through all ranges, then check the fluid level. Refer to Transmission Fluid Level Check procedure.