 CAUTION: Do not try to stop the fluid leak by increasing the torque beyond
specification. This may cause damage to the case threads.
 Section 07-01B: Transmission, Automatic—AOD | 1993 Mustang Workshop Manual |
Troubleshooting the automatic transmission is simplified by using the proven method of diagnosis. One of the most important things to remember is that there is a definite procedure to follow. Do not take short cuts or assume that critical checks or adjustments have already been made.
The following procedures are recommended for checking and/or verifying that the various components are adjusted and operating properly. Use Rotunda Automatic Transmission Tester 014-00737 or equivalent. Follow the manufacturer's instructions.
Check the speedometer cable connection at the transmission. Replace the rubber seal, if necessary.
Check for leakage at oil pan gasket.
NOTE: Fluid from other external sources can collect between the case and pan rail and give the appearance of a pan gasket leak. If fluid is present check the following positions as outlined.
Oil Pan
Leakage at the oil pan gasket often can be stopped by tightening the retaining bolts to 8-13.5 Nm (71-119 lb-in). Do not over-tighten pan bolts. If necessary, replace the gasket.
Fluid Filler Tube
Check the fluid filler tube connection at the transmission case or oil pan. If leakage is found here, install a new O-ring and press the filler tube to the case. The filler tube bracket should align properly and be attached to the transmission or engine.
Transmission Cooler Lines
 CAUTION: Do not try to stop the fluid leak by increasing the torque beyond
specification. This may cause damage to the case threads.
Check the fluid lines and fittings between the transmission and the cooler in the radiator tank for looseness, wear or damage. When fluid is found to be leaking between the case and the cooler line fitting, tighten the fitting to 31 Nm (23 lb-ft).
If the leak continues, replace the cooler line fitting and tighten to 24-31 Nm (18-23 lb-ft). The same procedure should be followed for fluid leaks between the radiator cooler and cooler line fittings.
Transmission Case
Check the engine coolant in the radiator. If transmission fluid is present in the coolant, the transmission cooler in the radiator is probably leaking.
The cooler can be further checked for leaks by disconnecting the lines from the cooler fittings and applying 345-517 kPa (50-75 psi) air pressure to the fittings. Remove the radiator pressure cap to relieve the pressure buildup at the exterior of the oil cooler tank. If the cooler is leaking and/or will not hold pressure, the cooler must be replaced. Refer to Section 03-03 for coolant replacement procedure.
If leakage is found at either the throttle valve lever shaft or the manual lever shaft, replace either or both seals.
Pipe Plugs
The automatic overdrive transmission (AOD) has four pipe plugs: three on the RH side of the case and one on the LH side. Inspect the plugs for leakage. Ensure they are tightened to 8-16 Nm (6-12 lb-ft). If tightening does not stop the leak, replace the plug.
When a converter drain plug leaks, remove the drain plug with a six-point wrench. Coat the threads with Pipe Sealant with Teflon® D8AZ-19554-A (ESG-M4G194-A and ESR-M18P7-A) or equivalent and install plug. Tighten the drain plug to 11-38 Nm (8-28 lb-ft). Fluid leakage from the converter housing may also be caused by engine oil leaking past the rear main bearing seal, or from oil galley plugs. Verify the exact cause of the leak before starting service procedures.
Oil soluble aniline or fluorescent dyes premixed at the rate of 2.5ml (1/2-teaspoon) of dye powder to 0.23l (1/2-pint) of transmission fluid have proved helpful in locating the source of fluid leakage. Such dyes may be used to determine whether an engine oil or transmission fluid leak is present, or if the fluid in the oil cooler leaks into the engine coolant system. A black light must be used with the fluorescent dye solution.
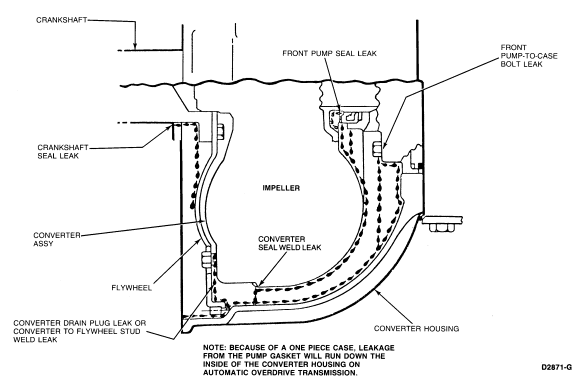
Fluid Leakage in Converter Area
In diagnosing and correcting fluid leaks in the front pump and converter
area, use the following procedures to locate the exact cause of the leakage.
Leakage at the front of transmission, as evidenced by fluid around the
converter housing, may have several sources. By careful observation, it is
possible, in many instances, to pinpoint the source of leak before removing the
transmission from the vehicle. The paths which the fluid takes to reach the
bottom of the converter housing are shown in the following illustration. 
NOTE: White tissue paper may aid in determining the color (red is transmission fluid) and source of the leaking fluid.
Converter Leakage Check
Tools Required:
If welds on the torque converter indicate leakage remove the converter and make the following check:
Assemble Rotunda Torque Converter Leak Detector 021-00054 or equivalent to the converter. Test the converter for leaks, following the directions supplied with the detector kit.