Section 07-01A: Transmission, Automatic, A4LD | 1993 Mustang Workshop Manual |
DISASSEMBLY AND ASSEMBLY
Transmission Assembly
Tools Required:
- T74P-77498-A — Shift Lever Seal Replacer
(In A4LD
Service Kit T74P-77000-A)
- T74P-77247-A — Neutral Start Switch Socket
(In A4LD
Service Kit T74P-77000-A)
- T74P-77193-A — Overrunning Clutch Replacing Guide
- D80P-4201-A — Depth Micrometer
- T93T-77003-AH — Gauge Bar
- D80L-943-A — Universal Seal Puller
- T87L-77248-BH — Seal Staking Tool
- T74P-77103-X — Pump Alignment Set (In A4LD Service Kit
T74P-77000-A)
- T71P-77370-A — Band Adjustment Torque Wrench
- TOOL-4201-C — Dial Indicator With Bracket
- T74P-77190-A — Servo Rod Selecting Gauge
(In A4LD
Service Kit T74P-77000-A)
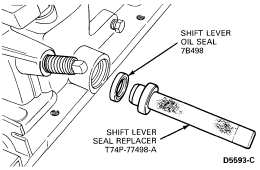
Shift Lever Seal
- Install the shift lever oil seal (7B498) using Shift Lever Seal Replacer
T74P-77498-A.
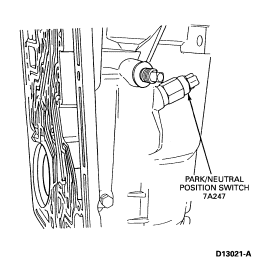
Park/Neutral Position Switch
 CAUTION: Do not use open end type wrench. The switch assembly could be damaged.
- Install the park/neutral position switch (7A247) using Neutral
Start Switch Socket T74P-77247-A.
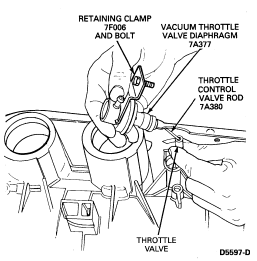
Vacuum Diaphragm
CAUTION: Make sure the valve (7D080) moves freely in the bore.
- Install throttle valve (7D080), actuating rod (7A380), vacuum
diaphragm (7A377) and retaining clamp (7F006). Hold in position by tightening
M6 x 12mm screw with a 10mm wrench.
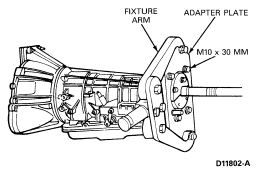
NOTE: The fixture arm T57L-500-B should still be attached to adapter plate. If
not, re-attach fixture arm at this time.
- Re-attach the adapter plate to transmission case (7005) on the extension
housing face using four M10 x 30mm screws as shown.
Manual Lever Assemblies
- Install the transmission case with fixture arm in bench pivot
T57L-500-B and rotate to position, oil pan rail face up.
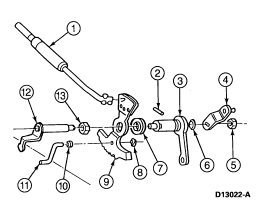
| Item |
Part Number |
Description |
|
1
|
7A232
|
Park Actuating Rod
|
|
2
|
E840125-S
|
Pin
|
|
3
|
7A256
|
Manual Control Lever Assembly
|
|
4
|
7A394
|
Outer Downshift Control Lever
|
|
5
|
E820109572
|
Nut
|
|
6
|
386078
|
O-Ring
|
|
7
|
7B498
|
Seal
|
|
8
|
E662312-S
|
Clip
|
|
9
|
7A115
|
Inner Detent Lever
|
|
10
|
E630020-S71
|
Washer
|
|
11
|
7E333
|
Inner Manual Pin (Z-Link)
|
|
12
|
7D261
|
Inner Downshift Lever
|
|
13
|
N820112-S72
|
Nut
|
WARNING: MAKE SURE LOCK PIN ON BENCH FIXTURE (T57L-500-B) IS SECURE.
- Assemble the inner manual valve lever (7A115), park rod assembly (7A232),
inner manual pin "Z"-link (7E333), flat washer (E630020-S71) and retaining clip
(E662312-S) as shown.
- Place the inner manual lever, park rod, and "Z"-link into position.
- Insert the inner downshift lever (7D261) with the inner lever-to-lever hex
nut (E820112-S) in position as shown.
- Install the manual lever (7A256) so that inner lever flats match the flats
on the manual lever.
CAUTION: Do not bend "Z"-link. Care should be taken to not damage pan rail when
installing the centering pin.
- Install centering pin (E840125-S). Pin should be flush with oil pan rail.
Tighten 7/8 Inch hex nut (E820112-S) to 41-54 Nm (30-40 ft-lb).
| Item |
Part Number |
Description |
|
1
|
—
|
Hammer
|
|
2
|
7A115
|
Lever, Manual Valve, Inner
|
|
3
|
7E333
|
Inner Manual Pin (Z-Link)
|
|
4
|
7D261
|
Inner Downshift Lever
|
|
5
|
E820112-S
|
Lever-to-Lever Hex Nut
|
|
6
|
E840125-C
|
Centering Pin
|
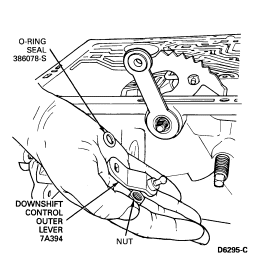
- Install the O-ring (386078-S) and outer kickdown lever (7A394). Use a 13mm
wrench to tighten the outer nut (E8020109-S72) to 10-15 Nm
(7-11 ft-lb).
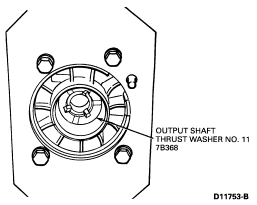
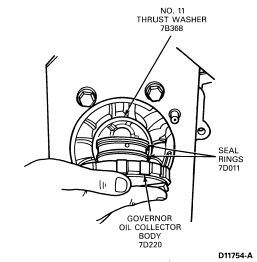
CAUTION: The tabs on No. 11 washer point into case.
NOTE: Petroleum jelly can be used to hold No. 11 washer in place.
- Install No. 11 thrust washer (7B368) into rear of case (7005)
bore.
Governor Oil Collector Body
- Install the governor oil collector body (7D220) with three new
seal rings (7D011) into rear case (7005) bore.
- Install the reverse brake drum assembly (7C498).
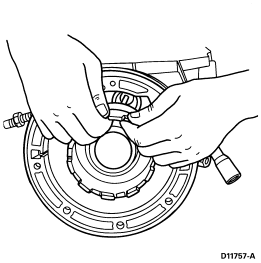
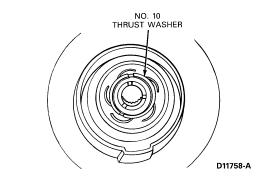
CAUTION: The tabs on No. 10 thrust washer point into the one-way clutch.
NOTE: The size of No. 10 thrust washer is model dependent.
- Install No. 10 thrust washer (7D422) against the one-way clutch using
petroleum jelly to hold the washer in place during assembly.
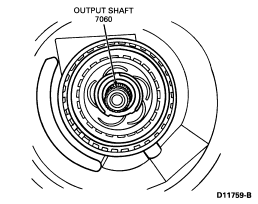
Output Shaft
- Install the output shaft (7060) through governor oil collector
body (7D220) spline.
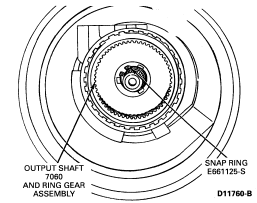
CAUTION: Always use a new snap ring.
- Install the output shaft hub (7D164) and ring gear (7A153) assembly. Retain
with a new snap ring (E661125-S) (25 x 2.0mm) in the output shaft groove.
Reverse Planet Assembly
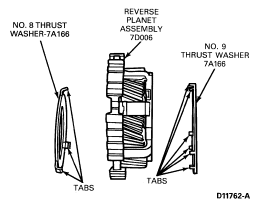
CAUTION: The tabs on the thrust washers point into the planet.
NOTE: Use petroleum jelly to hold the thrust washers in place for assembly.
- Position No. 8 thrust washer (7A166) on the front face and No. 9
thrust washer (7A166) on the rear face of reverse planet assembly (7D006).
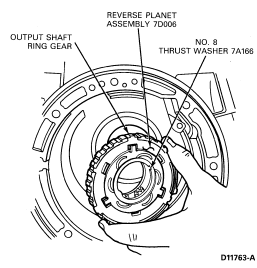
CAUTION: Make sure the thrust washers stay in place.
- Install the reverse planet assembly (7D006) with No. 8 and No. 9
thrust washers held in place into the output shaft ring gear (7A153).
- Install the snap ring (E860119-S) into the reverse brake drum
(7C498) groove to hold planet assembly in place.
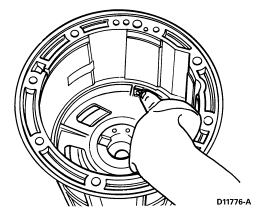
CAUTION: Make sure band is resting on two anchor pins in case.
- Install reverse band (7D095) onto the reverse brake drum (7C498).

- Install the reverse servo piston assembly (7D189) temporarily to
hold the reverse band in position.
NOTE: The reverse servo springs will be installed later.
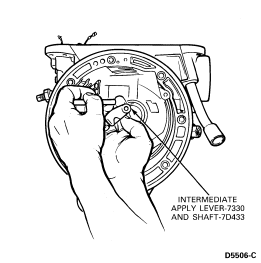
- Install the intermediate servo apply lever (7330) and shaft
(7D433), as identified in removal.
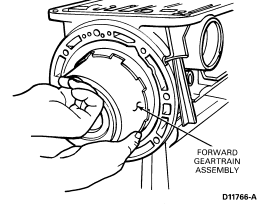
Forward Geartrain Assembly
- Install the previously completed forward geartrain assembly as a
unit.
WARNING: MAKE SURE THE LOCK PIN ON BENCH FIXTURE T57L-500-B IS SECURE.
- Rotate the transmission assembly to position, converter housing
gasket surface face up.
- Install the intermediate band (7D034) and apply strut (7D029).
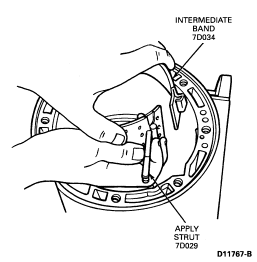
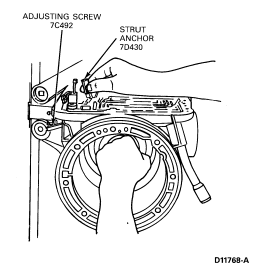
NOTE: Use the adjusting screw as a temporary alignment guide.
NOTE: The intermediate and overdrive anchor struts are the same.
- Install the intermediate band anchor side strut (7D430) and
adjusting screw (7C492).
Selective Thrust Washers
Tools Required:
Rear No. 4 Thrust Washer Clearance Selection, Non Clip Together Type
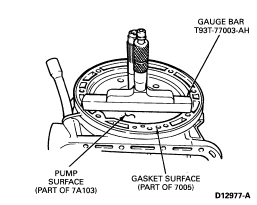
- Place Gauge Bar (T93T-77003-AH) or case shoulder and set micrometer on top
of gauge bar as shown.
- Extend probe until it contacts No. 4 thrust washer surface at intermediate
brake drum.
- Remove micrometer and record reading as Dimension "A."
- Move micrometer to opposite side of gauge bar (180 degrees) and repeat Step
3. Record as Dimension "B."
- Add Dimensions "A" and "B" together, divide by 2, then subtract the
thickness of Gauge Bar T93T-77003-AH (17.78mm [0.700 in.]).
This is Dimension "C."
- See chart for proper thrust washer selection with Dimension "C" from Above
step.
| Transmission Lower End Clearance Non Snap Dimension "C" |
Identification Number Stamped on Washer |
Service Part Number |
Washer Thickness |
| 1.66-1.85mm (0.065-0.073 in.) |
1 |
F0TZ-7D014-A |
1.35-1.40mm (0.053-0.055
in.) |
| 1.86-1.95mm (0.074-0.077 in.) |
2 |
F0TZ-7D014-B |
1.55-1.60mm (0.061-0.063
in.) |
| 1.96-2.05mm (0.078-0.081 in.) |
3 |
F0TZ-7D014-C |
1.65-1.70mm (0.065-0.067
in.) |
| 2.06-2.15mm (0.082-0.085 in.) |
4 |
F0TZ-7D014-D |
1.75-1.80mm (0.069-0.071
in.) |
| 2.16-2.25mm (0.086-0.089 in.) |
5 |
F0TZ-7D014-E |
1.85-1.90mm (0.073-0.075
in.) |
| 2.26-2.35mm (0.090-0.093 in.) |
6 |
F0TZ-7D014-F |
1.95-2.00mm (0.077-0.079
in.) |
| 2.36-2.55mm (0.094-0.100 in.) |
7 |
F0TZ-7D014-G |
2.05-2.10mm (0.081-0.083
in.) |
| Rear: #4 Reference End Play 0.30-0.54mm (0.012-0.022 in.) |
|
|
|
- Remove the micrometer and tool from transmission.
NOTE: Use petroleum jelly on washer to hold in place.
- Install correctly selected No. 4 thrust washer over center support hub as
shown.
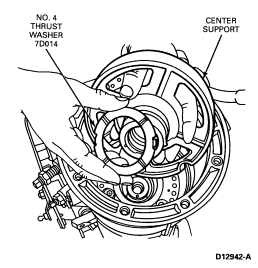
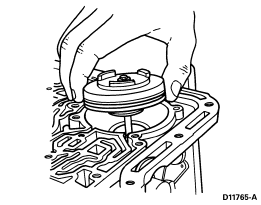
Center Support
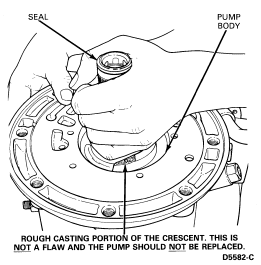
- Remove the center support (7A130) from the overdrive brake drum
where the seals (7D429) have been sizing.

CAUTION: Do not apply pressure to the center support to avoid damage to seal
rings.
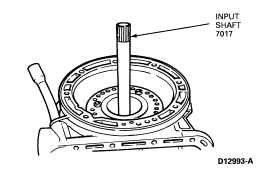
- Position the center support (7A130) into the reverse/high drum
(7D044). Use the input shaft as an aid to seat center support (7A130). Gently
wiggle the shaft from side to side until center support (7A130) is seated
against the case (7005) shoulder.
- Remove the input shaft.
CAUTION: Install the snap ring (7C122) in groove with the taper side of ring up.
- Install the large snap ring (7C122) into groove in the case
(7005) to retain the center support (7A130).

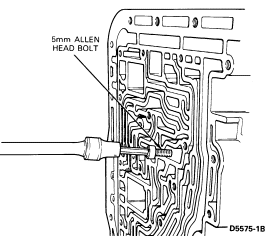
- Make sure the nut and cage assembly (E826160-S76) is in place as
shown.
- Use a 5mm Allen wrench to install one M6 x 20mm capscrew into
the nut and cage assembly (E826160-S76) as shown. Tighten to 9-13 Nm
(80-115 in-lb).
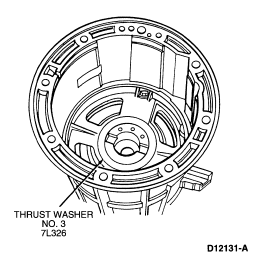
- Position No. 3 thrust washer (7L326) on the thrust surface of
the center support (7A130) as shown.
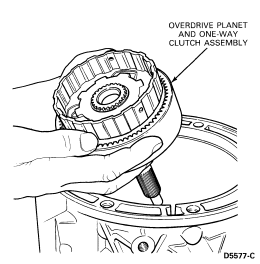
Overdrive Planet and One-Way Clutch Assembly
- Install the overdrive planet (7B446) and one-way clutch assembly
(7A089) into the center support.
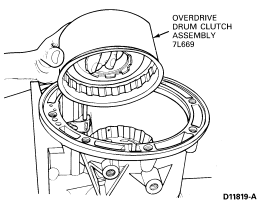
Overdrive Drum Assembly
- Install the overdrive drum (7L669) clutch assembly.
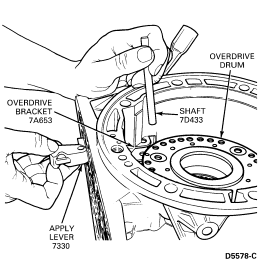
- Install the overdrive bracket (7A653). Apply lever (7330) and
shaft (7D433) as identified at disassembly.
- Install the overdrive band (7D034) over the overdrive drum (7L669).
- Install the apply side strut (7D029).
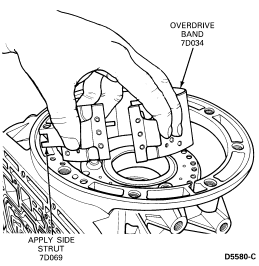
NOTE: Use the adjusting screw as a temporary alignment guide.
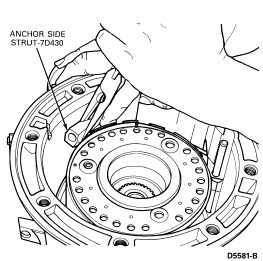
- Install the anchor side strut (7D430) and the adjusting screw (7C492).
Front End Play Check
CAUTION: Be sure the pump body is seated against the washer and overdrive drum.
The pump body must be below the level of the case gasket surface.
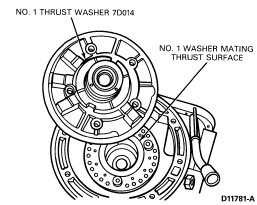
- To perform the front end play check procedure, place any No. 1
thrust washer (7D014) on the rear of pump (7A103) using petroleum jelly to hold
the washer in place. The washer tabs go into the pump face. Place the pump into
position in the case.
CAUTION: Gauge bar must rest on gasket surface.
- Place Gauge Bar T93T-77003-AH across case (7005) as shown.
- Place the micrometer on gauge bar, extend probe until it contacts pump
surface.
- Read micrometer and subtract the thickness of gauge bar (17.78mm [
0.700 in.]). Record this as Dimension "A."
- Move Gauge Bar T93T-79003-AH to opposite size of case (180 degrees).
- Repeat steps 3 and 4 and record measurement as Dimension on "B."
- Add Dimensions "A" and "B" together, divide by 2 and this is your front
end clearance, Dimension "C."
CAUTION: If your average is below the specification choose a washer of less
thickness. If your average is above specification choose a thicker washer.
NOTE: The front end play specification is .018-.64mm (.007-.025 inch).
TRANSMISSION END PLAY NO. 1 SELECTIVE THRUST WASHER CHART
| Transmission End Clearance Dimension "C" |
Identification Number Stamped on Washer |
Service Part Number |
Thickness |
Front #1 (All Engines)
0.18-0.64mm (0.007-0.025 in.)
without gasket |
1
2
3
4
5
6
7 |
F0TZ-7D014-A
F0TZ-7D014-B
F0TZ-7D014-C
F0TZ-7D014-D
F0TZ-7D014-E
F0TZ-7D014-F
F0TZ-7D014-G |
1.35-1.40mm (0.053-0.055 in.)
1.55-1.60mm (0.061-0.063 in.)
1.65-1.70mm
(0.065-0.067 in.)
1.75-1.80mm (0.069-0.071 in.)
1.85-1.90mm (0.073-0.075
in.)
1.95-2.00mm (0.077-0.079 in.)
2.05-2.10mm (0.081-0.083 in.) |
NOTE: The tabs on the washer go into the pump face.
- Remove the pump and install the correct No. 1 thrust washer
(7D014). Use petroleum jelly to hold the washer in place.
- Verify the end play by repeating the check procedure with the selected No.
1 thrust washer in place.
- Remove the pump and correct No. 1 thrust washer. Set the washer
aside for installing after assembling the pump to converter housing. Refer to converter housing and pump assembly in Sub-Systems Disassembly.
- Install input shaft to guide converter pump when installed.
CAUTION: Do not position the gasket on the case first.
- Place a new converter housing gasket (7A136) on the separator
plate (7B472) as shown. Use petroleum jelly to hold gasket in place.
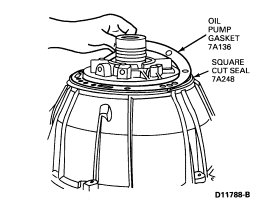
NOTE: Make sure square cut seal is installed on converter housing and pump
assembly.
- Install correct No. 1 thrust washer on pump. Use petroleum jelly
to hold washer in place.
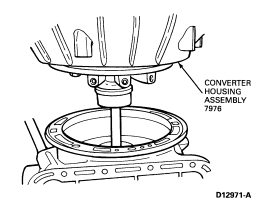
- Position the completed converter housing (7976) and pump (7A103) assembly
(with gasket 7A136) and No. 1 thrust washer (7D013) to the case (7005). Use a
17mm socket to install eight new M10 x 33mm screws (E80495-S200). Tighten to
36-52 Nm (27-38 ft-lb).
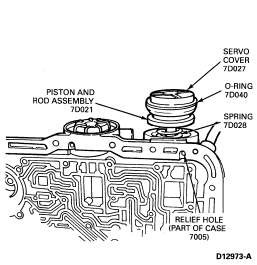
Intermediate and Overdrive Servos
WARNING: MAKE SURE THE LOCK PIN ON BENCH MOUNTED HOLDING FIXTURE (T57-500-B) IS
SECURE.
- Rotate the transmission assembly to position oil pan rail face up.
CAUTION: Do not damage O-ring (7D040) during installation. Do not press servo
cover and O-ring (7D027) past relief hole in case, or O-ring damage may occur.
- Install the previously identified intermediate servo
spring (7D028), piston and cover assembly with O-ring and retain with snap ring.
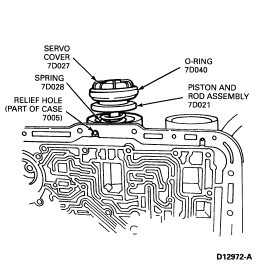
CAUTION: Do not damage O-ring (7D040) during installation. Do not press servo
cover (7D027) and O-ring past relief hole in case, or O-ring damage may occur.
- Install previously identified overdrive servo spring
(7D028), piston and cover assembly with O-ring and retain with snap ring.
Band Adjustment
Intermediate Band Adjustment
CAUTION: Install, but do not tighten, a new locknut (388307-S100) on the
adjusting screw (7C492). Apply petroleum jelly to locknut seal.
- Tighten the adjusting screw (7C492) using the Band Adjustment
Torque Wrench Set T71P-77370-A.
NOTE: The wrench will click at 14 Nm (10 ft-lb).
- Back off the adjusting screw (7C492) exactly two turns and hold
in that position. Tighten the locknut (388307-S100) to 47-61 Nm
(35-45 ft-lb) using a 19mm wrench.
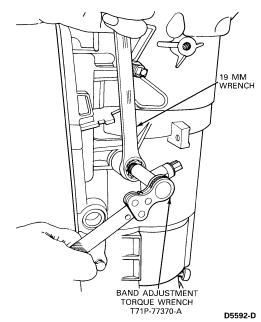
Overdrive Band Adjustment
CAUTION: Install, but do not tighten, a new locknut (388307-S100) on adjustment
screw (7C492). Apply petroleum jelly to locknut seal.
- Tighten the adjusting screw (7C492) using the Band Adjustment
Torque Wrench Set T71P-77370-A.
NOTE: The wrench will click at 14 Nm (10 ft-lb).
- Back off the adjusting screw (7C492) exactly two turns and hold
that position. Tighten locknut (388307-S100) to 47-61 Nm
(35-45 ft-lb) using a 19mm wrench.

WARNING: MAKE SURE THE LOCK PIN ON BENCH FIXTURE (T57-500-B) IS SECURE.
- Rotate the transmission assembly to position oil pan rail face up.
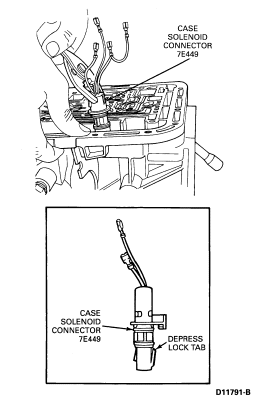
Solenoid Case Connector
- Push the solenoid case connector (7E449) into the case (7005)
until the lock tab snaps into place.
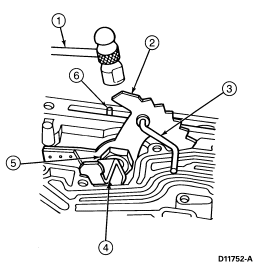
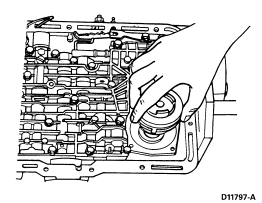
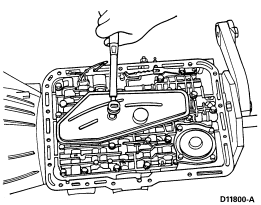
Main Control Valve Body
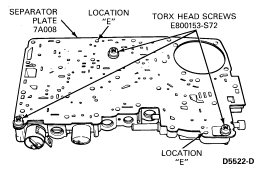
CAUTION: Make sure all holes in gasket line up with holes in separator plate.
- Place a new valve body-to-case gasket (7C155) on separator plate.
NOTE: Use petroleum jelly to hold gasket in place.
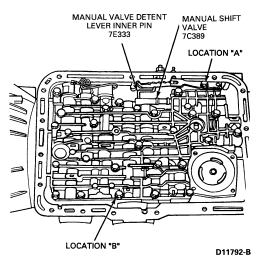
- Position the valve body (7A100) on case (7005) with the selector
lever connecting rod ("Z"-link) (7E333) placed into the hole on the manual
valve.
CAUTION: Do not bend the "Z"-link.
NOTE: The following step is for alignment of valve body to case.
- Insert one number 4 length screw in location "A," and one number
1 length screw in location "B," both finger-tight.
NOTE: See the illustration for screw size, identification, and hole location.
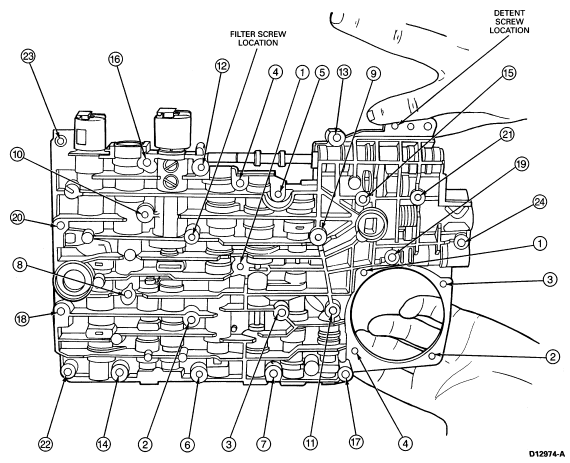
Valve Body Screw Location
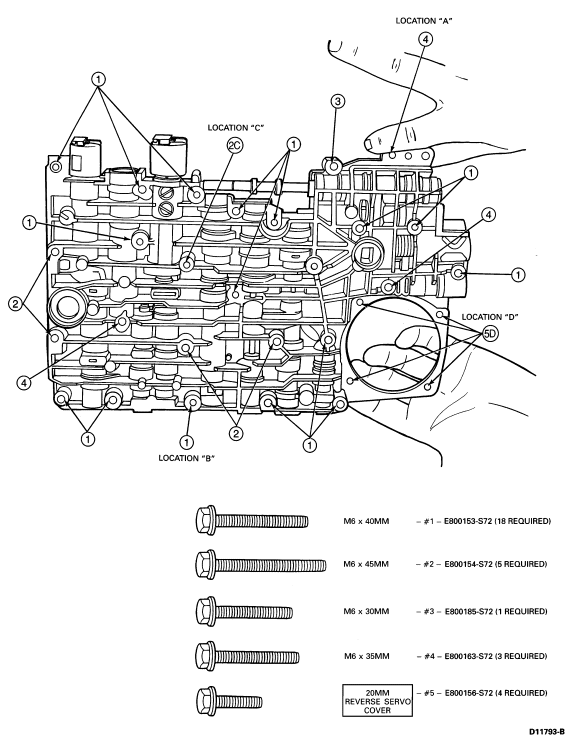
- Install four M6 x 45mm screws in location "2" finger-tight.
- Install two M6 x 35mm screws in location "4" finger-tight.
- Install one M6 x 30mm screws in location "3" finger-tight.
- Install 18 M6 x 40mm screws in location "1" finger-tight.
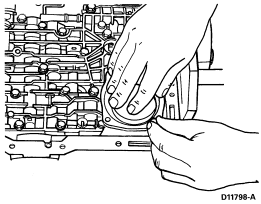
- Tighten screws to 8-11 Nm (71-97 in-lb) in
sequence shown using a 10mm socket.
Valve Body Torque Sequence
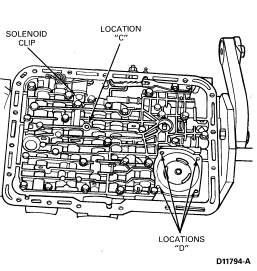
NOTE: Make sure the solenoid retaining clip is in place. Location "C" is for
the filter screen. Locations "D" are for the reverse servo cover. Do not insert
screws yet.
See the illustration for screw size, identification and location.
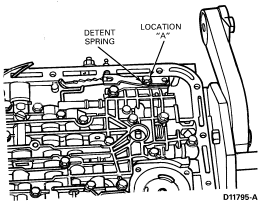
- Remove screw from location "A" on valve body.
- Install detent spring (7E332). Retain by reinserting screw in location "A."
Tighten to 8-11 Nm (71-97 in-lb).

Reverse Servo
- Remove reverse servo piston from case (7005) Assembly.
- Install the reverse servo piston assembly into servo bore along with a
reverse servo spring D4ZZ-7D031-A.
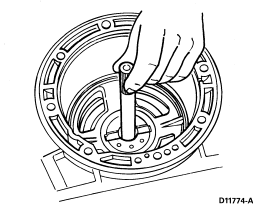
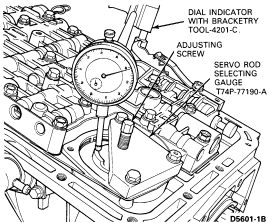
- Install new servo cover gasket and Servo Rod Selecting Gauge
T74P-77190-A and tighten with three attaching bolts as shown.
- Tighten servo tool adjusting screw to 4 Nm (35 in-lb).
- Install dial indicator with bracketry TOOL-4201-C on
transmission case and position indicator on piston pad. Set dial indicator to
zero.
- Back out the servo tool adjusting screw until piston bottoms out on the
tool. Record the distance the servo piston traveled.
NOTE: If piston travel is between 3 and 5.6mm (.120 and .220 Inch), it is
within specification. If piston travel is greater than 5.6mm (.220 Inch), use
the next longer piston and rod. If piston travel is less than 3mm (.120 Inch),
use the next shorter piston and rod.
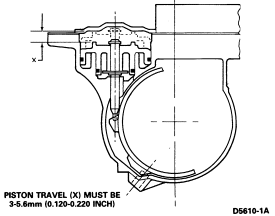
- Using the above procedure, check the piston travel with the new
selected piston and rod (if required) to make sure that the piston travel is
between 3 and 5.6mm (.120 to .220 Inch).
- Remove the servo adjusting tool and the reverse servo piston checking spring.
| Length — mm |
Length — inches |
I.D. |
| 54/53 |
2.112/2.085 |
1 Groove |
| 51/50 |
2.014/1.986 |
No Groove |
| 49/48 |
1.915/1.888 |
2 Grooves |
CAUTION: Replace the reverse servo piston assembly seals (7423) if damaged.
- Install the reverse servo piston spring (7D031) to the piston
assembly (7D189).
- Re-install the reverse servo piston assembly (7D189) into the case (7005).
NOTE: See the valve body screw location illustration.
- Use a 10mm socket to install four number 5 length screws to
attach the reverse servo cover (7D036) and gasket (7L173) at locations "D."
Tighten to 9-13 Nm (80-115 in-lb).
- Using needlenose pliers, connect solenoid case connecter (7E449)
wires to torque converter clutch solenoid (7F037) and 3-4 shift-solenoid
(7M107).
NOTE: Refer to the valve body screw location illustration.
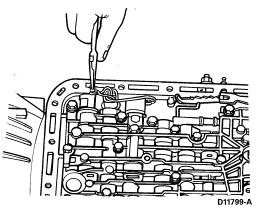
Oil Screen
- Install new O-rings (7A469) on the oil screen assembly (7A098).
Lubricate with petroleum jelly. Position oil screen (7A098) and use a 10mm
socket to install one No. 2 length screw M6 x 45mm in location "C." Tighten to
8-11 Nm (71-97 in-lb).
Oil Pan
- Position a new oil pan gasket (7A191) on case (7005) oil pan
rail. Position oil pan (7A194) on top of gasket. Use a 13mm socket to install
eighteen M8 x 14mm screws (E800158-S72). Tighten to 11-13 Nm
(97-115 in-lb).

- Remove the transmission fixture arm with adapter plate from the bench
fixture pivot. Place on a flat surface.
- Remove the fixture arm and adapter plate held on by four M10 x 30mm screws.
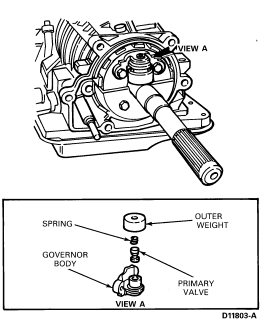
Governor Assembly
CAUTION: The governor assembly can come apart until installed in place.
- Assemble the governor assembly (7C063), (7C064), (7A302),
(7D334), (7F124). Install the governor assembly to the governor oil collector
body (7D220) with two M6 x 20mm screws (E800156-S). Tighten to 9-13 Nm
(84-115 in-lb).
Extension Housing Assembly
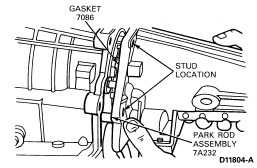
CAUTION: Make sure the park rod assembly (7A232) is correctly seated into the
guide cup (7D419).
NOTE: Use petroleum jelly to hold the gasket in place.
- Install a new gasket (7086) on the case assembly.
NOTE: The guide cup is a press fit into the extension housing (7D039) and is
not serviced separately.
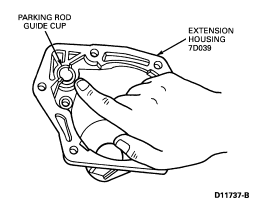
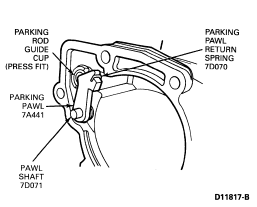
- Install the parking pawl (7A441), pawl return spring (7D070),
and pawl shaft (7D071) into the extension housing (7A039).
Extension Housing
- Install the extension housing assembly (7A039) to transmission
case (7005) using four M10-30mm screws (E800152-S72), and two studs
(E804137-S72). Tighten to 36-52 Nm (27-38 ft-lb).
Input Shaft
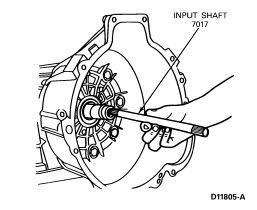
CAUTION: The splines are not the same on both ends. The shaft end with the
shorter spline goes into the pump support.
- Install the input shaft (7017) into the pump support (7A103).
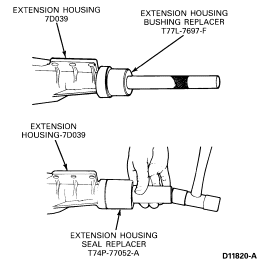
CAUTION: Tool will bottom when bushing is in proper position.
NOTE: Install extension housing bushing (7A034) only if removed in
disassembly).
- Install the extension housing bushing (7A034) using Extension
Housing Bushing Replacer T77L-7697-F.
- Install the extension housing seal (7052) using Extension Housing Seal
Replacer T74P-77052-A.
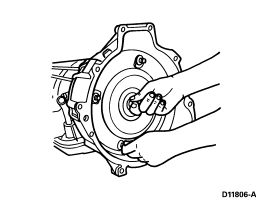
Torque Converter
CAUTION: Make sure the converter hub is fully engaged in the pump gear and
rotates freely. Do not damage hub seal.
WARNING: THE TORQUE CONVERTER CAN FALL OUT IF THE TRANSMISSION IS TIPPED.
- Install the torque converter (7902) by pushing and rotating the
converter.
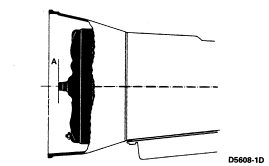
NOTE: Dimension "A" should be 10.23-14.43mm (7/16-9/16 Inch).
CAUTION: If the torque converter slides out and back you may damage the hub
seal.
CAUTION: Make sure the cooler line system is open and clean before the
transmission is installed in vehicle.
Refer to Cleaning and
Inspection in this section.