Section 05-02B: Axle, Integral Carrier Ś 8.8 Inch Ring Gear | 1993 Mustang Workshop Manual |
MAJOR SERVICE OPERATIONS
Drive Pinion and Gearset
Tools Required:
- Pinion Depth Gauge Set T79P-4020-A
A selective pinion shim (0.254mm to 0.965mm (0.010 to 0.038 inch)) is
used between pinion rear bearing and pinion head. The shim compensates for
machining variations in carrier, pinion and pinion bearings. The correct shim
size will locate pinion for proper tooth contact with ring gear. Selecting
correct pinion shim when installing a new gearset can be done by using Pinion
Depth Gauge Set T79P-4020-A as outlined.
Pinion Depth Gauge Procedure
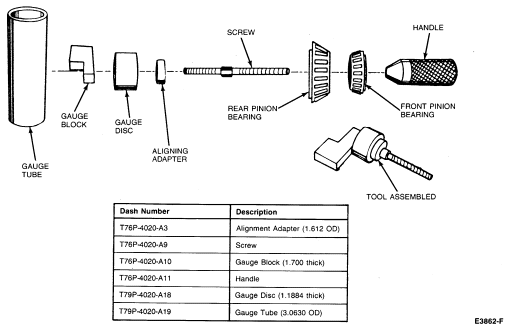
- Refer to illustration and assemble the appropriate aligning adapter, gauge
disc and gauge block to the screw.
Rear Axle Pinion Depth Gauge SetŚT79P-4020-A

NOTE: The gauge block must be offset to obtain an accurate reading.
- Place rear pinion bearing (new, or used if in good condition) over aligning
disc and insert into pinion bearing cup of the carrier. Place front bearing
into the bearing cap and assemble the tool handle into screw and tighten to
2.26 Nm (20 lb-in).

- Make sure that the gauge handle adapter screw, aligning adapter, gauge disc
and gauge block assembly are securely mounted between the front and rear
bearing. Check the tool handle torque prior to gauging to ensure that bearings
are properly seated. This can affect final shim selection when improperly
assembled. Clean bearing cups and differential pedestal surfaces thoroughly.
Apply only light oil film on bearing assemblies prior to gauging.
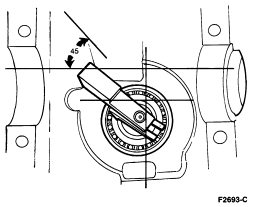
- The gauge block should then be rotated several half turns to ensure rollers
are properly seated in bearing cups. Rotational torque on the gauge assembly
should be 2.2 Nm (20 lb-in) with new bearings. Final position
should be approximately 45 degrees across gauge tube to ensure that gauge block
is in-line with gauge tube high point. This area should be used for pinion shim
selection. Selection of pinion shim with gauge block not lined up with tube
high point will cause improper shim selection and may result in axle noise.

NOTE: Shims must be flat. Do not use dirty, bent, nicked or mutilated shims as
a gauge.
- Use pinion shims as the gauge for shim selection.
This will minimize errors in attempting to stack feeler gauge stock together or
simple addition errors in calculating correct shim thickness.
NOTE: The same rear pinion bearing used in this procedure must be used in final
assembly of the axle.
- It is important to feel a slight drag on the shim for correct selection. Do
not attempt to force the shim between the gauge block and the gauge tube. This
will minimize selection of a shim thicker than required which results in a deep
tooth contact in final assembly of integral axles.
NOTE: A tooth pattern check with the marking compound and road testing is not
required when Pinion Depth Gauge Set T79P-4020-A is used.
- Place the selected shim(s) on pinion shaft and press pinion bearing until
firmly seated onshaft.
