Section 05-02B: Axle, Integral Carrier — 8.8 Inch Ring Gear
1993 Mustang Workshop Manual
REMOVAL AND INSTALLATION

Axle Housing

Tools Required:


Removal

  1. Raise vehicle on a hoist and position safety stands under the rear frame crossmember. Refer to Section 00-02.
  1. Drain lubricant from the axle by removing cover.
  1. Remove wheels, disc brake calipers and rotors.
  1. Remove lock bolt from the pinion shaft and remove the shaft.


  1. Push axle shafts inward to remove C-locks.


  1. Remove axle shafts.
  1. Remove four retaining nuts from each backing plate and wire the backing plate to underbody.

    NOTE: Mark driveshaft at companion flange. Refer to Pinion Seal Removal, Step 2.

  1. Disconnect driveshaft at the circular companion flange and wire it to the underbody.
  1. Support axle housing with jackstands or a hoist.
  1. Disengage brake line from clips that retain the line to the axle housing.

    NOTE: The axle vent is secured to the housing assembly. At assembly, apply Stud and Bearing Mount E0AZ-19554-BA (WSK-M2G349-A1) or equivalent to the thread to ensure retention.

  1. Disconnect vent from rear axle housing.
  1. Disconnect lower shock absorber studs from the mounting brackets on the axle housing.
  1. Remove retaining nut and bolts and disconnect the upper arms from the mountings on the axle housing ear brackets. If equipped, disconnect quad shock from quad shock bracket.
  1. Lower axle housing assembly until the coil springs are released. Lift out coil springs.
  1. Remove nuts and bolts that connect suspension lower arms to axle housing. Disconnect both arms from the axle housing.
  1. Lower axle housing and remove it from the vehicle.
 

Installation

  1. Transfer all components from old housing to new housing as outlined.
  1. Install new axle shaft bearings into new axle housing using Axle Tube Bearing Replacer T78P-1225-A.


  1. Install two new wheel seals using Axle Tube Seal Replacer T78P-1177-A. Apply Premium Long-Life Grease XG-1-C (ESA-M1C75-B) or equivalent between the lips of the seal.


  1. Position new axle housing under vehicle and raise axle with a hoist or jack. Connect the suspension lower arms to their mounting brackets on axle housing. (Do not tighten bolts and nuts at this point).
  1. Position rear coil springs in area provided.
  1. Raise housing into position.
  1. Connect upper arms to the mounting ears on housing. Connect lower suspension arms to axle housing. Tighten upper suspension arm bolts to 95-135 Nm (70-100 lb-ft). Tighten lower arm retaining bolts to 95-135 Nm (70-100 lb-ft).
  1. Position brake lines to the axle housing and secure with retaining clips. Position and secure brake junction block to the housing cast boss. Tighten to 14-24 Nm (10-18 lb-ft).
  1. Install brake backing plates on axle housing flanges (no gaskets required).
  1. Connect shock absorber lower studs to the mounting bracket on the axle housing. Install the attaching nuts and tighten to specification. Refer to Group 04.
  1. Connect driveshaft to circular companion flange. Install bolts. Tighten to 95-130 Nm (70-95 lb-ft).


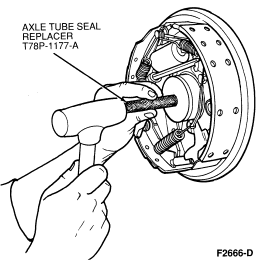
     CAUTION: Do not damage wheel bearing seal.

  1. Slide rear axle shafts into the housing until the splines enter the side gears.
  1. Push axle shafts at the flange inward, and install the C-lock at the end of each shaft spline. Pull shafts outboard until each C-lock enters the recess in the side gears.


  1. Coat threads of pinion shaft lock bolt with Stud and Bearing Mount E0AZ-19554-BA (WSK-M2G349-A1) or equivalent and install pinion shaft and pinion shaft lock bolt. Tighten lock bolt to 20-41 Nm (15-30 lb-ft).


  1. Install rear brake drums or disc rotors and calipers.
  1. Install wheels and tires. Tighten wheel lug nuts to 115-142 Nm (85-105 lb-ft).
  1. Install carrier cover using Silicone Rubber D6AZ-19562-AA or BA (ESE-M4G195-A and ESB-M4G92-A) or equivalent and tighten to 38-52 Nm (28-38 lb-ft) for metal covers.

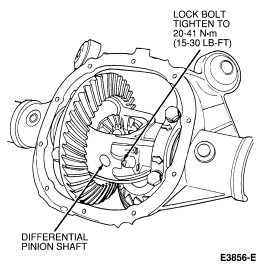
    NOTE: Bolt at two o'clock position (at ratio tag location) is to be tightened to 24-38 Nm (18-28 lb-ft) for metal covers.


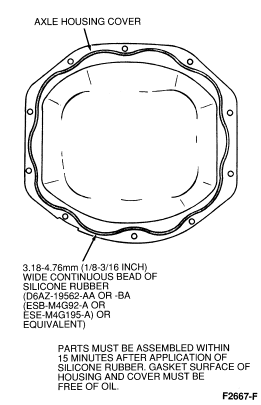
     CAUTION: Overfilling axle will cause axle leak.
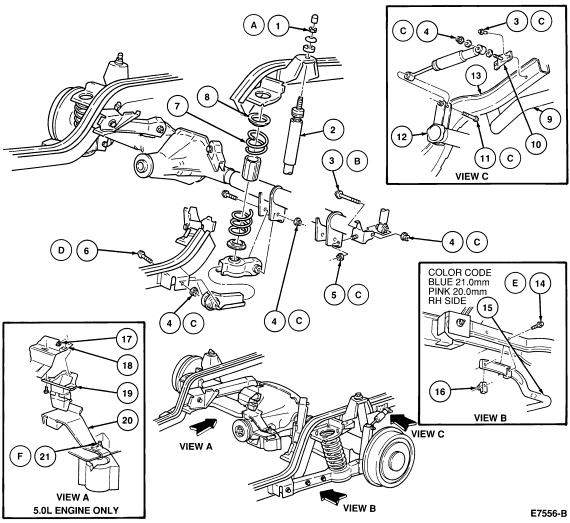
  1. Fill axle with lubricant until fluid level is within 6-14mm (1/4-9/16 inch) below bottom of the fill hole. Add four ounces of Additive Friction Modifier C8AZ-19B546-A (EST-M2C118-A) or equivalent for Traction-Lok axles. Be sure that the axle is in operating position. Install fill plug. Tighten to 20-41 Nm (15-30 lb-ft).
  1. Ensure axle vent is not plugged with debris.
  1. Road test vehicle.


    Item Part Number Description
    1A N802356-S100 Nut (2 Req'd)
    2 18080 Shock Assy (2 Req'd)
    3B N803486-S56 Bolt (2 Req'd)
    4C N800937-S151 Nut (2 Req'd)
    5C N800169-S101 Nut (2 Req'd)
    6D N802293-S101 Bolt (2 Req'd)
    7 5560 Spring (2 Req'd)
    8 5536 2 Req'd
    9 Exhaust
    10 4A491
    4A490
    Assy LH
    Assy RH
    11C N605933-S7 4 Req'd
    12 Axle
    13 Sidemember
    14E N801672-S151 Bolt (4 Req'd)
    15 5A772 Color Code Blue 21.0mm
    Pink 20.0mm
    RH Side
    16 N802812-S56 4 Req'd
    17 N804272-S56 3 Req'd
    18 Floor Pan
    19 4K223 Assy
    20 4A215 Assy
    21F N605891-S56 Bolt (3 Req'd)
    A Tighten to 26-35 Nm (20-25 Lb-Ft)
    B Tighten to 60-81 Nm (45-59 Lb-Ft)
    C Tighten to 76-103 Nm (57-75 Lb-Ft)
    D Tighten to 104-142
    Nm (77-105 Lb-Ft)
    E Tighten to 45-70 Nm (33-52 Lb-Ft)
    F Tighten to 10-16 Nm (8-11 Lb-Ft)