
Section 03-07B: Electronic Ignition (EI) System | 1993 Mustang Workshop Manual |
Tools Required:
Removal
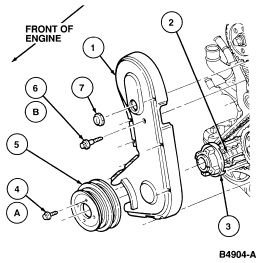
| Item | Part Number | Description |
|---|---|---|
| 1 | 6E004 | Timing Belt Outer Cover |
| 2 | 6C315 | Crankshaft Position Sensor (CKP) |
| 3 | 6C337 | Crankshaft Pulley Hub Assy |
| 4A | Ś | Bolt |
| 5 | 6312 | Crankshaft Pulley Assy |
| 6B | Ś | Bolt |
| 7 | Ś | Plug |
| A | Tighten to 28-38 Nm (20-28 Lb-Ft) | |
| B | Tighten to 8-12 Nm (6-9 Lb-Ft) |
NOTE: The vane cups are attached to the crankshaft pulley hub assembly.
Installation
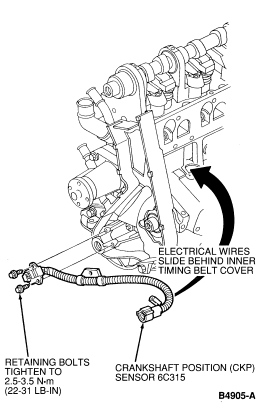
 CAUTION: Ensure the four wires to the large electrical connector are installed
in the proper locations as indicated. The sensor will not function properly if
the wires are installed in the wrong locations.
CAUTION: Ensure the four wires to the large electrical connector are installed
in the proper locations as indicated. The sensor will not function properly if
the wires are installed in the wrong locations.
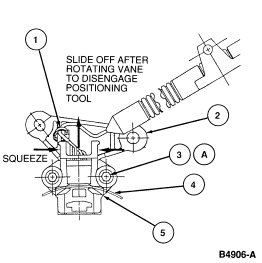
| Item | Part Number | Description |
|---|---|---|
| 1 | Ś | Plastic Wire Harness Retainer |
| 2 | 6C350 | Crankshaft Position Sensor Mounting Bracket |
| 3A | Ś | Bolts (2 Req'd) |
| 4 | Ś | Outer Vane of Crankshaft Pulley Hub Assy |
| 5 | T89P-6316-A | Crankshaft Hall Effect Sensor Positioner |
| A |
Tighten to 2.5-3.5 Nm (22-31 Lb-In) |