Section 03-01B: Engine, 5.0L HO and 5.0L Cobra | 1993 Mustang Workshop Manual |
IN VEHICLE SERVICE
Cylinder Heads
If a cylinder head is to be replaced, follow the procedures under
Cylinder Head Disassembly and Assembly, and transfer all valves, springs, spark
plugs, etc., to the new cylinder head. Clean and inspect all parts. Reface
valves (refer to Section 03-00). Check all assembly clearances before
assembling the new or used parts to the new cylinder head.
Removal
- Remove the upper intake manifold and throttle body as an assembly. Remove
the lower intake manifold.
- Remove the rocker arm cover(s).
If the LH cylinder head is to be removed on a vehicle with an
air conditioner, isolate and remove the compressor. Refer to Group 12.
If the LH cylinder head is to be removed, disconnect the power
steering pump bracket from the LH cylinder head. Position the power steering
pump out of the way and in a position that will prevent the oil from draining
out. Disconnect oil lever indicator tube from exhaust manifold stud.
Remove secondary air injection crossover tube from rear of
cylinder heads.
- If the RH cylinder head is to be removed, remove the generator/air pump
assembly mounting bracket from the RH cylinder head assembly.
- Remove fuel line from clip at front of RH cylinder head.
- Disconnect the exhaust manifold(s) from the muffler inlet pipe(s).
- Loosen the rocker arm fulcrum bolts so that the rocker arms can be rotated
to the side. Remove the push rods in sequence so that they may be installed in
their original positions.
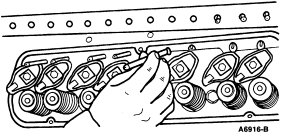
- Remove the cylinder head retaining bolts and lift the cylinder head off the
block. If required, remove the exhaust manifolds to gain access to the lower
attaching bolts. Remove and discard the cylinder head gasket.
Installation
- Clean the cylinder head, intake manifold, valve rocker arm cover and
cylinder head gasket surfaces. If the cylinder head was removed for a cylinder
head gasket replacement, check the flatness of the cylinder head and block
gasket surfaces. Refer to Section 03-00.
- Position the new cylinder head gasket over the cylinder dowels on the
block. Position the cylinder head on the block and install the attaching bolts.
Remove the holding fixtures.
NOTE: When cylinder head bolts have been tightened following this procedure, it
is not necessary to retighten the bolts after extended operation. The bolts may
be checked and retightened, if desired.
- The cylinder head bolts are tightened in two or three steps depending upon
the type of head bolt used. Two styles are available: flanged hex head or
non-flanged hex head.
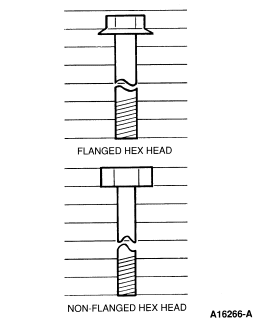
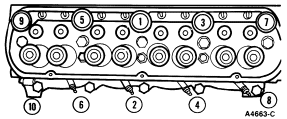
Refer to the following illustration for the tightening
sequence. For the non-flanged (standard) hex-head bolts, tighten in two steps:
- Tighten all bolts in sequence to 75-88 Nm (55-65 lb-ft).
- Tighten all bolts in sequence to 88-98 Nm (65-72 lb-ft).
If using the flanged hex head bolts, tighten in three steps:
- Tighten all bolts in sequence to 34-47 Nm (25-35 lb-ft).
- Tighten all bolts in sequence to 61-75 Nm (45-55 lb-ft).
- Tighten all bolts in sequence an additional 1/4 turn (85-95 degrees).
NOTE: The right hand side cylinder head has one stud at location 8. The left
hand side does not.
- If removed, install the exhaust manifolds with new gaskets. Tighten the
retaining bolts to 32-43 Nm (26-32 lb-ft).
 CAUTION: Do not attempt to straighten push rods.
- Clean the push rods in a suitable solvent. Blow out the oil passage in the
push rods with compressed air. Check the ends of the push rods for nicks,
grooves, roughness or excessive wear. Visually check the push rods for
straightness or check push rod runout with a dial indicator. If runout exceeds
the maximum limit at any point, discard the rod.
- Apply Multi-Purpose Grease D0AZ-19584-AA (ESR-M1C159-A and ESB-M1C93-A) or
equivalent to both ends of the push rods. Install the push rods in their
original positions. Apply Multi-Purpose Grease D0AZ-19584-AA (ESR-M1C159-A and
ESB-M1C93-A) or equivalent to the valve stem tips.
- Install the rocker arms. If all original assembly components are installed,
a valve clearance adjustment is not necessary. If any valve train components
are replaced, however, perform a valve clearance adjustment as outlined.
- Connect the exhaust manifold(s) at the muffler inlet pipe(s). Tighten nuts
to specification. Refer to Section 09-00.
- If the RH cylinder head was removed, install the generator attaching
bracket on the RH cylinder head assembly. Install the generator.
- Clean the valve rocker arm cover(s). Position the valve rocker cover
gaskets. Install valve rocker arm cover(s).
- Install valve rocker cover bolts and tighten the bolts to 16-20 Nm
(12-15 lb-ft).
- If the LH cylinder head was removed on a vehicle with an air conditioner,
install the compressor. Refer to
Group 12.
- If the LH cylinder head was removed, install the drive belt and power
steering pump bracket. Install the bracket retaining bolts.
- Install secondary air injection crossover tube at rear of cylinder heads.
- Install the intake manifold and related parts.