Section 03-01A: Engine, 2.3L
1993 Mustang Workshop Manual
REMOVAL AND INSTALLATION

 CAUTION: Do not oil threads that require oil resistant or water resistant sealer.

When installing nuts or bolts, oil the threads with light-weight engine oil.

Camshaft—Cylinder Head Installed

Tools Required:


Removal

  1. Drain cooling system. Remove upper radiator hose.
  1. Remove air intake resonator assembly.
  1. Remove throttle body and EGR tube.
  1. Disconnect spark plug wires from coils, remove from rocker cover and position aside.
  1. Disconnect engine electrical harness and position aside.
  1. Remove A/C and power steering belts.
  1. Remove fan shroud and radiator assemblies. Refer to Section 03-03.
  1. Remove automatic belt tensioner.
  1. Remove timing belt cover retaining bolt and timing belt cover.
  1. Loosen timing belt idler, position in unloaded position, and retighten retaining bolts.
  1. Remove timing belt from camshaft and auxiliary pulleys.
  1. Compress valve springs using Valve Spring Compressor T88T-6565-BH and remove cam followers.
  1. Remove camshaft pulley using Cam Sprocket Holding/Removing Tool T74P-6256-B.
  1. Remove seal using Front Cover Seal Remover T74P-6700-B.
  1. Remove camshaft rear retainer (two screws).
  1. Raise vehicle on hoist. Refer to Section 00-02.
  1. Remove RH and LH engine support bolts and nuts.
  1. Position a transmission jack under the engine. Position a block of wood on the transmission jack. Raise the engine as high as it will go. Place blocks of wood between engine mounts and chassis brackets and remove jack. Lower vehicle.

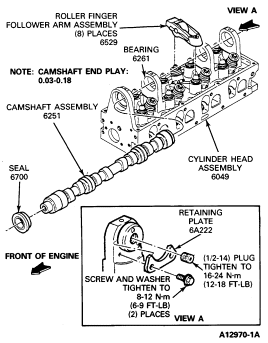
     CAUTION: Remove camshaft carefully to avoid damaging journals and lobes.

  1. Remove camshaft.


Installation

  1. Ensure the threaded plug is in the rear of the camshaft. If not, remove threaded plug from old camshaft and install. Coat the camshaft lobes with Multi-Purpose Grease D0AZ-19584-AA (ESR-M1C159-A and ESB-M1C93-A), or equivalent and lubricate the journals with heavy oil SF before installation. Carefully slide the camshaft through the bearings.
  1. Install two camshaft rear retainer. Tighten to 8-12 Nm (6-9 lb-ft).
  1. Install seal using Cam and Auxiliary Shaft Seal Replacer T74P-6150-A.
  1. Install belt deflector and gear to camshaft.
  1. Install retaining bolt using Cam Sprocket Holding/Removing Tool T74P-6256-B to hold gear. Tighten to 70-95 Nm (52-70 lb-ft).
  1. Remove one spark plug from each cylinder.
  1. Set camshaft timing as outlined under adjustments.
  1. Install spark plugs.
  1. Install cam belt cover and retaining bolt.
  1. Install power steering belt (and A/C belt if equipped).
  1. Raise vehicle.
  1. Position a transmission jack to engine, raise engine, remove blocks of wood, lower engine and remove jack.
  1. Install engine support bolts and nuts.
  1. Lower vehicle.
  1. Clean rocker arm cover (cam cover).
  1. Install rocker arm cover gasket to cylinder head.
  1. Depress valve springs using Valve Spring Compressor T88T-6565-BH and install cam followers.
  1. Install rocker arm cover as outlined.
  1. Connect engine electrical harness.
  1. Connect spark plug wires to coils and wire retainers.
  1. Install radiator and fan shroud. Refer to Section 03-03.
  1. Install upper radiator hose using constant tension clamps.
  1. Fill cooling system. Refer to Section 03-03.
  1. Install throttle body and EGR tube assembly.
  1. Install air intake resonator.
  1. Start engine and check for leaks.