Section 01-18: Body Stripes (Tape) and Vinyl Films | 1993 Mustang Workshop Manual |
REMOVAL AND INSTALLATION
Tape Striping
Removal
- Clean repair surfaces, adjacent panels and openings, as required.
- Remove any parts overlapping tape stripe.
 CAUTION: Avoid using pointed or sharp tools as they may damage the painted
surface.
CAUTION: Avoid using pointed or sharp tools as they may damage the painted
surface.
- Remove tape stripe by starting at one edge and peeling it from painted
surface. Apply heat to decal to assist in removal.
CAUTION: Be careful when using solvents because of possible damage to painted
surfaces. To determine if solvent is harmful to body paint, test it on a hidden
area of the vehicle.
- Remove adhesive from painted surfaces by wiping area with a cloth saturated
with 3M® Adhesive Cleaner, Xylol or equivalent, then scrape
with a squeegee.
- Rinse thoroughly with clean water or a solvent, as required.
Dry Method—Small or Thin Stripes
Tools Required:
- Rotunda Heat Gun 107-00300
Installation
NOTE: Freshly painted surfaces must be thoroughly dry. Residual solvents in
fresh paint may cause tape stripe to blister.
- Clean painted surface (including wrap-around flanges on door openings) with
Multi-Purpose Paint Precleaner VC-542-A or equivalent. Wipe surface with clean
cloth and allow to dry. Leading edge of doors are not striped because cleaning
of wrap-around area is impossible.
It is extremely important that the vehicle
panel surface, the transfer film and the wetting solution all be at a moderate
temperature of at least 21°C (71°F) or above
when performing this repair.
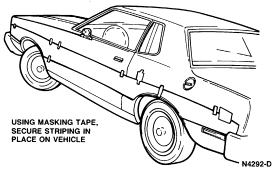
- Position tape stripe to vehicle and align character lines and locators on
tape stripe to contour of the vehicle. Using masking tape, tape striping into
place.
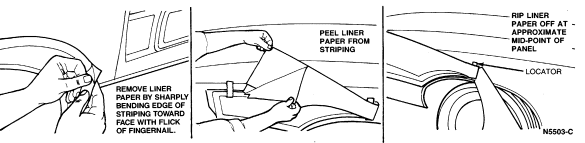
NOTE: Tear paper off down and away from stripe.
- Remove liner paper from stripe one-half distance of panel and tear off
liner paper.
CAUTION: Use of hands or fingers to smooth on the striping will result in
creases, air bubbles and poor adhesion.
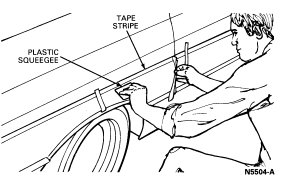
- Position striping in place, but do not push striping to vehicle. Using a
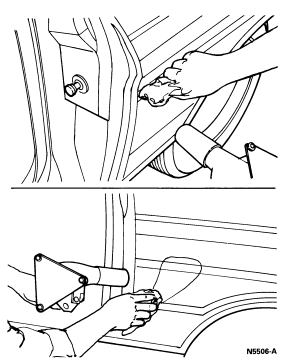
plastic squeegee, start from center of panel and press striping in place,
moving toward the end of the panel.
- Using the plastic squeegee, peel off the remainder of liner paper and press
into place.
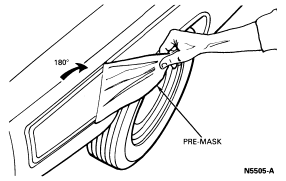
- Remove pre-mask by pulling at 180 degree angle away from stripe. After
removal, inspect for bubbles and remove using procedure under Repair.
- Mould recessed areas into place using 400°C
(750°F) Rotunda Heat Gun 107-00300 or equivalent and soft
clean cloth.
Wet Method—Large Areas, Decal or Stripe
Tools Required:
- Rotunda Heat Gun 107-00300
Installation
NOTE: Freshly painted surfaces must be thoroughly dry. Residual solvents in
fresh paint may cause tape stripe to blister.
- Clean painted surface (including wrap-around flanges on door openings) with
Multi-Purpose Paint Precleaner VC-542-A or equivalent. Wipe surface with clean
cloth and allow to dry.
It is extremely important that the vehicle
panel surface, the transfer film and the wetting solution all be at a moderate
temperature of at least 21°C (71°F) or above
when performing this repair.
- Mix 4.9ml (1 teaspoon) of dish washing detergent (Joy, Ivory, etc.) in
3.79L (1 gallon) of water. Fill a spray bottle with the solution.
- Lay decal on flat surface with liner paper up.
- Completely remove liner paper from decal.
- Wet pressure-sensitive side of decal and area on vehicle to be striped with
detergent solution.
- Position decal to dry area to be striped in the same way outlined for dry
installation (masking tape not required).
- Using squeegee and firm overlapping pressure, begin from center of decal
and squeegee toward the sides and then toward the front. Decal can be easily
lifted and re-applied if air bubbles are present.
NOTE: Ensure all moisture/air is squeegeed out between decal and sheet metal to
prohibit latent bubbles/blisters.
- After the decal is completely in place and squeegeed, remove pre-mask by
pulling at 180 degree angle away from stripe. After removal, inspect for
bubbles and remove using procedure outlined under Repair. An assistant can be
very helpful in removing pre-mask from large areas. Wetting pre-mask on large
decals may assist in removal.
NOTE: After installation of decal, a 20 minute adhesive cure time is required
before unit is subjected to cold temperatures and/or car wash.
- Use Rotunda Heat Gun 107-00300 or equivalent as used in Dry Installation to
mould decal into recessed areas and dry any moisture from wrapped area.