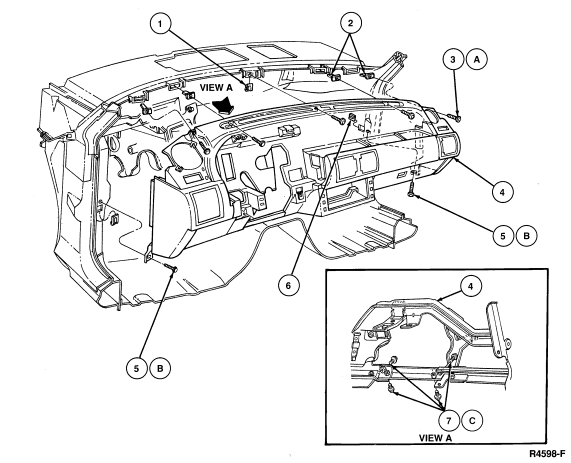
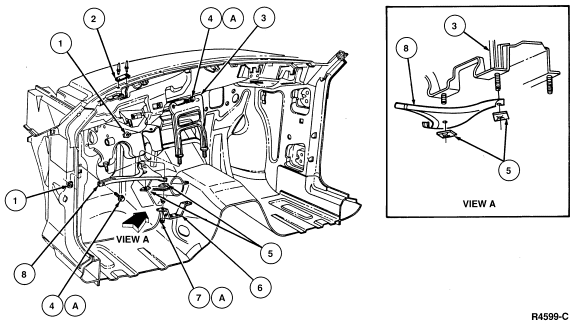
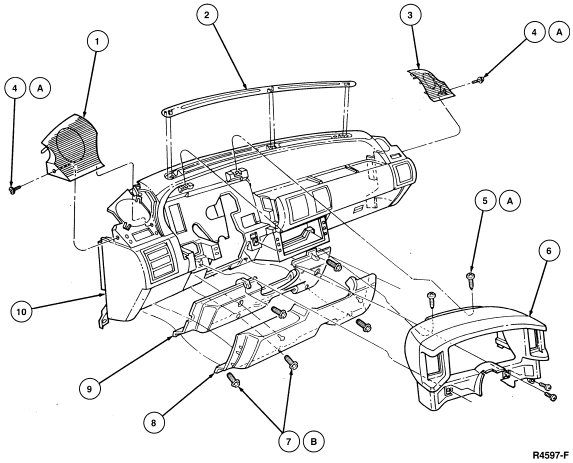
Section 01-12: Instrument Panel and Console
1993 Mustang Workshop Manual
REMOVAL AND INSTALLATION

Instrument Panel

NOTE: Removal and installation of the instrument panel is best accomplished by two people.


Removal and Installation

  1. Disconnect positive battery cable.
  1. Disconnect all underhood wiring connectors from main wiring harness (14401). Disengage rubber grommet seal from dash panel and push wiring harness and connectors into passenger compartment. Refer to Section 18-01.
  1. Remove three bolts retaining steering column opening cover and reinforcement panel. Remove cover.


    Item Part Number Description
    1 4481 LH Speaker Cover Assy
    2 46B62 Grille Opening
    3 4480 RH Speaker Cover Assy
    4A N804251-S36B Tapping Screw (1 Req'd)
    5A 56920-S36B Tapping Screw (5 Req'd)
    6 42A82 Instrument Cluster
    7B N806486-S36 Bolt (5 Req'd)
    8 44F08 Steering Column Opening Cover
    9 43600 Reinforcement Panel Assy
    10 Instrument Panel Assy
    A    Tighten to 2.0-2.9
    Nm (18-25 Lb-In)
    B    Tighten to 6-8 Nm (54-70 Lb-In)
  1. Remove steering column opening reinforcement by removing two bolts.
  1. Remove two bolts retaining lower steering column opening reinforcement and remove reinforcement.
  1. Remove floor console as outlined.
  1. Remove six steering column retaining nuts (two retaining the hood release mechanism and four retaining column to lower brake pedal support). Lower steering column to floor.


  1. Remove steering column upper and lower shrouds and disconnect wiring from multi-function switch.


  1. Remove brake pedal support nut.
  1. Snap out defroster grille.
  1. Remove screws from speaker covers. Snap out speaker covers.
  1. Remove front screws retaining RH and LH scuff plates at cowl trim panel.
  1. Remove RH and LH side cowl trim panels.
  1. Disconnect wiring at RH and LH cowl sides.
  1. Remove cowl side retaining bolts (one each side).
  1. Open glove compartment door and flex glove compartment bin tabs inward. Drop down glove compartment door assembly.


    Item Part Number Description
    1 N802539-S100 U-Nut (1 Req'd)
    2 N805849-S Nut (4 Req'd)
    3A N804251-S36B Tapping Screw (5 Req'd)
    4 Instrument Panel Assy
    5B N606677-S2 Bolt (1 Req'd Each Side)
    6 N800854-S2 Nut (1 Req'd Each Side)
    7C N806486-S36B Screw (4 Req'd)
    A    Tighten to 2.3-3.4
    Nm (21-30 Lb-In)
    B    Tighten to 7-11 Nm (6-8 Lb-Ft)
    C    Tighten to 2.0-2.9
    Nm (18-25 Lb-In)
  1. Remove five cowl top screw attachments.
  1. Gently pull instrument panel away from cowl. Disconnect air conditioning controls, speedometer cable and wire connectors.
  1. If instrument panel is being replaced, transfer all components, wiring and hardware to new instrument panel.
  1. To install, reverse Removal procedure. Check operation of all components.


    Item Part Number Description
    1 389622-S2 Nut (2 Req'd)
    2 1631 VIN Plate
    3 4488 Bracket Assy
    4A 57041-S2 Screw and Washer Assy (2 Req'd)
    5 377689-S2 Spring Nut (2 Req'd)
    6 Latch Control Cable Mounting Bracket
    7A 382802-S2 Nut (2 Req'd)
    8 45F92 Brace Assy
    A    Tighten to 16-27 Nm (12-19 Lb-Ft)