Section 01-12: Instrument Panel and Console
1993 Mustang Workshop Manual
REMOVAL AND INSTALLATION

Console Assembly


Removal and Installation
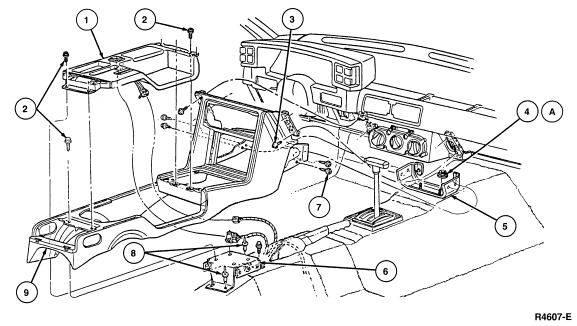
  1. Remove two access covers at rear of console (snaps out) to gain access to armrest retaining bolts.
  1. Remove four armrest-to-floor bracket retaining bolts and remove armrest assembly (snaps out of console).
  1. Remove gear shift lever opening finish panel (snaps out). On vehicles equipped with manual transmissions, shift boot is attached to bottom of finish panel. Remove shift knob and slide boot and finish panel up shift lever to remove.


  1. To remove top finish panel, position emergency brake lever in UP position. Remove four retaining screws and lift panel up. Disconnect necessary wire connectors.
  1. Remove two console-to-rear floor bracket retaining screws.
  1. Insert a small screwdriver into two notches at bottom of front upper finish panel and snap out.
  1. There are three combinations of radio cover finish panels:
    1. Radio opening cover plate with stowage bin (radio delete option)
    1. Radio with stowage bin
    1. Radio with graphic equalizer (one unit)
      • Combination A: Use a small screwdriver and pry radio cover finish panel out of console.
      • Combinations B and C: The radio must be removed first. Refer to Section 15-01 for procedures.


  1. Open glove compartment door and drop glove compartment assembly down. Remove two console-to-instrument panel retaining screws.
  1. Remove four console-to-bracket retaining screws. Remove console from vehicle.
  1. To install, reverse Removal procedure.


    Item Part Number Description
    1 44D90-A
    44D90-B
    Console Top Panel Assy (With Power Assist Side Mirrors)
    2 56902-S2 Screw (4 Req'd)
    3 56929-S2 Screw (4 Req'd)
    4A N621906-S2 Nut (2 Req'd)
    5 45B56 Front Console Support Panel
    6 45A02 Rear Console Support Panel
    7 56920-S58 Screw (4 Req'd)
    8 353016-S2 Rivet (3 Req'd)
    9 45A06 Console Assy
    A    Tighten to 3.5-5.0
    Nm (31-44 Lb-In)