Section 15-01: Radio and Tape Chassis | 1993 Mustang Workshop Manual |
DESCRIPTION AND OPERATION
Control Functions
The premium sound system consists of six speakers (two high frequency
instrument panel speakers, two premium front door speakers and two premium rear
speakers). The door and instrument panel speakers are wired in parallel.
Separate signal return wiring to each speaker is used. The four-channel
amplifier is in operation and is part of the circuit at all times.
Electronic Search Radio (ESR)
Three types of radios are available on the Mustang: the Electronic Search
Radio (ESR), the Electronic Stereo Cassette (ESC) and the Compact Disc Receiver
(CDR). On the Cobra, the Compact Disc Receiver (CDR) or the Premium Analog
Cassette/Multi Disc Controller (PAC/CDDJ) is available.
The Electronic Search Radio (ESR) contains some features which may not be
familiar to the user. These instructions will explain the features.

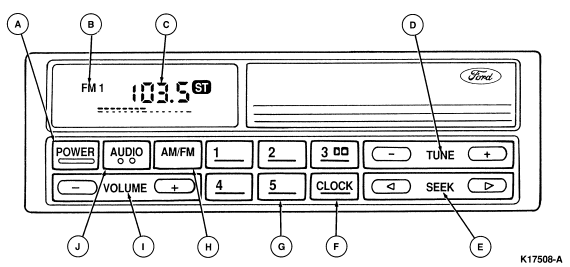
The following is a description of the various controls:
- POWER: Push to turn ON, push again to turn OFF.
- BAND INDICATOR: Indicates if band is in AM, FM1 or FM2
setting.
- STATION INDICATOR: Indicates radio station frequency in
radio mode.
- TUNE: This button is used to change the frequency up or down
one increment at a time by pressing the right (>) or left
(<) side of button. To change frequencies quickly, press
and hold either right or left side of button.
- SEEK: Push right (>) side of SEEK button to tune radio to
the next higher frequency station. Push left (<) side of
SEEK button to tune radio down to next lower frequency station.
- CLOCK: The clock can be set at any time (Radio, Power "off,"
ignition "off"). First depress the CLOCK button and simultaneously depress
"SEEK (<)" to advance hours, or "SEEK (>)" to advance
minutes. The CLOCK button must be held in throughout the time setting
operation. Seconds are reset to zero when the CLOCK button is released.
- MEMORY BUTTONS: The six memory buttons are used to store
preferred broadcast stations in radio memory. To store a station, tune to
desired station, push memory button in and hold for approximately two seconds
until station sound returns, then release button. Repeat process for each
memory button. Once a station is stored in memory, pushing a memory button for
less than two seconds will cause radio to turn to stored station. All six
memory buttons will store a station on AM, FM1 or FM2 for a total of 18
storable radio stations.
- AM/FM: Each successive push, when in radio mode, will select
AM, FM1 or FM2 as indicated by band indicator in display window.
- VOLUME: Push right (+) side of VOLUME button to increase
volume. Push left (-) side to decrease volume. If VOLUME button is held to the
right or left, the volume will continuously increase or decrease (bars in
display will show relative volume) until button is released.
NOTE: If the VOLUME button is set above a preset listening level when ignition
switch is turned off, when ignition switch is turned back on, the volume will
return to a nominal listening level. However, if radio power is turned off with
the POWER button before ignition is turned off, volume will return to the
position it was set at previously, when radio power is switched back on.
- AUDIO: The AUDIO button is used to adjust bass, treble,
speaker balance and fade. Illuminated bars in display will show relative
positions.
- Bass: Push AUDIO button repeatedly until BASS is displayed.
Push the right (+) side of VOLUME button to increase low frequency sound or
left (-) side to decrease low frequency sounds.
- Treble: Push AUDIO button repeatedly until TREB is
displayed. Push the right (+) side of VOLUME button to increase high frequency
sound or left (-) side to decrease high frequency sounds.
- Speaker Balance: Push AUDIO button repeatedly until BAL is
displayed. Push the right (+) side of VOLUME button to shift sound to right
speakers or left (-) side to shift sound to left speakers.
- Speaker Fade: Push AUDIO button repeatedly until FADE is
displayed. Push the right (+) side of VOLUME button to shift sound to rear
speakers or left (-) side to shift sound to front speakers.
Electronic Stereo Cassette (ESC)

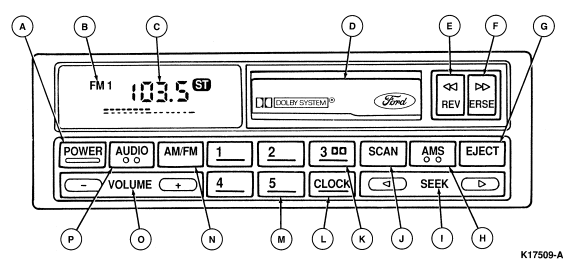
The following explains various features of controls:
- POWER: Push to turn ON, push again to turn OFF.
- BAND INDICATOR: Indicates if band is in AM, FM1 or FM2
setting.
- STATION INDICATOR: Indicates radio station frequency in
radio mode. When a tape is played, arrows indicate direction of tape removal.
- TAPE OPENING: When tape is inserted (with open edge to the
right) and radio power is ON, tape begins to play.
- REVERSE: Push the left (<) side of
REVERSE button to rewind a tape playing forward. To return tape play, push
right (>) side of REVERSE button momentarily. Pushing both sides of REVERSE
button simultaneously will reverse tape to opposite side (track).
- REVERSE: Push the right (>) side of REVERSE button to fast
forward a tape playing forward. To return tape play, push left
(<) side of REVERSE button momentarily. Pushing both sides
of REVERSE button simultaneously will reverse tape to opposite side (track).
- EJECT: Press the EJECT button to stop the tape and eject
cassette. The radio will resume playing if power is on.
- AMS: The automatic music search (AMS) button is used to
change frequency up or down one increment at a time in radio mode. After
pushing the AMS button, push and release either the right (>) or left
(<) side of SEEK button. To change frequencies quickly,
press and hold down either right or left side of SEEK button. In tape mode, use
AMS button change tape to next selection. First push and hold AMS button, then
push either left or right side of REWIND button to find beginning of next tape
selection.
- SEEK: Push right (>) side of SEEK button to tune radio to
the next higher frequency station. Push left (<) side of
SEEK button to tune radio down to next lower frequency station.
- SCAN: Press SCAN button to enter scan mode. The radio will
begin to scan up to the next radio station for a five second sampling.
To
stop scan mode on presently sampled radio station, press the SCAN button a
second time.
- DOLBY: Push No. 3 memory button to select
Dolby® Noise Reduction in tape mode.
- CLOCK: The clock can be set at any time (Tape, Radio, Power
"off", Ignition "off"). First, depress the CLOCK button and simultaneously
depress "SEEK <" to advance hours, or "SEEK >" to advance
minutes. The CLOCK button must be held in throughout the time setting
operation.
Seconds are reset to zero when the CLOCK button is released.
- MEMORY BUTTONS: The six memory buttons are used to store
preferred broadcast stations in radio memory. To store a station, tune to
desired station, push memory button in and hold for approximately two seconds
until station sound returns, then release button. Repeat process for each
memory button. Once a station is stored in memory, pushing a memory button for
less than two seconds will cause radio to turn to stored station. All six
memory buttons will store a station on AM, FM1 or FM2 for a total of 18
storable radio stations.
- AM/FM: Each successive push, when in radio mode, will select
AM, FM1 or FM2 as indicated by band indicator in display window.
- VOLUME: Push right (+) side of VOLUME button to increase
volume, push left (-) side to decrease volume. If VOLUME button is held to the
right or left, the volume will continuously increase or decrease (bars in
display will show relative volume) until button is released.
NOTE: If the VOLUME button is set above a preset listening level when ignition
switch is turned off, when ignition switch is turned back on, the volume will
return to a nominal listening level. However, if radio power is turned off with
the POWER button before ignition is turned off, volume will return to the
position it was set at previously, when radio power is switched back on.
- AUDIO: The AUDIO button is used to adjust bass, treble,
speaker balance and fade. Illuminated bars in display will show relative
positions.
- Bass: Push AUDIO button repeatedly until BASS is displayed.
Push the right (+) side of VOLUME button to increase low frequency sound or
left (-) side to decrease low frequency sounds.
- Treble: Push AUDIO button repeatedly until TREB is
displayed. Push the right (+) side of VOLUME button to increase high frequency
sound or left (-) side to decrease high frequency sounds.
- Speaker Balance: Push AUDIO button repeatedly until BAL is
displayed. Push the right (+) side of VOLUME button to shift sound to right
speakers or left (-) side to shift sound to left speakers.
- Speaker Fade: Push AUDIO button repeatedly until FADE is
displayed. Push the right (+) side of VOLUME button to shift sound to rear
speakers or left (-) side to shift sound to front speakers.
Premium Analog Cassette Radio (PAC), Cobra Only

The features described are identical on all PAC radios.
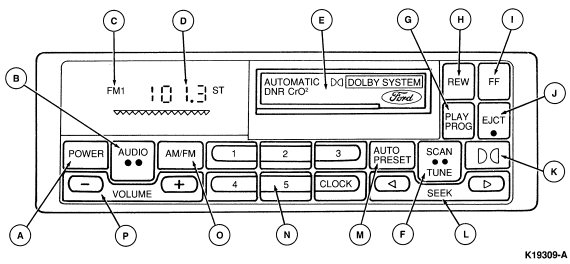
- POWER: Push to turn radio ON, push again to turn OFF.
- AUDIO: The audio button is used to adjust bass, treble,
speaker balance and fade. Illuminated bars in display will show relative
positions.
- BASS: Push AUDIO button repeatedly until BASS is displayed.
Push the right (+) side of VOLUME button to increase low frequency sounds or
left (-) side to decrease low frequency sounds.
- TREBLE: Push AUDIO button repeatedly until TREB is
displayed. Push the right (+) side of VOLUME button to increase high-frequency
sounds or left (-) side to decrease high-frequency sounds.
- SPEAKER BALANCE: Push AUDIO button repeatedly until BAL is
displayed. Push the right (+) side of VOLUME button to shift sound to right
speakers or left (-) side to shift sound to left speakers.
- SPEAKER FADE: Push AUDIO button repeatedly until FADE is
displayed. Push the right (+) side of VOLUME button to shift sound to rear
speakers or left (-) side to shift sound to front speakers.
- BAND INDICATOR: Indicates if band is in AM, FM1 or FM2
setting.
- STATION INDICATOR: Indicates radio station frequency in
radio mode. When tape is played, whirling sprockets indicate direction of tape
travel.
- TAPE OPENING: Cassette tape player is equipped with power
loading. When tape is inserted (with open edge to the right) the loading
mechanism draws the tape in the rest of the way and begins to play.
- SCAN TUNE:
- Press SCAN TUNE button to enter scan mode (display will blink SCN). Pushing the right (>) side of SEEK button will begin
forward scan mode up to the next radio station for a five second sampling, or a
five second sampling of the next tape selection on tape currently playing.
- Pushing left (<) side of SEEK button will begin reverse
scan mode to previous radio station for a five second sampling or a five second
sampling of previous tape selection on tape currently playing.
- To stop scan mode on presently sampled radio station, press the side of SEEK button which
matches the direction the radio is currently scanning or re-press SCAN TUNE button.
- To stop scan mode on presently sampled tape selection, press the
side of SEEK button which matches the direction tape is currently scanning.
- To change radio stations up or down by one increment, push SCAN TUNE button
twice (display reads TUNE), then within five seconds press and release either
right (>) or left (<) side of SEEK button. To change
stations quickly, press and hold either the right or left side of SEEK button.
- PLAY PROGRAM: Push and hold PLAY PROG button for 1 second to
stop the tape player and resume radio play. The cassette will be stored in the
tape player and the symbol will display until PLAY PROG button is pushed to
resume tape play.
- REVERSE: Push REV button to rewind tape. The radio will
automatically begin playing until rewind is manually stopped by pushing PLAY
PROG button or tape is completely rewound.
- FAST FORWARD: Push the FF button to forward tape. The radio
will automatically begin playing until fast forward is manually stopped by
pushing PLAY PROG button or tape reaches end.
- EJECT: Press EJCT button to stop tape and eject cassette.
The radio will resume playing if power is ON. The tape cartridge can be ejected
whether radio power or ignition is on or off.
- DOLBY: Push to select Dolby® noise
reduction in tape mode or Dynamic Noise Reduction® in radio
mode. A second push will turn off active Noise Reduction System and lighted
symbol from display. The audio system is designed to automatically activate
Dynamic Noise Reduction® when under a weak FM signal and will
automatically deactivate when it is not needed for signal strength.
- SEEK: Push right (>) side of SEEK button to tune radio to
the next higher frequency station or to beginning of next tape selection on
tape currently playing. Push left (<) side of SEEK button
to tune radio down to next lower frequency station or to the beginning of tape
selection currently playing.
- AUTO PRESET: Push the AUTO PRESET button for three seconds
to use automatic memory store feature. The radio will automatically seek six
strong stations and set them sequentially on memory buttons 1 through 6.
- MEMORY BUTTONS: The six memory buttons are used to store
preferred broadcast stations in radio memory. To store a station, tune to
desired station, push memory button in and hold for approximately two seconds
until station sound returns, then release button. Repeat process for each
memory button. Once a station is stored in memory, pushing a memory button for
less than two seconds will cause radio to turn to stored station. All six
memory buttons will store a station on AM, FM1 or FM2 for a total of 18
storable radio stations.
- AM/FM: Each successive push, when in radio mode, will select
AM, FM1 or FM2 as indicated by band indicator in display window.
- VOLUME: Push right (+) side of VOLUME button to increase
volume. Push left (-) side to decrease volume. If VOLUME button is held to the
right or left, the volume will continuously increase or decrease (bars in
display will show relative volume) until button is released.
NOTE: If the VOLUME button is set above a preset listening level when ignition
switch is turned off, when ignition switch is turned back on, the volume will
return to a nominal listening level. However, if radio power is turned off with
the POWER button before ignition is turned off, volume will return to the
position it was set at previously, at when radio power is switched back on.
- CLOCK: The clock can be set at anytime. First, press the
CLOCK button and at the same time press the SEEK (<) to
advance hours, or SEEK (>) to advance minutes.


