Section 10-01: Fuel Tank, Filter and Electric Fuel Pump | 1993 Mustang Workshop Manual |
REMOVAL AND INSTALLATION
Fittings, Push Connect
Push connect fittings are designed with two different retaining clips.
The fittings used to connect to 3/8 inch and 5/16 inch nominal diameter metal
tubing use a hairpin clip.
The fittings used with 1/4 inch nominal diameter metal tubing uses a
duck-bill clip.
Each type of fitting requires different procedures for service. Clips
should be replaced whenever a connector is removed.
Disconnect all push connect fittings from components (sender, filter)
prior to component removal. The push connect fittings that connect flexible
fuel lines to the fuel tank sender cannot be disconnected until the tank is
partially lowered just before removing the fuel tank completely.
Fittings, Hairpin Clip (5/16 or 3/8 inch)
Removal
NOTE: If necessary, drain fuel tank as outlined under Fuel Tank, Removal.
- Inspect visible internal portion of fitting for dirt accumulation. If more
than a light coating of dust is present, clean the fitting before disassembly.
NOTE: On 90 degree elbow connectors excessive side loading could break the
connector body.
- Some adhesion between the seals in the fitting and the tubing will occur
with time. To separate, twist the fitting on the tube, then push and pull the
fitting until it moves freely on the tube.
 CAUTION: Do not use any tools.
- Remove hairpin-type clip from fitting by first bending the shipping tab
downward so that it will clear the body. Next, (using hands
only) spread the two clip legs about 3.2mm (1/8 inch) each to disengage
the body and push the legs into the fitting. Complete removal is accomplished
by lightly pulling from the triangular end of the clip
and working it clear of the tube and fitting.
- Grasp the fitting and hose assembly and pull in an axial direction to
remove the fitting from the steel tube.
- When fitting is removed from the tube end, inspect the fitting and tube for
any internal parts that may have been dislodged from the fitting. Any loose
internal parts should be immediately installed, using the mating tube to insert
the parts.
Installation
- It is recommended that the original clip not be
reused in the fitting. To install the new clip, insert clip into any two
adjacent openings with the triangular portion pointing away from the fitting
opening. Install clip to fully engage the body (legs of hairpin clip locked on
outside of body). Piloting with an index finger is necessary.
- Before installing fitting on the tube, wipe tube end with a clean cloth.
Inspect the inside of the fitting to ensure it is free of dirt and/or
obstructions.
- To install the fitting onto the tube, align the fitting and tube axially
and push the fitting onto the tube end. When the fitting is engaged, a definite
click will be heard. Pull on fitting to ensure it is fully engaged. Applying a
light coat of oil to the tube end will aid assembly.
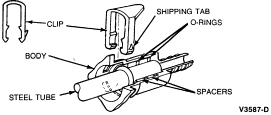
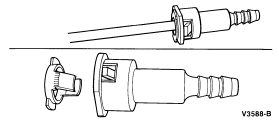
Fittings, Duck Bill Clip (1/4-Inch)
Tools Required:
- Push Connect Disassembly Tool T82L-9500-AH
Removal
This fitting consists of a body, spacers, O-rings and a duck-bill
retaining clip. The clip maintains the fitting to steel tube juncture. One of
the two following methods is to be followed to disconnect the fitting.
Before attempting to disconnect the fitting:
- Inspect visible internal portion of fitting for dirt accumulation. If more
than a light coating of dust is present, clean the fitting before disassembly.
NOTE: If necessary, drain fuel tank as outlined in Fuel Tank, Removal.
- Some adhesion between the seals in the fitting and the tubing will occur
with time. To separate, twist the fitting on the tube, then push and pull the
fitting until it moves freely on the tube.
Preferred Method
- To disengage the tube from the fitting, align the slot on Push Connect
Disassembly Tool T82L-9500-AH or equivalent with either tab on the clip (90
degrees from the slots on side of fitting) and insert the tool. This disengages
the duck bill from the tube.
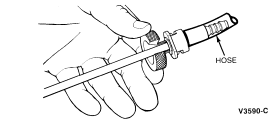
NOTE: Only moderate effort is required if the tube has been properly
disengaged. Use hands only.
- Holding the tool and the tube with one hand, pull fitting away from the
tube.
NOTE: Some fuel tubes have a secondary bead which aligns with the outer surface
of the clip. These beads can make tool insertion difficult. If there is extreme
difficulty, use the disassembly method described below.
- After disassembly, inspect and clean the tube sealing surface. Also inspect
the inside of the fitting and the tube for any internal parts that may have
been dislodged from the fitting. Any loose internal parts should be immediately
installed using the mating tube to insert the parts.
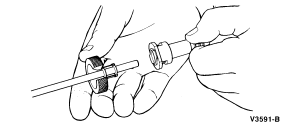
Acceptable Method
This method of disassembly disengages the retaining clip from the fitting
body.
Use with a pair of narrow pliers, 152mm (6 inch) channel lock pliers are
ideal. The pliers must have a jaw width of 5mm (0.2 inch) or less.
- Align the jaws of the pliers with the openings in the side of the fitting
case and compress the portion of the retaining clip that engages the fitting
case. This disengages the retaining clip from the case (often one side of the
clip will disengage before the other; it is necessary to disengage the clip
from both openings).
NOTE: Only moderate effort is required if the retaining clip has been properly
disengaged. Use hands only.
- Pull the fitting off the tube.
- When fitting is removed from the tube end, inspect the fitting and tube for
any internal parts that may have been dislodged from the fitting. Any loose
internal parts should be immediately installed, using the mating tube to insert
the parts.
The retaining clip will remain on the tube. Disengage the clip
from the tube bead and remove.
Installation
- It is recommended that the retaining clip not be
reused. Install the new replacement clip into the body by inserting one of the
retaining clip serrated edges on the duck-bill portion into one of the window
openings. Push on the other side until the clip snaps into place.
- Before installing fitting on the tube, wipe tube end with a clean cloth.
Inspect the inside of the fitting to ensure it is free of dirt and/or
obstructions.
- To install the fitting onto the tube, align the fitting and tube axially
and push the fitting onto the tube end. When the fitting is engaged, a definite
click will be heard. Pull on fitting to ensure it is fully engaged. Applying a
light coat of engine oil to the tube end will ease assembly.