 WARNING: THESE VEHICLES ARE EQUIPPED WITH GAS PRESSURIZED SHOCK ABSORBERS WHICH
WILL EXTEND UNASSISTED. DO NOT APPLY HEAT OR FLAME TO THE SHOCK ABSORBER TUBE
DURING REMOVAL.
WARNING: THESE VEHICLES ARE EQUIPPED WITH GAS PRESSURIZED SHOCK ABSORBERS WHICH
WILL EXTEND UNASSISTED. DO NOT APPLY HEAT OR FLAME TO THE SHOCK ABSORBER TUBE
DURING REMOVAL.
Section 04-02: Suspension, Rear | 1993 Mustang Workshop Manual |
Tools Required:
Removal
For inspection procedure, refer to Section 04-00.
WARNING: THESE VEHICLES ARE EQUIPPED WITH GAS PRESSURIZED SHOCK ABSORBERS WHICH
WILL EXTEND UNASSISTED. DO NOT APPLY HEAT OR FLAME TO THE SHOCK ABSORBER TUBE
DURING REMOVAL.
Installation
With 5.0L Engine: lace the absorber's lower mounting eye between the ears of the lower shock mounting bracket, then insert the bolt. Its bolt head must seat on the inboard side of the shock bracket, through the shock bracket and the shock absorber mounting eye. Install a new nut. Do not tighten the nut at this time.
With 5.0L Engine: While holding the shock absorber in its position, tighten the lower shock cross bolt to 76.5-103.5 Nm (56-76 lb-ft).
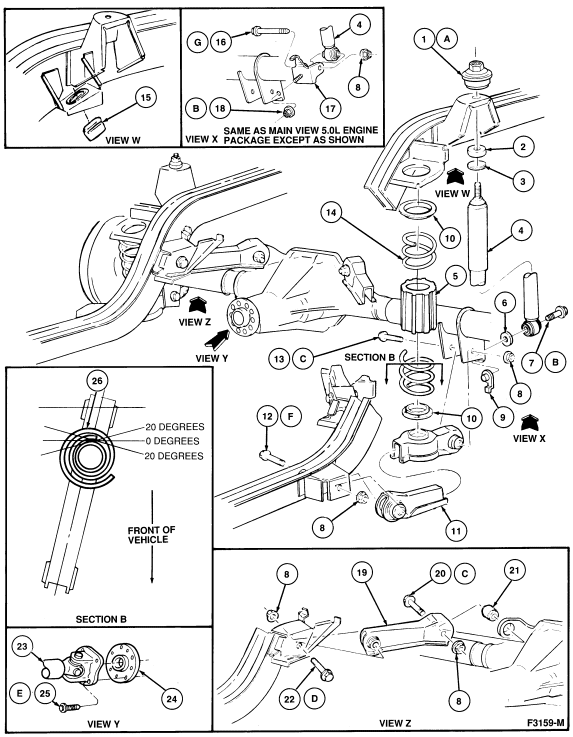
| Item | Part Number | Description |
|---|---|---|
| 1A | 18A192 | Insulator Assy (2 Req'd) |
| 2 | 18198 All | Grommet |
| 3 | 18177 | Washer |
| 4 | 18080 | Shock Assy |
| 5 | 5A669 | Spacer (2 Req'd) |
| 6 | N801616 | Washer (2 Req'd) |
| 7B | N801623-S150 | Bolt (2 Req'd) |
| 8 | N800937-S151 | Nut |
| 9 | N802574 | Nut (2 Req'd) |
| 10 | 5536 | Base (2 Req'd) |
| 11 | 5538 | Assy (2 Req'd) |
| 12F | N802293-S101 | Bolt (2 Req'd) |
| 13C | N802293-S152 | Bolt (2 Req'd) |
| 14 | 5560 | Spring (Install Pigtail in Direction Shown in Section B) |
| 15 | 4730 | Bumper |
| 16G | N803486-S56 | Bolt to Point Out Board (Both Sides) (2 Req'd) |
| 17 | 18164 | Shock Attachment Bracket (2 Req'd) |
| 18B | N800169-S101 | Nut (2 Req'd) |
| 19 | 5500 | Arm |
| 20C | N800932-S152 | Bolt (2 Req'd) |
| 21 | 5A638 | Bushing |
| 22D | N800932-S101 | Bolt (2 Req'd) |
| 23 | 4602 | Assy |
| 24 | — | Axle Flange |
| 25E | N800594-S100 | Bolt (4 Req'd) |
| A | Tighten to 26-35 Nm (20-25 Lb-Ft) | |
| B | Tighten to 76-103 Nm (57-75 Lb-Ft) | |
| C | Tighten to 95-135 Nm (70-100 Lb-Ft) | |
| D |
Tighten to 104-142 Nm (77-105 Lb-Ft) |
|
| E | Tighten to 56-77 Nm (41-56 Lb-Ft) | |
| F |
Tighten to 104-142 Nm (77-105 Lb-Ft) |
|
| G | Tighten to 76.5-103.5 Nm (56-76 Lb-Ft) |
